> For the complete documentation index, see [llms.txt](https://docs.prismacloud.io/llms.txt). Markdown versions of documentation pages are available by appending `.md` to page URLs; this page is available as [Markdown](https://docs.prismacloud.io/admin-guide/32/agentless-scanning/onboard-accounts/configure-gcp.md).
# Configure Agentless Scanning for GCP
1. Log in to your Prisma Cloud Compute Console.
2. Go to **Manage > Cloud** Accounts.
3. Click **+Add account**.
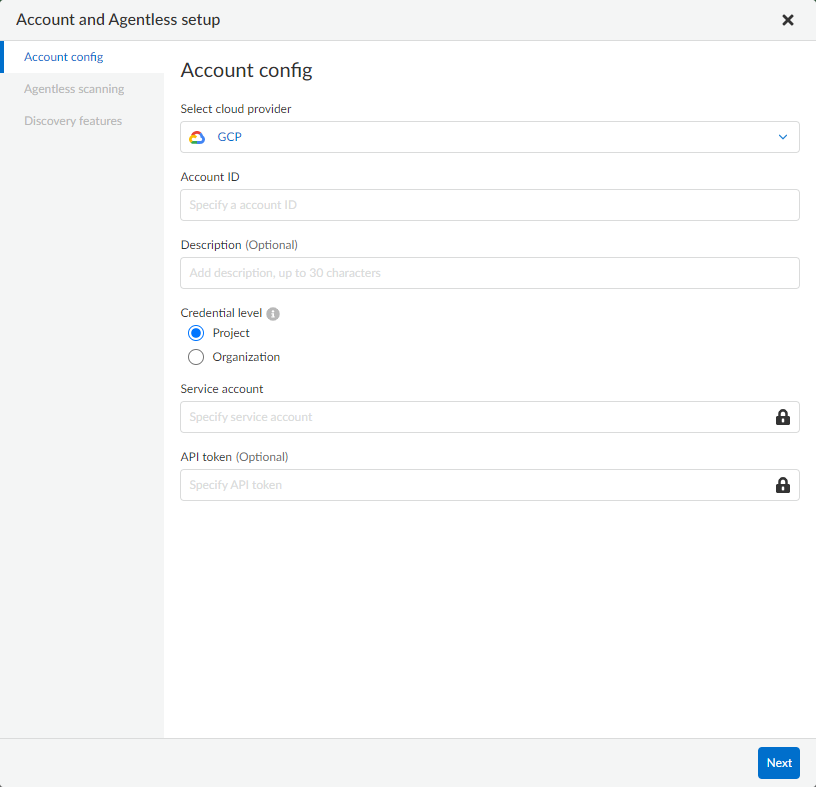
4. Enter the following information for the hub account in the **Account config** page.
1. **Select Cloud provider**: GCP
2. **Account ID:** Enter your Google project ID for the hub account.
3. **Description:** Provide an optional string.
4. **Service account:** Paste the contents of the downloaded service account key file for the hub account.
5. **API token:** Leave blank.
5. Click **Next**.
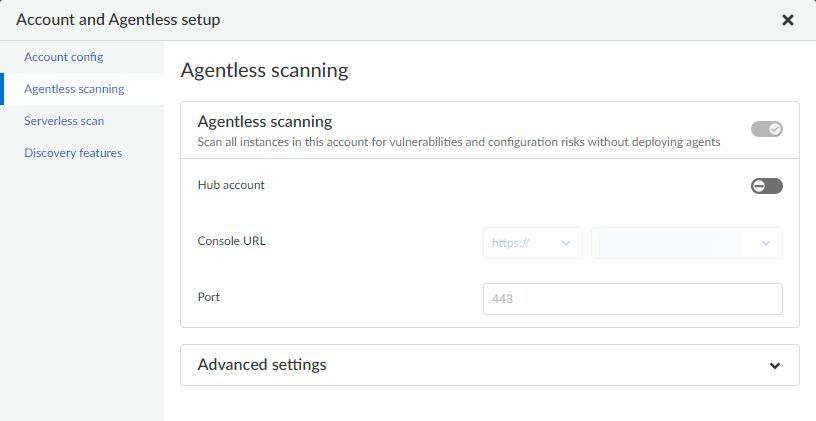
6. In the Agentless scanning page, complete the following steps.
1. Enable **Agentless scanning**.
2. Set the **Console URL** and **Port** to the address of your Prisma Cloud console that can be reached from the internet. To create an address or FQDN reachable from the internet, complete the [Subject Alternative Names procedure](/admin-guide/32/configure/subject-alternative-names.md).
7. **Hub account**: Enable the toggle to configure this account as a [hub account](/admin-guide/32/agentless-scanning/agentless-scanning-modes.md).
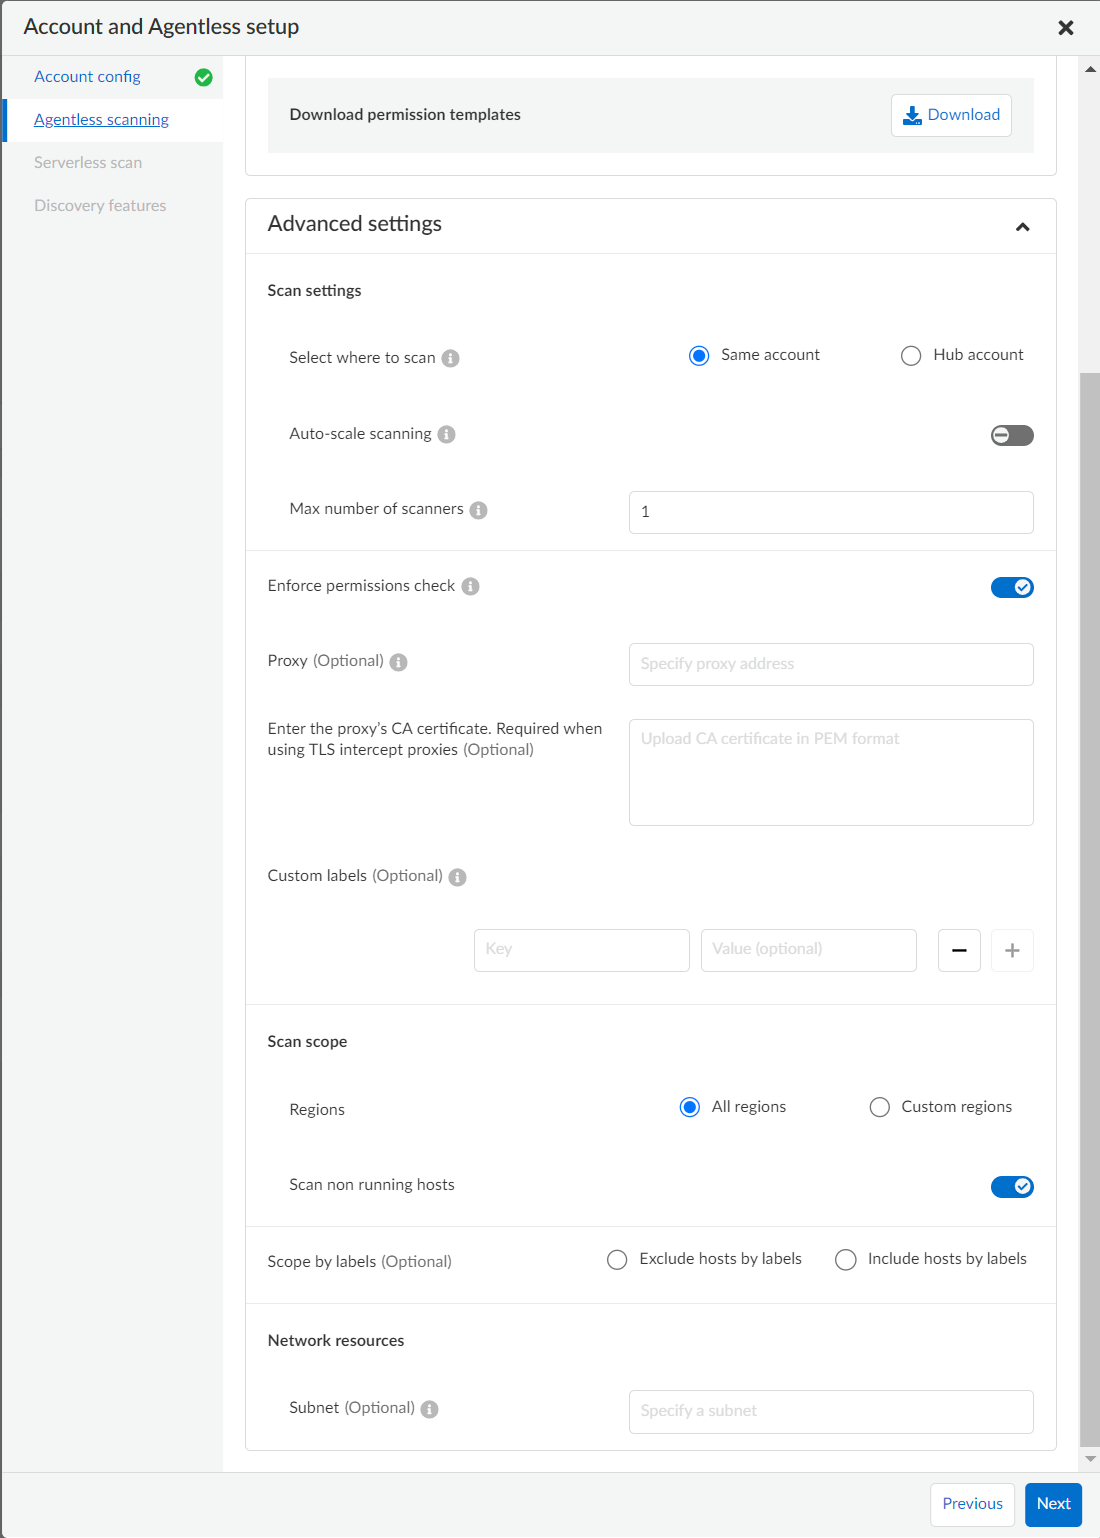
8. Expand the **Advanced settings** and provide the appropriate values based on your deployment for the following items.
9. Click **Save** to return to **Compute > Manage > Cloud accounts**.
## Scan Settings
**Select where to scan**: For GCP accounts, you can decide between [two scanning modes](https://github.com/PaloAltoNetworks/pc-docs-md/tree/main/compute-edition/32/admin-guide/agentless-scanning/agentless-scanning.md#scanning-modes).
* **Same Account**: Perform the agentless scanning process using this account.
* **Hub Account**: Perform the agentless scanning process using a centralized hub account. Select another account from the list to use as the centralized hub account to scan this account.
If you wish Prisma Cloud to scan encrypted volumes on the target accounts, follow the steps on [encrypted volumes](#gcp-encrypted-volumes).
## Auto-scale Scanning
Automatically create the required amount of scanners to scan all of the hosts within a region, up to a limit of 50 scanners. To use a different limit specify the **Max number of scanners**.
**Max number of scanners**: Enter the upper limit of scanners that Prisma Cloud can automatically spin up within a region in your account for faster results.
## Enforce Permissions Check
When enabled, this account isn’t scanned in case of failure to validate the required permissions.
When disabled, the pre-scan check to validate permissions is skipped. If permissions are missing or blocked by an organizational policy, the scan fails at that stage.
Review the [needed permissions to enable agentless scanning in GCP](/admin-guide/32/configure/permissions.md#gcp-agentless).
## Proxy
Enter a **Proxy** value if traffic leaving your GCP tenant uses a proxy.
Provide the proxy’s CA certificate.
## Custom Labels
Apply **Custom labels** to any resources Prisma Cloud creates during agentless scanning.
## Scan Scope
Under **Scan scope** you can refine the scope of the scanning by **Regions** or using labels. image::tags-scope.png\[width=300]
* **All regions**: Scan in all GCP regions.
* **Custom regions**: Specify the GCP regions, which you want scanned.
* **Scan non running hosts**: Choose whether or not to scan hosts that aren’t running.
* **Exclude hosts by labels**: Select a subset of hosts which you want to exclude from the scan process
You can use wildcards to specify a range of labels in both keys and values following these examples:
```
"abcd*"
"*abcd"
"abcd"
"*"
"*abcd*"
```
* **Include hosts by labels**: Select a subset of hosts to scan
You can use wildcards to specify a range of labels in both keys and values following these examples:
```
"abcd*"
"*abcd"
"abcd"
"*"
"*abcd*"
```
## Network Resources
Configure custom network resources for agentless scanning
* **Subnet**: If left blank, agentless scanning uses the default [networking infrastructure](https://github.com/PaloAltoNetworks/pc-docs-md/tree/main/compute-edition/32/admin-guide/agentless-scanning/agentless-scanning.md#networking-infrastructure) and assigns scanners with a public IP. Specify a subnet name to use an existing subnet in your environment and to use a private IP. The subnet must be unique and identical across all regions. If you are configuring a hub account, this requirement only applies to the hub account and not for the targets.
* **Shared VPC**: If you are using a shared VPC, enter the shared VPC path in this field with the following convention. Replace `{host_project_name}` with the ID of the project that owns the shared VPC.
```
projects/{host_project_name}/regions/{region_name}/subnetworks/{subnet_name}
```
Using a shared VPC requires [additional permissions](/admin-guide/32/configure/permissions.md#gcp-agentless) on the shared VPC host project. Refer to the GCP documentation to [learn more about shared VPCs](https://cloud.google.com/vpc/docs/shared-vpc).
## Scan Encrypted Volumes When Using Hub Mode
This section applies to scenarios where the following conditions are not met:
1. Your hub project is part of a GCP organization, and permissions were applied through organization onboarding.
2. Your encryption keys are not customer-managed encryption keys (CMEK).
If both the above conditions are met, no further action is required.
When you use [hub and target projects](/admin-guide/32/agentless-scanning/agentless-scanning-modes.md), you can configure your hub project to access the encrypted volumes of the target accounts. To use encrypted volumes the service account of Google Compute Engine needs to have the `cloudkms.cryptoKeyEncrypterDecrypter` role. Without it, the service agent of the the hub project can’t access the KMS keys.
The Compute Engine service agent for your hub project is labeled with the following convention. `service-PROJECT_NUMBER@compute-system.iam.gserviceaccount.com` Replace `PROJECT_NUMBER` with the number of your hub project.
1. Use the following command to apply the grant the role and permissions to the Compute Engine service agent.
```
gcloud projects add-iam-policy-binding KMS_PROJECT_ID \
--member serviceAccount:service-PROJECT_NUMBER@compute-system.iam.gserviceaccount.com \
--role roles/cloudkms.cryptoKeyEncrypterDecrypter
```
2. Replace `KMS_PROJECT_ID` with any project you need to use. The KMS project isn’t required to be the hub account or the target accounts you wish to scan.
### Agentless Scanning for Cloud Accounts
* **During Onboarding**: When cloud accounts are onboarded to Prisma Cloud with the "Agentless Scanning" option enabled, scanning starts immediately. This provides instant visibility into the vulnerabilities and configurations risks for the account. If this option is disabled before onboarding, Prisma Cloud does not scan the workloads in the account. The account remains unscanned until agentless scanning is enabled.
To modify the scan settings, see [Edit Agentless Scan Settings](#enable-agentless-scan).
* **For existing accounts**: Enabling agentless scanning for existing accounts in Prisma Cloud does not initiate an immediate scan. Instead, these accounts are added to the next scheduled scan cycle, which occurs every 24 hours by default. This ensures that scans are conducted systematically according to the scan cycle, rather than starting immediately upon enabling.
To modify the scan cycle, see [Modify the Agentless Scan Interval](#modifying-the-agentless-scan-interval).
### Edit Agentless Scan Settings
You can safely enable agentless scanning settings for disabled accounts on the **Runtime Security** > **Manage** > **Cloud accounts** page. After enabling agentless scan, the scan will trigger with the correct configuration in place.
To edit agentless scan settings, complete the following steps:
1. Go to **Runtime Security > Manage > Cloud accounts**.
2. Select **Edit Account** icon from the Actions column for the account.
3. In **Account and Agentless setup**, go to **Agentless scanning** section.
4. Modify the agentless configuration options in this section.
5. Select **Save**.
After the configuration is modified, the next scan uses the updated settings.
### Modify the Agentless Scan Interval
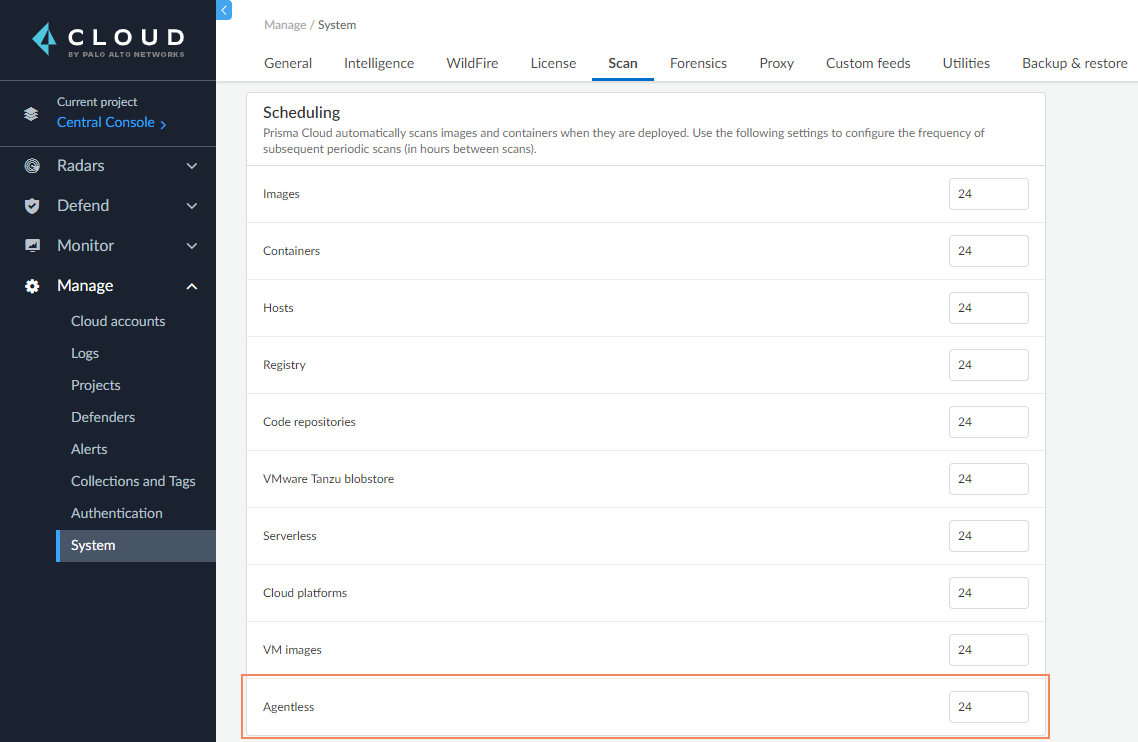
By default, agentless scans are triggered every 24 hours.
To change the interval, complete the following steps.
1. Go to **Runtime Security > Manage > System**.
2. Select the **Scan** tab.
3. In the **Scheduling** section, in **Agentless** box, type the new duration for the scan cycle.
4. Select **Save**
### Manually Start Agentless Scanning
To manually start a scan, complete the following steps.
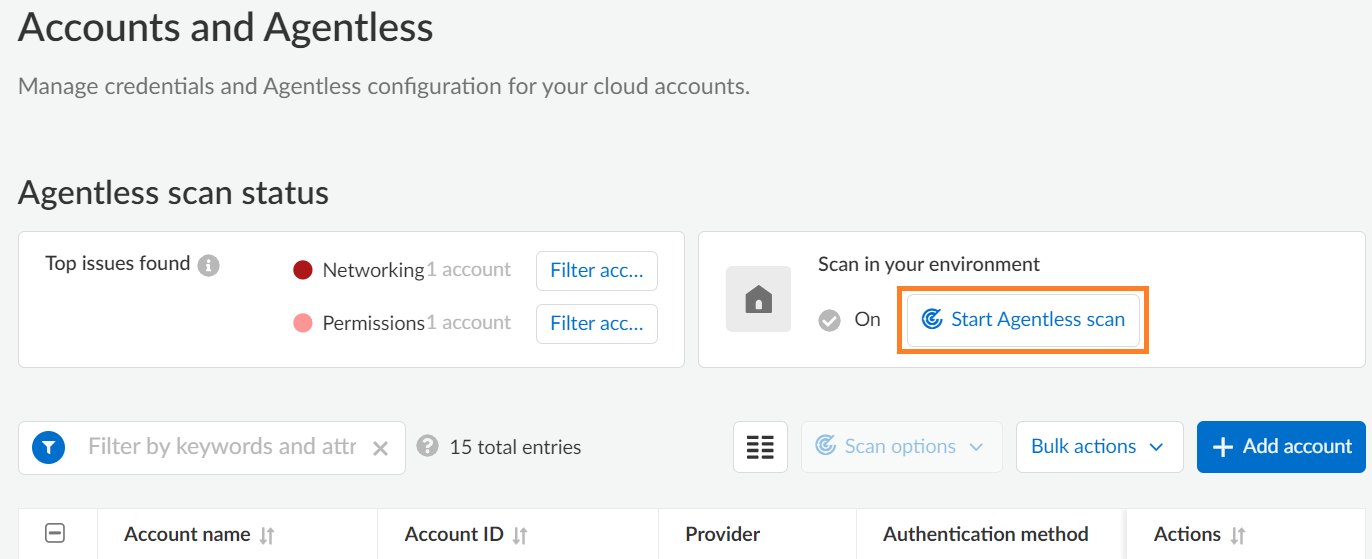
1. Go to **Runtime Security > Manage > Cloud accounts**.
2. In the **Scan in your environment** section, select **Start Agentless scan**.
Note: Scanning starts for all the accounts that have the agentless scanning option enabled.
3. Select the Scan icon in the top-right corner of the console to view the scan status.
4. To view the results, complete the following steps.
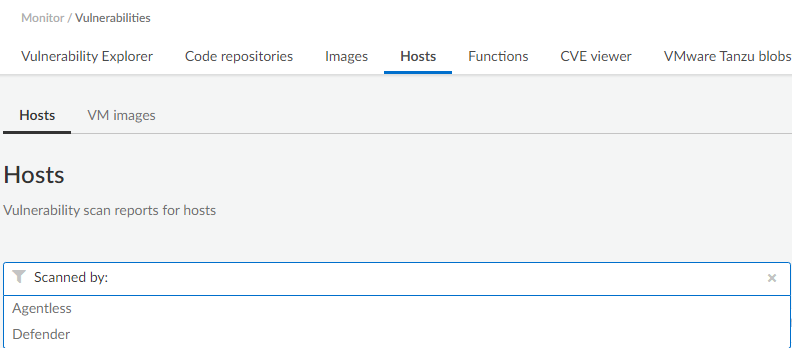
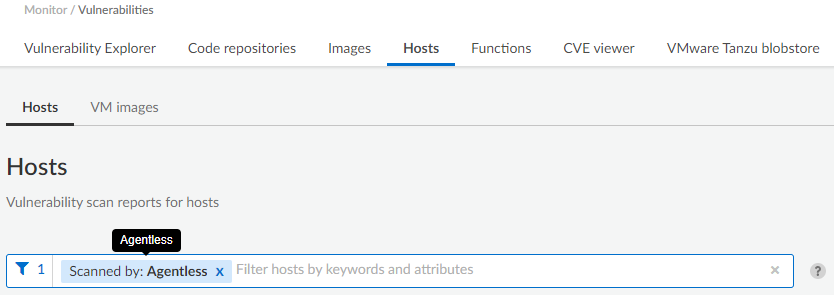
1. Go to **Runtime Security > Monitor > Vulnerabilities > Hosts** or **Runtime Security > Monitor > Vulnerabilities > Images**.
2. Select **Filter hosts**.
3. Select the **Scanned by** filter.
4. Select the **Agentless** filter.
---
# Agent Instructions
This documentation is published with GitBook. GitBook is the documentation platform designed so that both humans and AI agents can read, navigate, and reason over technical content effectively. Learn more at gitbook.com.
## Querying This Documentation
If you need additional information that is not directly available in this page, you can query the documentation dynamically by asking a question.
Perform an HTTP GET request on the current page URL with the `ask` query parameter, and the optional `goal` query parameter:
```
GET https://docs.prismacloud.io/admin-guide/32/agentless-scanning/onboard-accounts/configure-gcp.md?ask=&goal=
```
`ask` is the immediate question: it should be specific, self-contained, and written in natural language.
`goal` is optional and describes the broader end goal you are ultimately trying to accomplish on behalf of the user. GitBook uses it to tailor the answer towards what is most useful for that goal.
The response will contain a direct answer to the question and relevant excerpts and sources from the documentation.
Use this mechanism when the answer is not explicitly present in the current page, you need clarification or additional context, or you want to retrieve related documentation sections.