> For the complete documentation index, see [llms.txt](https://docs.prismacloud.io/llms.txt). Markdown versions of documentation pages are available by appending `.md` to page URLs; this page is available as [Markdown](https://docs.prismacloud.io/content-collections/administration/add-a-resource-list-on-prisma-cloud.md).
# Add a Resource List on Prisma Cloud
Use tags to identify resources deployed in your cloud environments.
A Resource List is a way to identify resources that are assigned with a specific tag or label. Resource lists can include tags or types of workloads.
* [Identify Cloud Resources by Tags](#id334bfb12-8cbe-460e-8698-fc4994e61b69)
* [Create a Tag-based Resource List for Compute Resources](#idd0ab9614-5daa-40b4-91cd-9bee6f70f2e6)
* [Create a Tag-based Resource List for Azure Resource Groups](#id814aa2ea-b823-4727-93ea-010ccf9edd44)
Resource lists can only be created by System Administrators.
## Identify Cloud Resources by Tags
A resource list for tags can reference tags that have been assigned to the resource as a part of a template deployment workflow or added manually.
1. Select **Settings > Resource Lists**.
2. **Add Resource List > Tag**.
3. Enter a **Resource List Name**.
You can optionally enter a description.
4. Specify the **Key** and **Value** to identify the tag. The following restrictions apply:
* Tag-based Resource Lists will be limited to 10 key-value pairs
* Up to 5 Tag-based Resource Lists may be associated with a Role
* Tag-based Resource List Tag key and value will be limited to 256 characters each
5. **Save** the list.
## Create a Tag-based Resource List for Compute Resources
The Compute Access Group resource list on Prisma Cloud enables you to:
* Restrict access to the data that is visible under **Runtime Security** to your read-only roles.
You can define the scope for the types of workloads or resources, such as hosts, containers, images, serverless functions that are accessible to a role and assign that role to a Prisma Cloud read-only role. For a user to view data, they must be assigned to an account group or an on-prem provider. The workloads you include in the list match criteria are within scope and accessible to the user who is assigned to the role.
On Compute, this resource list is referred to as an assigned collection and is a way to enable granular access to a specified set of resources instead of granting access to all resources within an account.
* Target **Compute** workloads—hosts and container images—for which you want to trigger alerts using an alert rule with [workload protection policies](/content-collections/governance/workload-protection-policies.md).
1. Select **Settings > Resource Lists**.
2. **Add Resource List > Compute Access Group**.
3. Enter a **Resource List Name**.
You can optionally enter a description.
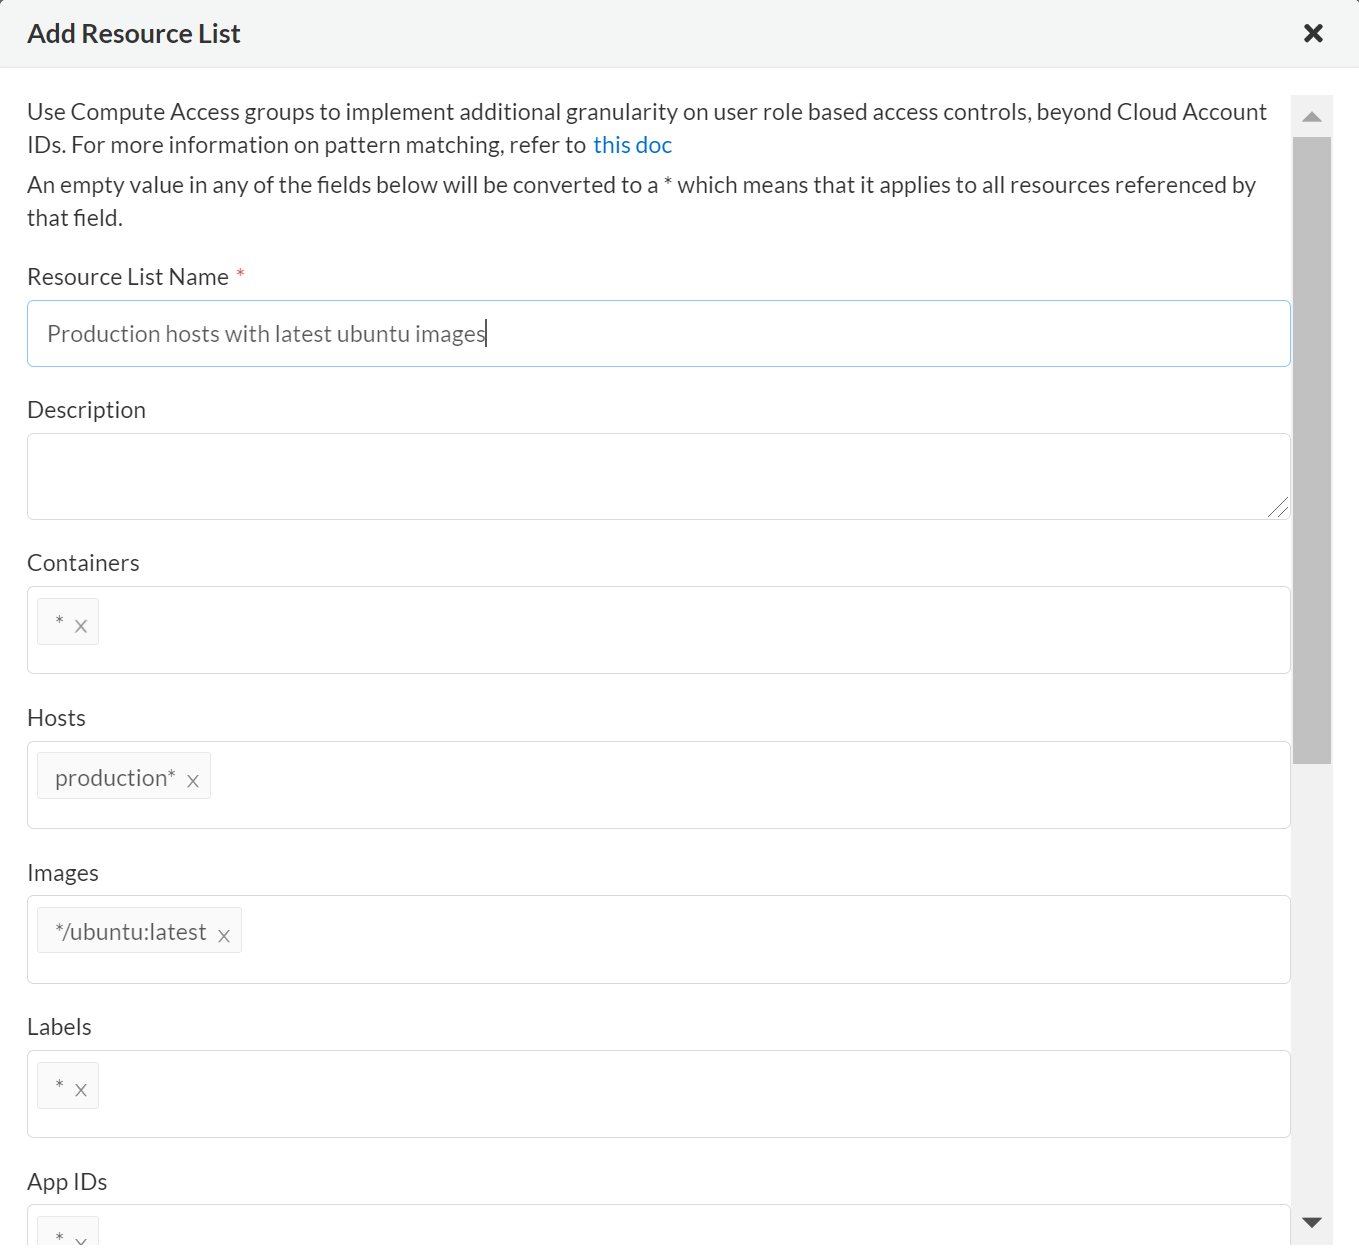
4. Specify the filters to define the scope of what is accessible within each type of resource.
By default, each field is populated with a wildcard to match all objects of a specific type, such as containers, images, hosts. The Individual fields are combined using AND logic. You can customize how a field is evaluated with string matching. When you use a wildcard in a resource name, it evaluates the resource name according to the position of the wildcard—If the string starts with a wildcard, it is evaluated as string-starts-with; If the string terminates with a wildcard, it is evaluated as string-ends-with; If a string is starts and terminates with a wildcard, it is evaluated as string-contains.
As an example, to match host names that start with production and image names that use the latest version of Ubuntu, and disregard the container name or label, you must enter the value userinput:\[production\*] for **Hosts** and userinput:\[\*/ubuntu:latest] for **Images** to match image names /library/ubuntu:latest or docker.io/library/ubuntu:latest. For more examples, refer to [pattern matching](https://docs.paloaltonetworks.com/prisma/prisma-cloud/prisma-cloud-admin-compute/configure/rule_ordering_pattern_matching.html).
5. **Save** the list.
6. View this resource list on **Compute**.
The resource list is automatically added to the list of Collections. Select **Manage > Collections And Tags > Collections** and find the resource list by name. Although the Resource List for Compute Access Group is included in the list of collections, you cannot edit it on the **Compute** tab or use it when you add or edit rules for enforcing security checks on your resources.
7. Attach the resource list.
You can now attach the Compute Access Group Resource list to a Prisma Cloud role or to an alert rule.
1. When you [Create Prisma Cloud Roles](/content-collections/administration/create-prisma-cloud-roles.md#id6d0b3093-c30c-41c4-8757-2efbdf7970c8) and attach the resource list to the role, verify that the role is assigned at least one account group or is enabled for access to data from **On-prem/ Other cloud providers**.
2. Assign the role to a user so that they can review data on **Compute** for the scope you defined in the resource list.
Assigning a Compute Access Group Resource List to a role converts the assigned users into **Scoped Users** within the Compute tab. Scoped users are prohibited from adding or modifying Registry Settings, even if the Resource List uses wildcards (\*). Attempting to save Registry Settings as a Scoped User will result in a `Failed to renew token` or `Insufficient permissions` error. To manage registries, the user’s role must not have a Resource List assigned. Use Account Groups instead for data filtering without restricting administrative scope.
## Create a Tag-based Resource List for Azure Resource Groups
Create resource lists for Azure Resource Groups and assign it to roles to restrict access. Then, filter these in the Alerts, Compliance, and Asset inventory dashboards.
The Azure Resource Group resource list enables you to specify roles on Prisma Cloud who can view the data associated with it. This enables you to restrict access to the data and also provides you greater visibility by allowing you to zoom in on that data using filters. You can filter Azure Resource Groups to generate compliance standard reports which shows only the data within them, or you can apply filters in the Asset inventory dashboard to pick and choose one-or-more Azure Resource Groups data that you want to observe. You can also filter based on Azure Resource Groups on the Alerts Overview, Alerts Reports, and Investigate pages.
Contact Prisma Cloud customer support to enable Azure Resource Group resource lists on your Prisma Cloud tenant.
1. Select **Settings > Resource Lists**.
2. **Add Resource List > Azure Resource Group**.
Only System Admins can create Resource Groups.
3. Enter the resource list details.
* **Name**—Enter the name of your resource list.
* **tt:\[Description]**—Enter the purpose of your resource list.
* **Azure Resource Group(s)**—Click the dialog box and select the Azure Resource Groups that you want to add to the resource list.
4. Click **Submit**.
5. tt:\[(Optional)] Attach the resource list to a Prisma Cloud role.
When you assign an Azure Resource Group Resource List to a role, that role will have access to azure resource groups in the resource list for the Compliance and Asset inventory dashboards. If no resource list is assigned to a role that you switch to, then no resource list data will display in the corresponding dashboards.
This is currently only applicable to Azure resources. If you have access to AWS, GCP, and Azure resources, the resource list filtering will only apply to the Azure resources, however you will still have access to the AWS and GCP data.
6. Filter the resource list to view data on the Compliance and Asset Inventory dashboards.
* Select **Compliance > Overview** and click the plus icon to view and add filter menu items.
* Select **Azure Resource Group** to view the resource list data associated with your role.
7. Apply a filter on the Asset inventory dashboard.
* Select **Inventory > Assets** and click the plus icon to view and add filter menu items.
* Select **Azure Resource Group** to view the resource list data associated with your role.
The Azure resources you see on the Asset Inventory page belong to the resource lists that are attached to your role. If you have access to accounts belonging to other cloud types, such as AWS or GCP, those resources are not filtered and you will see all the data associated with those cloud types.
8. Apply a filter on the **Investigate** page.
* Select **Investigate**.
* Enter your config query in the search bar:
`config from cloud.resource where azure.resource.group =`
The resource group is not auto-suggested because the list of resource groups can be very long. You have to manually enter the resource group.
* You can also filter based multiple resource groups:
`config from cloud.resource where azure.resource.group IN (’resource-group1’) AND (’resource-group2’)`
---
# Agent Instructions
This documentation is published with GitBook. GitBook is the documentation platform designed so that both humans and AI agents can read, navigate, and reason over technical content effectively. Learn more at gitbook.com.
## Querying This Documentation
If you need additional information that is not directly available in this page, you can query the documentation by asking a question.
Perform an HTTP GET request on the following URL with the `ask` and `goal` query parameters:
```
GET https://docs.prismacloud.io/content-collections/administration/add-a-resource-list-on-prisma-cloud.md?ask=&goal=
```
`ask` is the immediate question: it should be specific, self-contained, and written in natural language.
`goal` is what the user is ultimately trying to achieve, the reason they need the answer. Sharing it helps GitBook give you a better, more relevant answer. A goal is most helpful when it describes the outcome the user wants rather than restating the question. For example, with `ask=how do I create an API token`, a goal like `automate deployments from our CI pipeline` lets GitBook tailor the answer to that use case.
The response will contain a direct answer to the question and relevant excerpts and sources from the documentation.
Use this mechanism when the answer is not explicitly present in the current page, you need clarification or additional context, or you want to retrieve related documentation sections.