> For the complete documentation index, see [llms.txt](https://docs.prismacloud.io/llms.txt). Markdown versions of documentation pages are available by appending `.md` to page URLs; this page is available as [Markdown](https://docs.prismacloud.io/content-collections/administration/add-prisma-cloud-users.md).
# Add Administrative Users On Prisma Cloud
lean-:topic\_type: task
## Add Administrative Users On Prisma Cloud
Enable administrative access to Prisma Cloud by adding users and assigning one or more roles.
To provide administrative access to Prisma Cloud—admin and API—you must add *users* locally on Prisma Cloud. You can choose whether you want these administrators to use Palo Alto Networks Customer Support Portal (CSP) credentials to log in or SSO using a third-party Identity Service Provider.
If you want to use Palo Alto Networks Customer Support Portal (CSP) credentials, when you add the email address for a user who already has a support account with Palo Alto Networks, they can just log in to Prisma Cloud using the Prisma Cloud URL or from the Prisma Cloud tile on [hub](https://apps.paloaltonetworks.com). If you [Set up SSO Integration on Prisma Cloud](https://github.com/PaloAltoNetworks/pc-docs-md/tree/main/enterprise-edition/content-collections/administration/administration/setup-sso-integration-on-prisma-cloud/setup-sso-integration-on-prisma-cloud.md) with an Identity Service Provider who supports SAML, you can configure Just-in-Time Provisioning (JIT) to create a local account on the fly, instead of creating the account in advance on Prisma Cloud. With JIT, you do not need to manually create a local user account.
The time zone is set automatically for Prisma Cloud administrators. It is derived from the user’s web browser and is based on the operating system that is used to access the Prisma Cloud administrative console.
The following instructions are for manually adding a local user account on Prisma Cloud.
1. Select **Settings > Access Control > Users** and select **Add > User**.
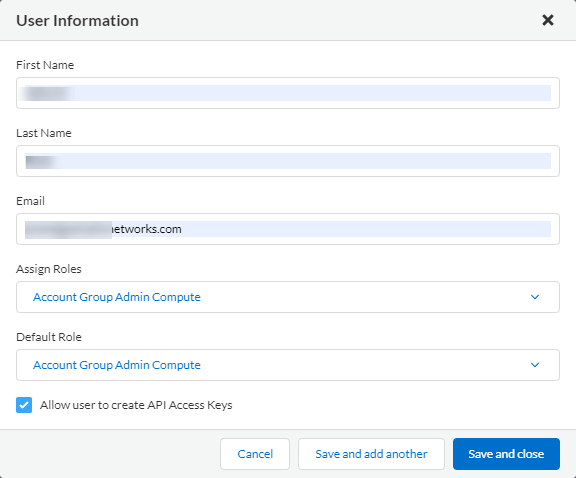
2. Enter **First Name**, **Last Name**, and **Email** of the user.
You can enter a maximum of 300 characters in the **First Name** and **Last Name** fields. For a user who has a Palo Alto Networks CSP account, you must enter the email address that is associated with the CSP account so that they can log in as soon as you save the changes. If the user does not have a CSP account, as soon as you add them here and save your changes, they will receive two emails. One email to activate the CSP account and another email with a link to get started with Prisma Cloud.
3. **Assign Roles** to the user.
You can assign up to fifty roles to a user, and must select one as the **Default Role**. See [Prisma Cloud Administrator Roles](/content-collections/administration/prisma-cloud-administrator-roles.md#id437b5c4a-3dfa-4c70-8fc7-b6d074f5dffc) for the different permission groups and associated permissions. Users with multiple roles can use the Profile to switch between roles. The default role is marked with a star.
The role assumed by the user is tied to policies, saved searches, saved alert filters, and recurring compliance reports that do not have a cloud account selected. These objects are available to any other user who has the same role, and it is not tied to the specific user.
4. Decide whether to **Allow user to create API Access Keys**.
By default, API access is enabled for the System Admin role only. When you add a new administrator, decide whether or not you want to enable API access for the other roles; the key icon in the API Access column indicates that the administrator has API access, and can create up to two access keys per role on Prisma Cloud. See [Create and Manage Access Keys](/content-collections/administration/create-access-keys.md#idb225a52a-85ea-4b0c-9d69-d2dfca250e16) for more information.
5. Click **Save and close** to save this user or click **Save and add another** to add additional users.
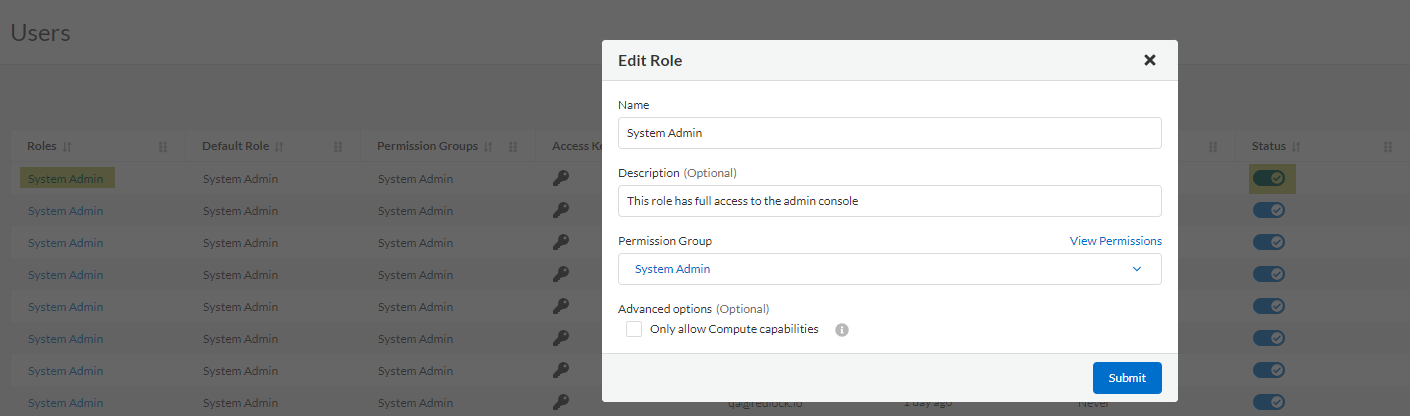
6. After you add an administrator, you can edit or delete the user or modify permissions to add additional roles.
When you delete an administrator or modify the role, all the access keys associated with the user and role are deleted immediately.
* To edit the details of an user, click the **Role** and change the details. You can enter a maximum of 300 characters in the **Name** field.
* To disable an user, toggle the **Status** of the user.
* To delete an user, click the corresponding **Delete** icon located under **Actions**.
7. Change the password for an administrative user.
If you want to set a new password or if you are unable to log in because you forgot your password, follow the steps below.
1. Access the URL for your Prisma Cloud instance.
2. Click the **Forgot password** link.
You will receive an email at the email address registered above in Step 2. Use the link in the email to set a new password.
Passwords do not expire and can be reused. As a security measure, if you enter an incorrect password five times, your account is locked and you must reset your password.
---
# Agent Instructions
This documentation is published with GitBook. GitBook is the documentation platform designed so that both humans and AI agents can read, navigate, and reason over technical content effectively. Learn more at gitbook.com.
## Querying This Documentation
If you need additional information that is not directly available in this page, you can query the documentation by asking a question.
Perform an HTTP GET request on the following URL with the `ask` and `goal` query parameters:
```
GET https://docs.prismacloud.io/content-collections/administration/add-prisma-cloud-users.md?ask=&goal=
```
`ask` is the immediate question: it should be specific, self-contained, and written in natural language.
`goal` is what the user is ultimately trying to achieve, the reason they need the answer. Sharing it helps GitBook give you a better, more relevant answer. A goal is most helpful when it describes the outcome the user wants rather than restating the question. For example, with `ask=how do I create an API token`, a goal like `automate deployments from our CI pipeline` lets GitBook tailor the answer to that use case.
The response will contain a direct answer to the question and relevant excerpts and sources from the documentation.
Use this mechanism when the answer is not explicitly present in the current page, you need clarification or additional context, or you want to retrieve related documentation sections.