> For the complete documentation index, see [llms.txt](https://docs.prismacloud.io/llms.txt). Markdown versions of documentation pages are available by appending `.md` to page URLs; this page is available as [Markdown](https://docs.prismacloud.io/content-collections/administration/add-service-account-prisma-cloud.md).
# Add Service Accounts On Prisma Cloud
Enable access to the Prisma Cloud APIs for non-human entities.
Service Accounts can be created for automation use cases to enable a nonhuman entity to interact programmatically with the Prisma Cloud APIs. Service accounts differ from user accounts in that they do not need an email address associated with them and do not need to be validated or activated in an external system before they can be used.
1. Navigate to **Settings > Access Control** and select **Add > Service Account**.
You must have the System Administrator role on Prisma Cloud to add a service account; a maximum of 250 service accounts are supported.
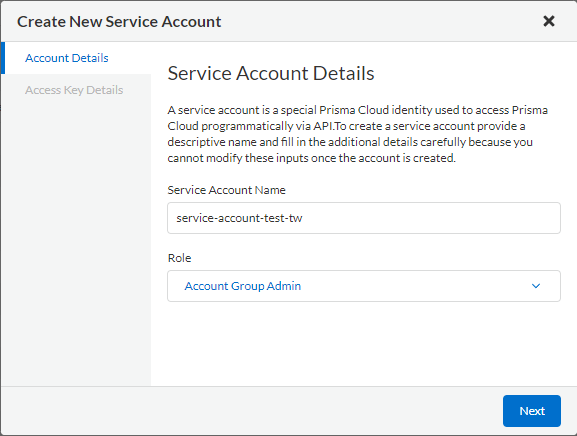
2. Enter the Service Account details and click **Next**.
Think about the data you will enter carefully because the information that’s associated with the service account cannot be modified afterwards.
* **Service Account Name**—A descriptive name for your service account. You can enter a maximum of 300 characters in the **Service Account Name** field.
* **Role**—The role for your service account.
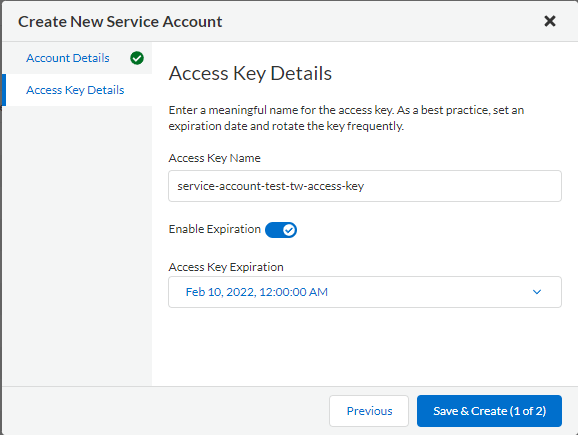
3. Create an Access Key.
1. Enter a descriptive name for your access key. You can enter a maximum of 300 characters in the **Access Key Name** field.
2. **Enable Expiration**. Select a date, adjust the time based on your requirements, and click **Apply**.
As a best practice, set an expiration date that meets your compliance requirements and rotate your keys frequently.
3. **Save & Create (1 of 2)** to generate the key.
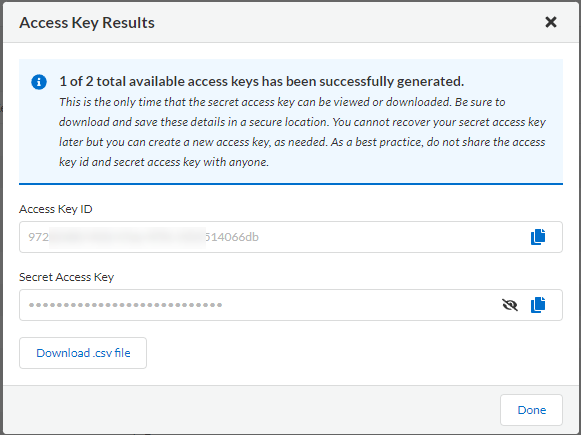
4. Download your Access Key.
Access keys are not stored on Prisma Cloud, so this will be the only opportunity that you’ll have to download it. Click **Download .csv file** to download your access key as a csv file and store it in a secure location.
5. **Done**.
6. View the service accounts.
To verify that the service accounts is created successfully, select **Settings > Users**, and enter the name of the service account in the search box.
You cannot edit the **Name** or **Roles** for a service account. To modify any of these values, you must delete it and create a new one. Each service account can have a maximum of two access keys; you must create one key when you add the service account, and can add an additional key later.
---
# Agent Instructions
This documentation is published with GitBook. GitBook is the documentation platform designed so that both humans and AI agents can read, navigate, and reason over technical content effectively. Learn more at gitbook.com.
## Querying This Documentation
If you need additional information that is not directly available in this page, you can query the documentation by asking a question.
Perform an HTTP GET request on the following URL with the `ask` and `goal` query parameters:
```
GET https://docs.prismacloud.io/content-collections/administration/add-service-account-prisma-cloud.md?ask=&goal=
```
`ask` is the immediate question: it should be specific, self-contained, and written in natural language.
`goal` is what the user is ultimately trying to achieve, the reason they need the answer. Sharing it helps GitBook give you a better, more relevant answer. A goal is most helpful when it describes the outcome the user wants rather than restating the question. For example, with `ask=how do I create an API token`, a goal like `automate deployments from our CI pipeline` lets GitBook tailor the answer to that use case.
The response will contain a direct answer to the question and relevant excerpts and sources from the documentation.
Use this mechanism when the answer is not explicitly present in the current page, you need clarification or additional context, or you want to retrieve related documentation sections.