> For the complete documentation index, see [llms.txt](https://docs.prismacloud.io/llms.txt). Markdown versions of documentation pages are available by appending `.md` to page URLs; this page is available as [Markdown](https://docs.prismacloud.io/content-collections/administration/create-manage-account-groups.md).
# Create and Manage Account Groups
You can use Account Groups to combine access to multiple cloud accounts with similar or different applications that span multiple divisions or business units, so that you can manage administrative access to these accounts from Prisma Cloud.
When you onboard a cloud account to Prisma Cloud, you can assign the cloud account to one or more account groups, and then assign the account group to [Prisma Cloud Administrator Roles](/content-collections/administration/prisma-cloud-administrator-roles.md). Assigning an account group to an administrative user on Prisma Cloud allows you to restrict access only to the resources and data that pertain to the cloud account(s) within an account group. Alerts on Prisma Cloud are applied at the cloud account group level, which means you can set up separate alert rules and notification flows for different cloud environments. In addition, you can also create nested account groups which provides you more flexibility in mapping out your internal hierarchy.
* [Create an Account Group](#idd54371f4-2f0b-4766-b207-5461b5927695)
* [Create Nested Account Groups](#id7d08b640-c9d6-4d6a-b6b5-313156fb1d5b)
* [Modify Account Group to Include Multiple Cloud Accounts](#id75582e6e-407d-4a64-b83a-006dp74631b1)
* [Manage Account Groups](#id75582e6e-407d-4a64-b83a-006de7424ab1)
## Create an Account Group
1. Select **Settings > Account Groups > Add Account Group**.
2. Enter a **Name** and **Description** for the new Account Group.
3. Select the cloud accounts that you want to group together in this account group and click **Save**.
These are the list of cloud accounts that you have onboarded and are monitoring on Prisma Cloud. You can also [nest account groups](#id7d08b640-c9d6-4d6a-b6b5-313156fb1d5b) so that you can map out your organization in a hierarchical manner.
4. Enter the Account IDs for cloud accounts for which you want visibility on **Compute**.
For the cloud service providers that are supported on Prisma Cloud Compute, you can add the Account IDs manually, even if you have not onboarded the cloud account and are not using Prisma Cloud for compliance and governance. Adding the account IDs manually enables you to assign these accounts to users for role-based access control on Compute so that they can view data collected from Defenders running on workloads across these cloud service providers on **Compute > Radar**.
You must provide the Account ID, the account name is not a unique identifier and is not used to retrieve information from the cloud service provider.
## Create Nested Account Groups
Create nested account groups and gain more flexibility in mapping out the internal hierarchy of your organization.
Prisma® Cloud enables you to nest account groups, which provides greater flexibility in how to map out your organization’s internal hierarchy and delegate permissions. A nested account group has one or more account groups that are organized in a parent-child hierarchy. Parents can have a combination of children and directly associated accounts, and they will be able to view all the assets or alerts of the parent account group and that of their children.
The following workflow creates an account group and then places it inside a parent. An account group becomes a child when it is placed inside of a parent.
1. Verify that your Prisma Cloud tenant is on Alerts 2.0.
This feature is available to customers on Alerts 2.0. Please contact your Prisma Cloud account or customer success team to enable this feature on your tenant.
2. Create an account group.
1. Select **Settings > Account Groups > Add Account Group**.
2. Enter a **name**, **description**, and (tt:\[optionally]) select cloud accounts to add to the account group and click **Save**.
3. Nest the account group.
In this example, we’re selecting one account group to be a child, but depending on your use case you’re allowed to select up to 300 account groups to be children.
1. Repeat steps 1-2 to add another account group.
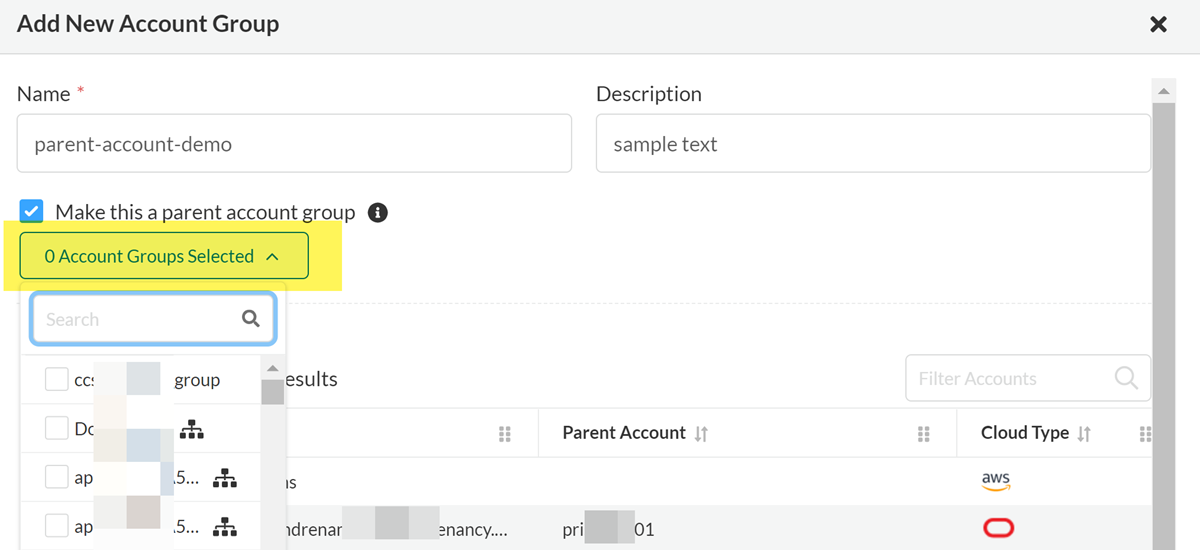
2. Select the **Make this a parent account group** check box.
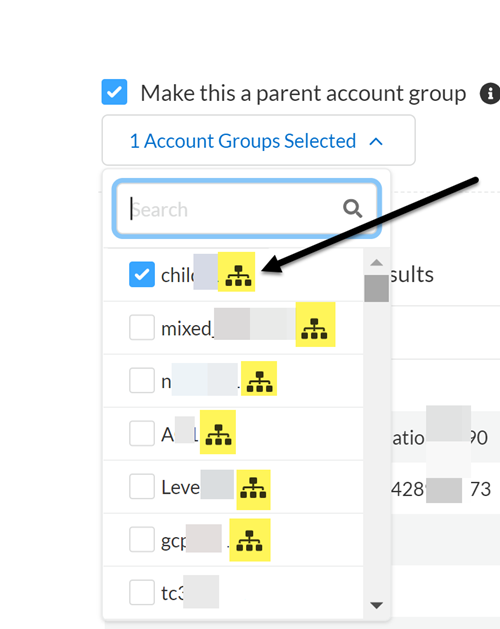
Click **Account Groups Selected** and select the two children account groups you previously created and click **Save**.
The () icon indicates that a child account is already part of another parent. If you choose to include it in the parent account group you are currently creating, it will be moved from the former parent account group to the new one. This may result in alerts being marked as **Resolved**.
4. Assign a parent account group to a role.
You have the option of creating a new role or assigning the parent account group to an existing one. Any user assigned with that role will be able to view the assets and alerts that belongs to the parent account group, along with all their child account groups and cloud accounts.
1. Add a new role.
Select **Settings > Roles > Add Role**.
2. Enter the new role details.
Enter **Name**, tt:\[Description], select **Permission Group** and click **Account Groups** to choose your parent account group.
3. (tt:\[Optional]) Assign the parent account group to an existing role.
Select **Settings > Roles**, and then select a role from the **Name** column.
4. (tt:\[Optional]) Select the **Account Group** dialog box and choose the parent account groups you want to add.
5. View the parent account group data.
You can view your parent account group data from several places in the console such as the **Asset Inventory**, **Compliance** dashboards, and the **Investigate** page.
To view the parent account groups in the **Asset Inventory** dashboard, Select **Inventory > Assets**, and select the account groups to filter in the **Account Group** search field.
And on the **Investigate** page, enter the following query:
screen:\[config from cloud.resource where cloud.accountgroup =]
## Modify Account Group to Include Multiple Cloud Accounts
When you onboard a cloud account such as an AWS Org or GCP Org, all child accounts associated with it are automatically included in the account group that you select in the onboarding workflow. If you now want to select or reassign the grouping of one or more cloud accounts to support your reporting or logical grouping needs, use this approach:
1. Select **Settings > Account Groups**.
2. Select the account group you want to edit and click the edit icon.
If the account group does not exist, create a new one first.
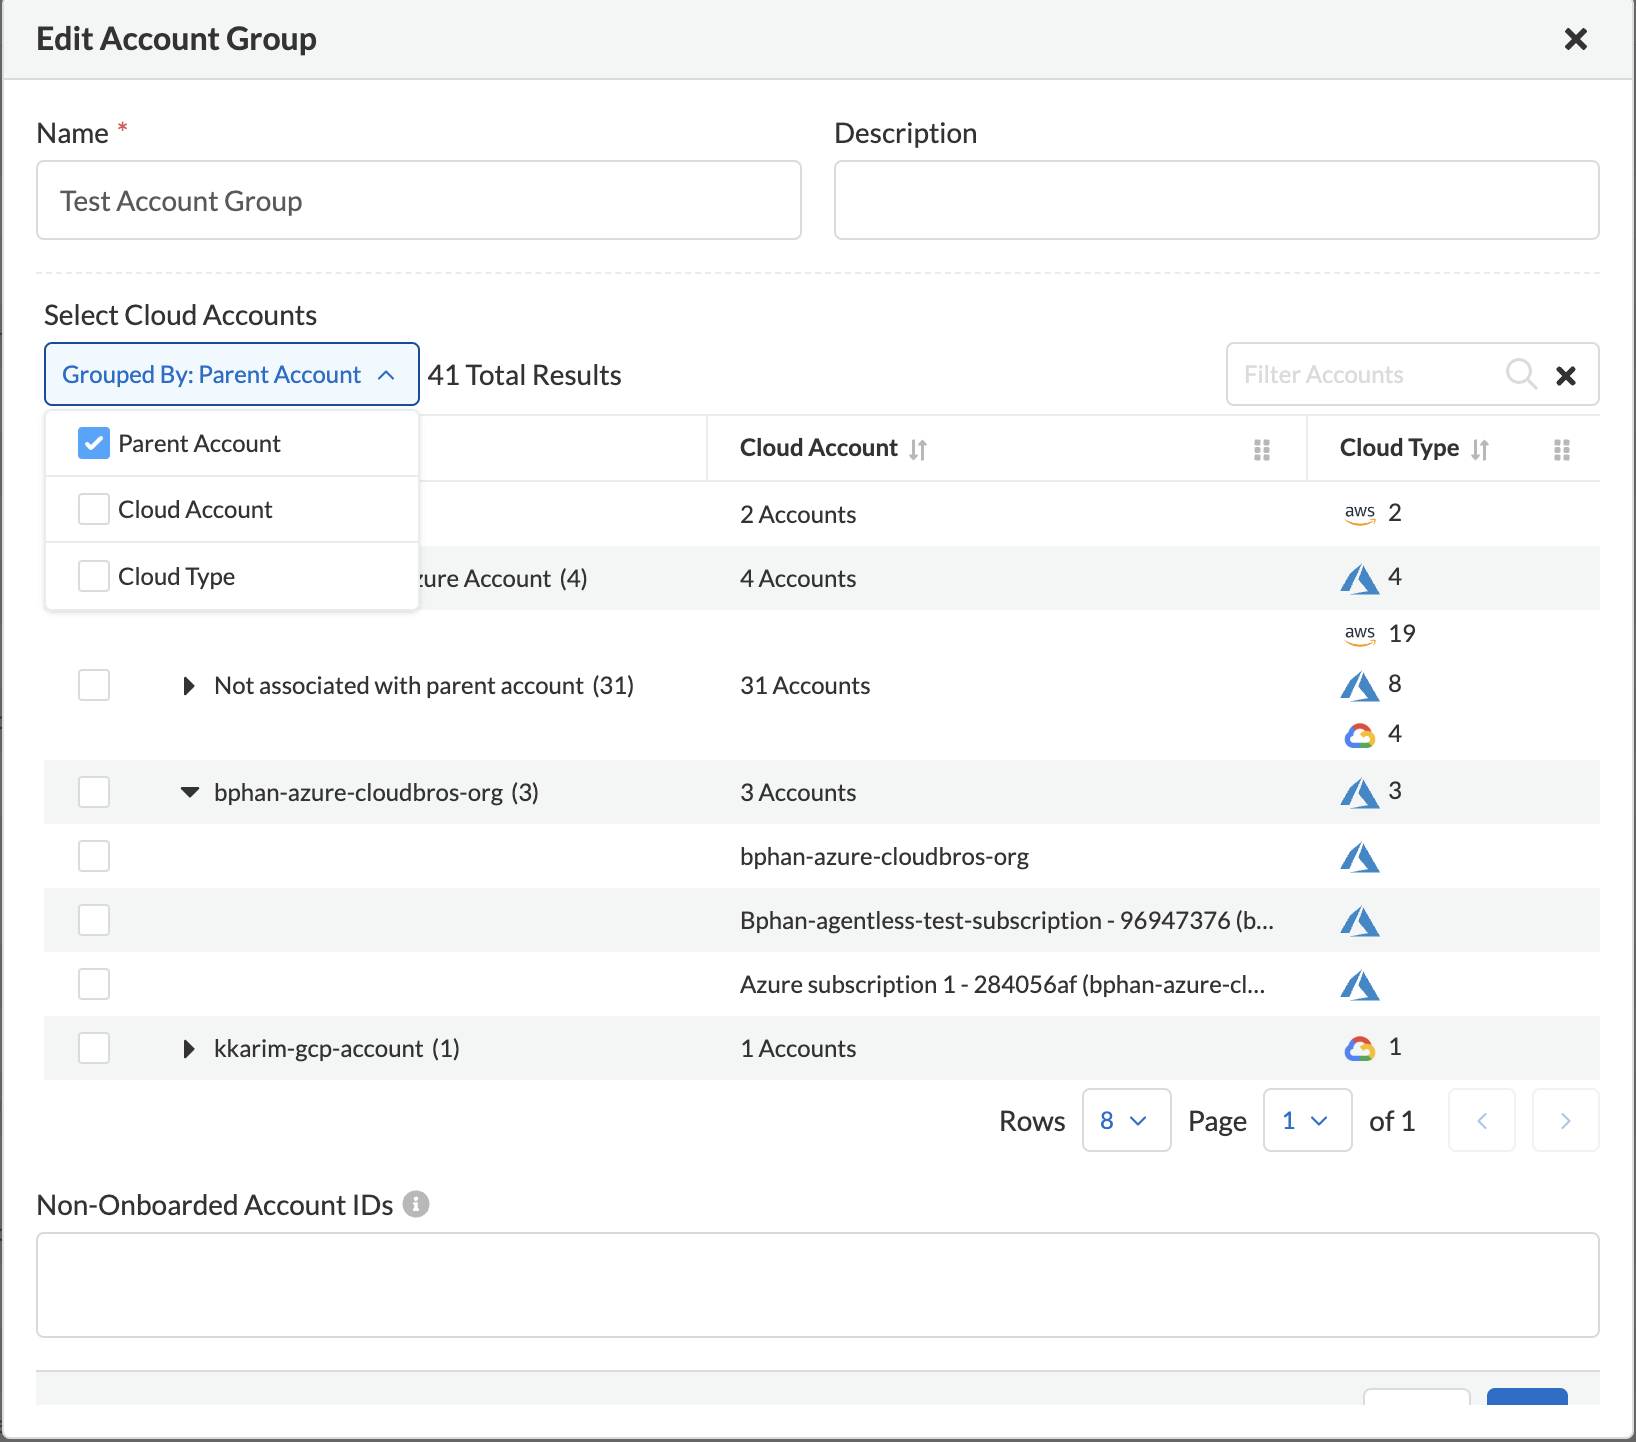
3. Select **Group By** as **Parent Account** in **Select Cloud Accounts**.
You can view a list of all the parent cloud accounts. Use the search to find the parent cloud account you want to edit.
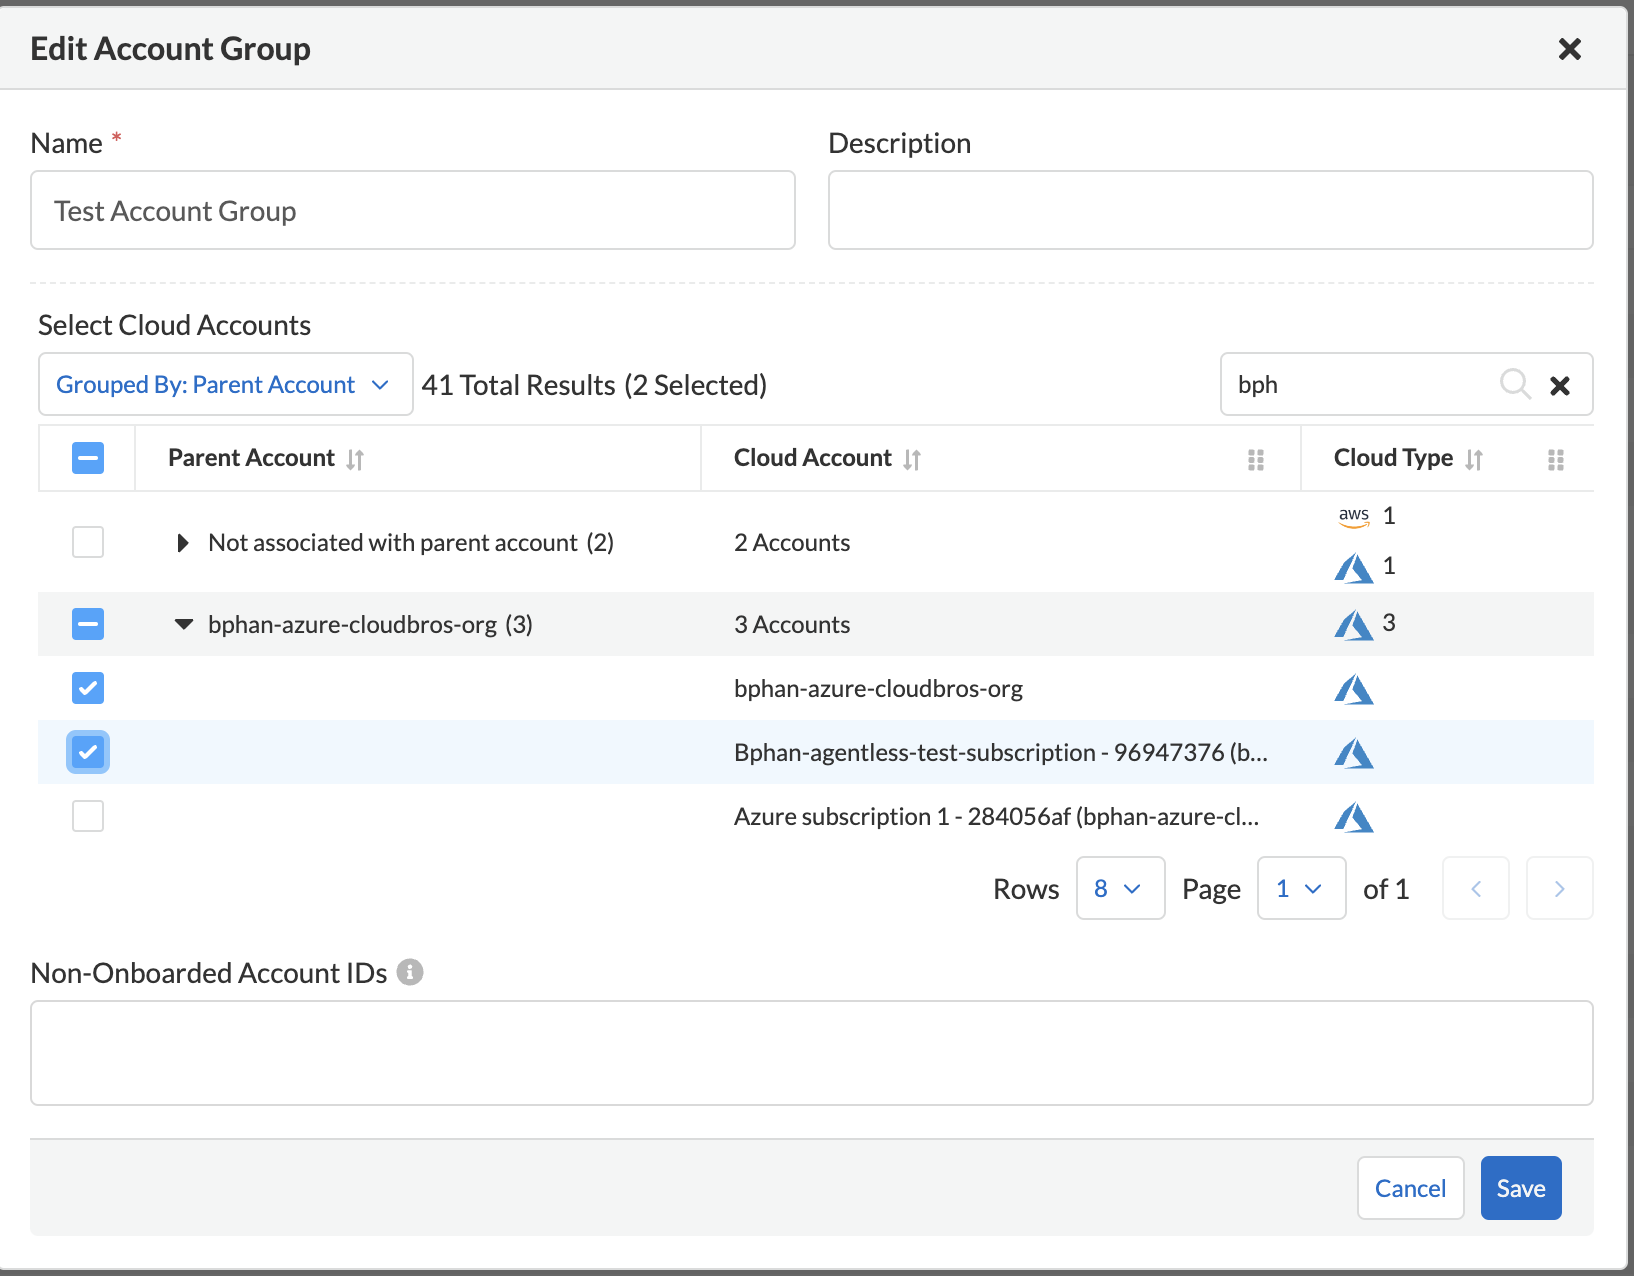
4. Select the parent cloud account, and expand to view the list of associated member or child accounts.
5. Select one or more cloud accounts that you want to add to the account group.
6. **Save** the changes.
## Manage Account Groups
To view and manage account groups:
1. Select **Settings > Account Groups**.
2. To edit the details of an Account Group, click the record, and change any details.
The () icon indicates account groups that are automatically created and therefore cannot be edited. These account groups are created when onboard a cloud account and enable **Auto Map** to automatically create account groups that match your organizational hierarchy.
3. To clone an Account Group, hover over the account group and click **Clone**.
Cloning an account group is creating a copy of an existing account group. Cloning serves as a quick method of creating a new account group if you choose to change a few details of the source account group.
4. To delete an Account Group, hover over the account group and click **Delete**.
---
# Agent Instructions
This documentation is published with GitBook. GitBook is the documentation platform designed so that both humans and AI agents can read, navigate, and reason over technical content effectively. Learn more at gitbook.com.
## Querying This Documentation
If you need additional information that is not directly available in this page, you can query the documentation by asking a question.
Perform an HTTP GET request on the following URL with the `ask` and `goal` query parameters:
```
GET https://docs.prismacloud.io/content-collections/administration/create-manage-account-groups.md?ask=&goal=
```
`ask` is the immediate question: it should be specific, self-contained, and written in natural language.
`goal` is what the user is ultimately trying to achieve, the reason they need the answer. Sharing it helps GitBook give you a better, more relevant answer. A goal is most helpful when it describes the outcome the user wants rather than restating the question. For example, with `ask=how do I create an API token`, a goal like `automate deployments from our CI pipeline` lets GitBook tailor the answer to that use case.
The response will contain a direct answer to the question and relevant excerpts and sources from the documentation.
Use this mechanism when the answer is not explicitly present in the current page, you need clarification or additional context, or you want to retrieve related documentation sections.