> For the complete documentation index, see [llms.txt](https://docs.prismacloud.io/llms.txt). Markdown versions of documentation pages are available by appending `.md` to page URLs; this page is available as [Markdown](https://docs.prismacloud.io/content-collections/cloud-and-software-inventory/applications-inventory.md).
# Applications Inventory
Once you onboard your cloud accounts, Prisma Cloud automatically initiates a scan to discover assets based on predefined criteria. This process intelligently groups the scanned assets into **Applications**, which are essential constructs within your cloud environment.
The application-centric grouping provides visibility into all your applications and their assets, and understand their relationships across your cloud environment.
By leveraging this application context, you can gain valuable insights into your security landscape. You will be able to investigate alerts, prioritize risk mitigation efforts, and swiftly remediate vulnerabilities based on the business criticality of your applications.
Use the **Applications Inventory** to inspect and review applications with critical alerts and vulnerabilities. This will help you gain deeper insights into the impacted applications.
## Prerequisites
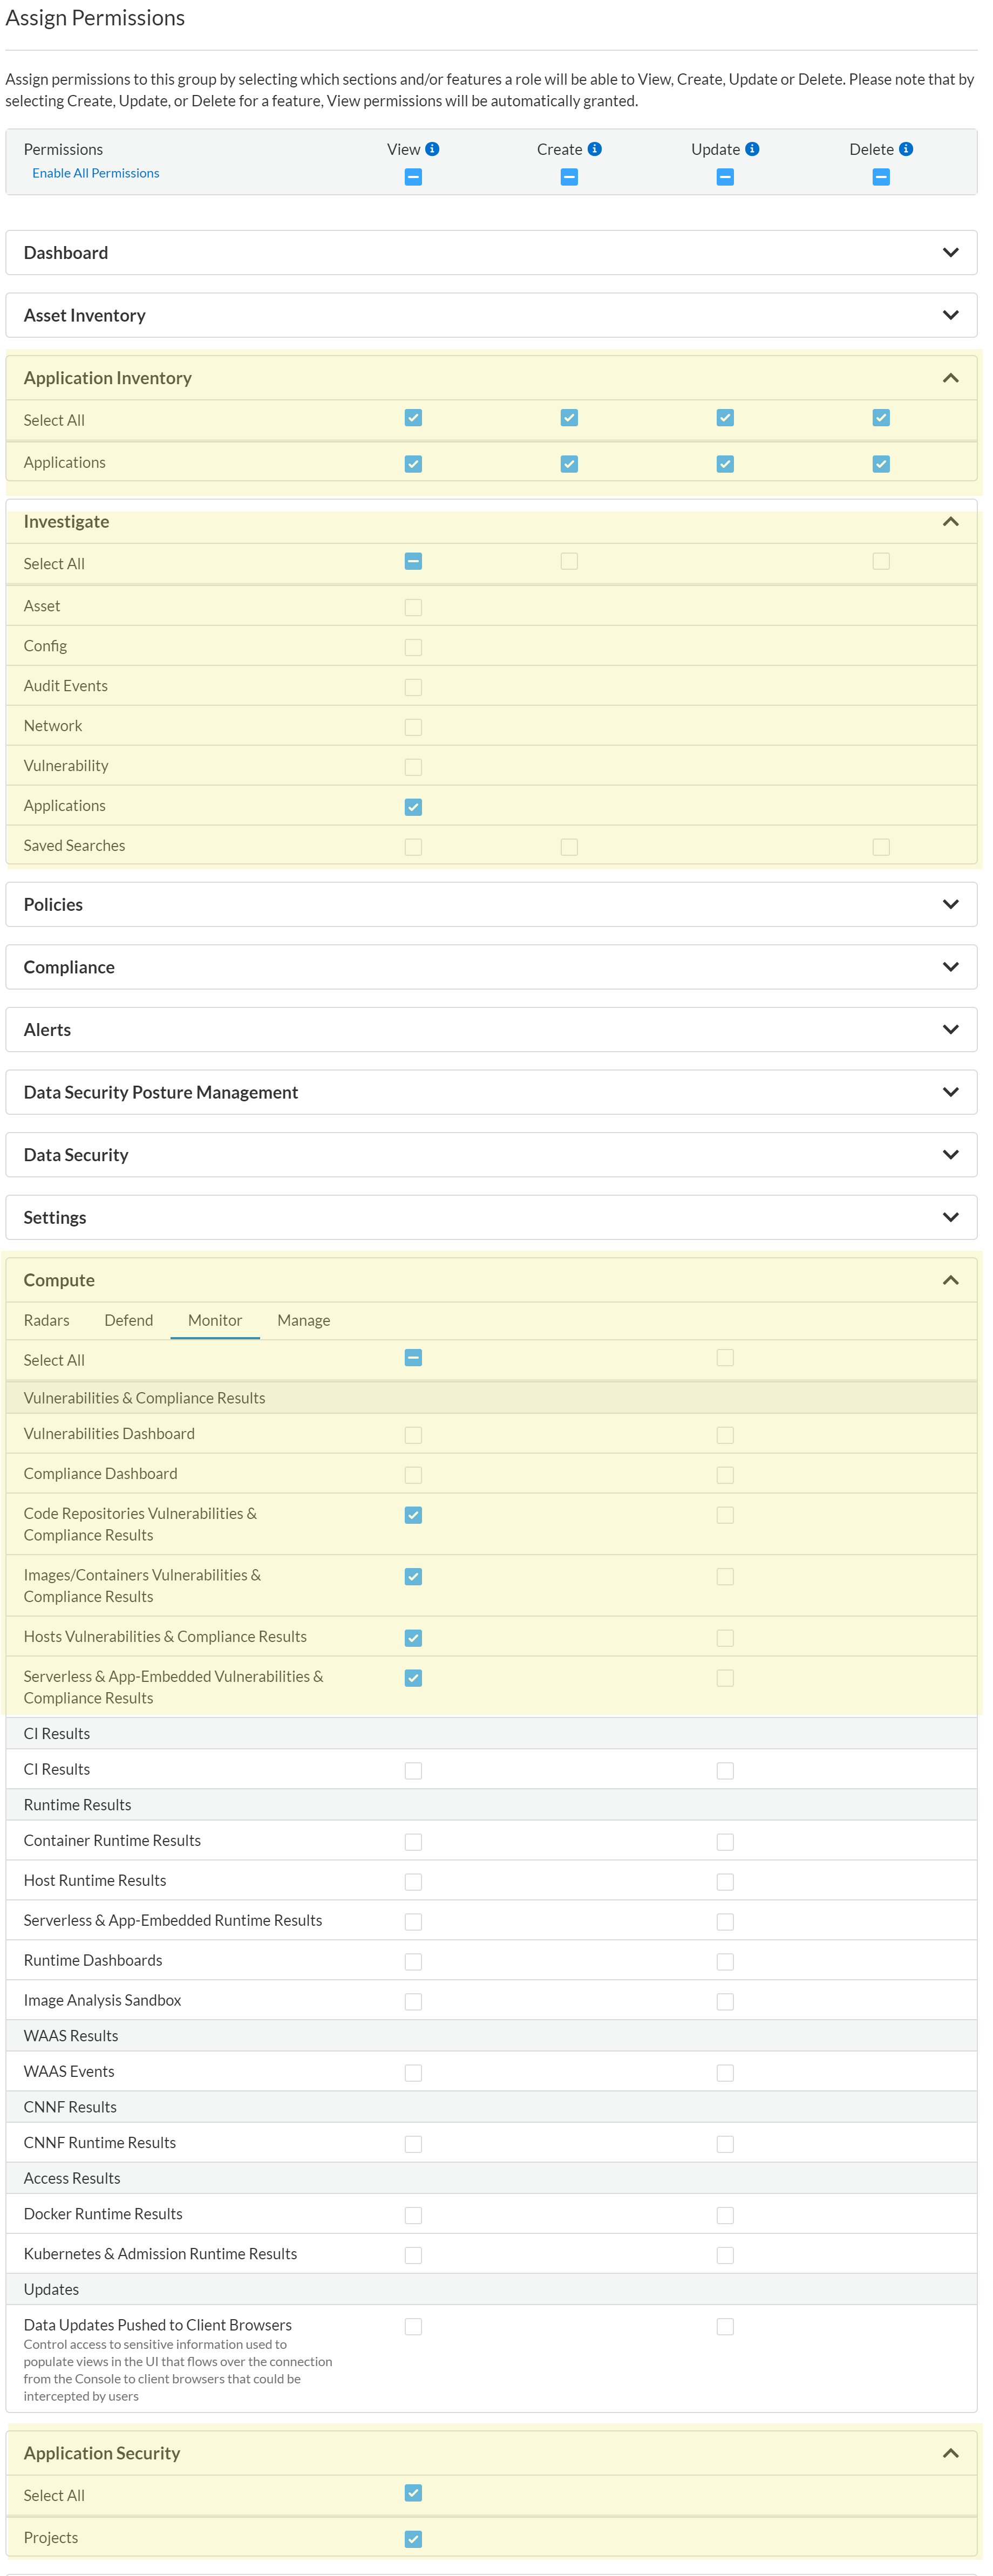
1. Ensure you have all the required permissions enabled in Prisma Cloud to view the applications. To assign permissions for various roles, see the [permissions page](/content-collections/administration/prisma-cloud-admin-permissions.md).
2. If you want to include your code **Repositories** to be scanned in the application, ensure you have enabled [Application Security](/content-collections/application-security/get-started/enable-application-security.md) with the **System Admin** role on Prisma Cloud. Only users with the system admin can view the **Code Assets** and **Code Issues** tabs to review the application.
There are two ways to get started:
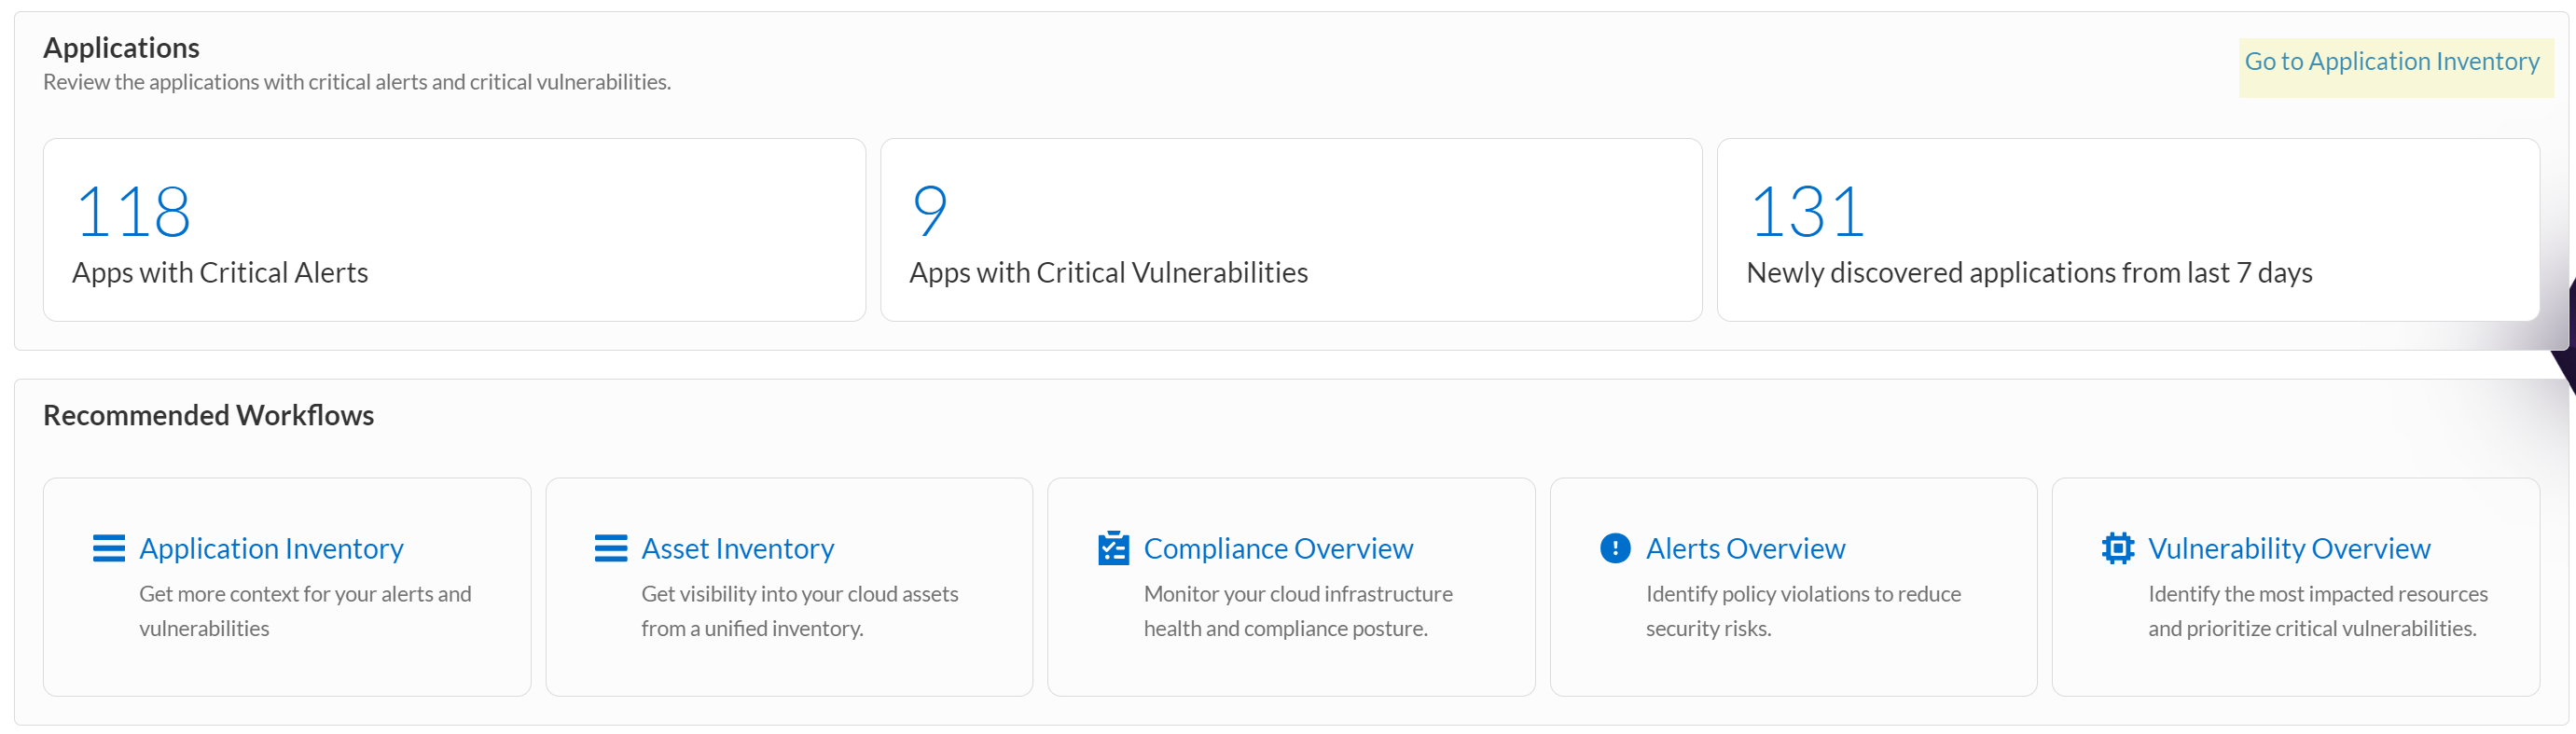
1. Log into Prisma Cloud and on the Home Page, select **Applications > Go to Application Inventory** to access information about your applications with critical alerts and vulnerabilities.
If you do not see any **Applications**, you can define custom [Discovery Criteria](#appdna-discovery-criteria) or [Create Application](#appdna-create-apps) and enable application scanning.
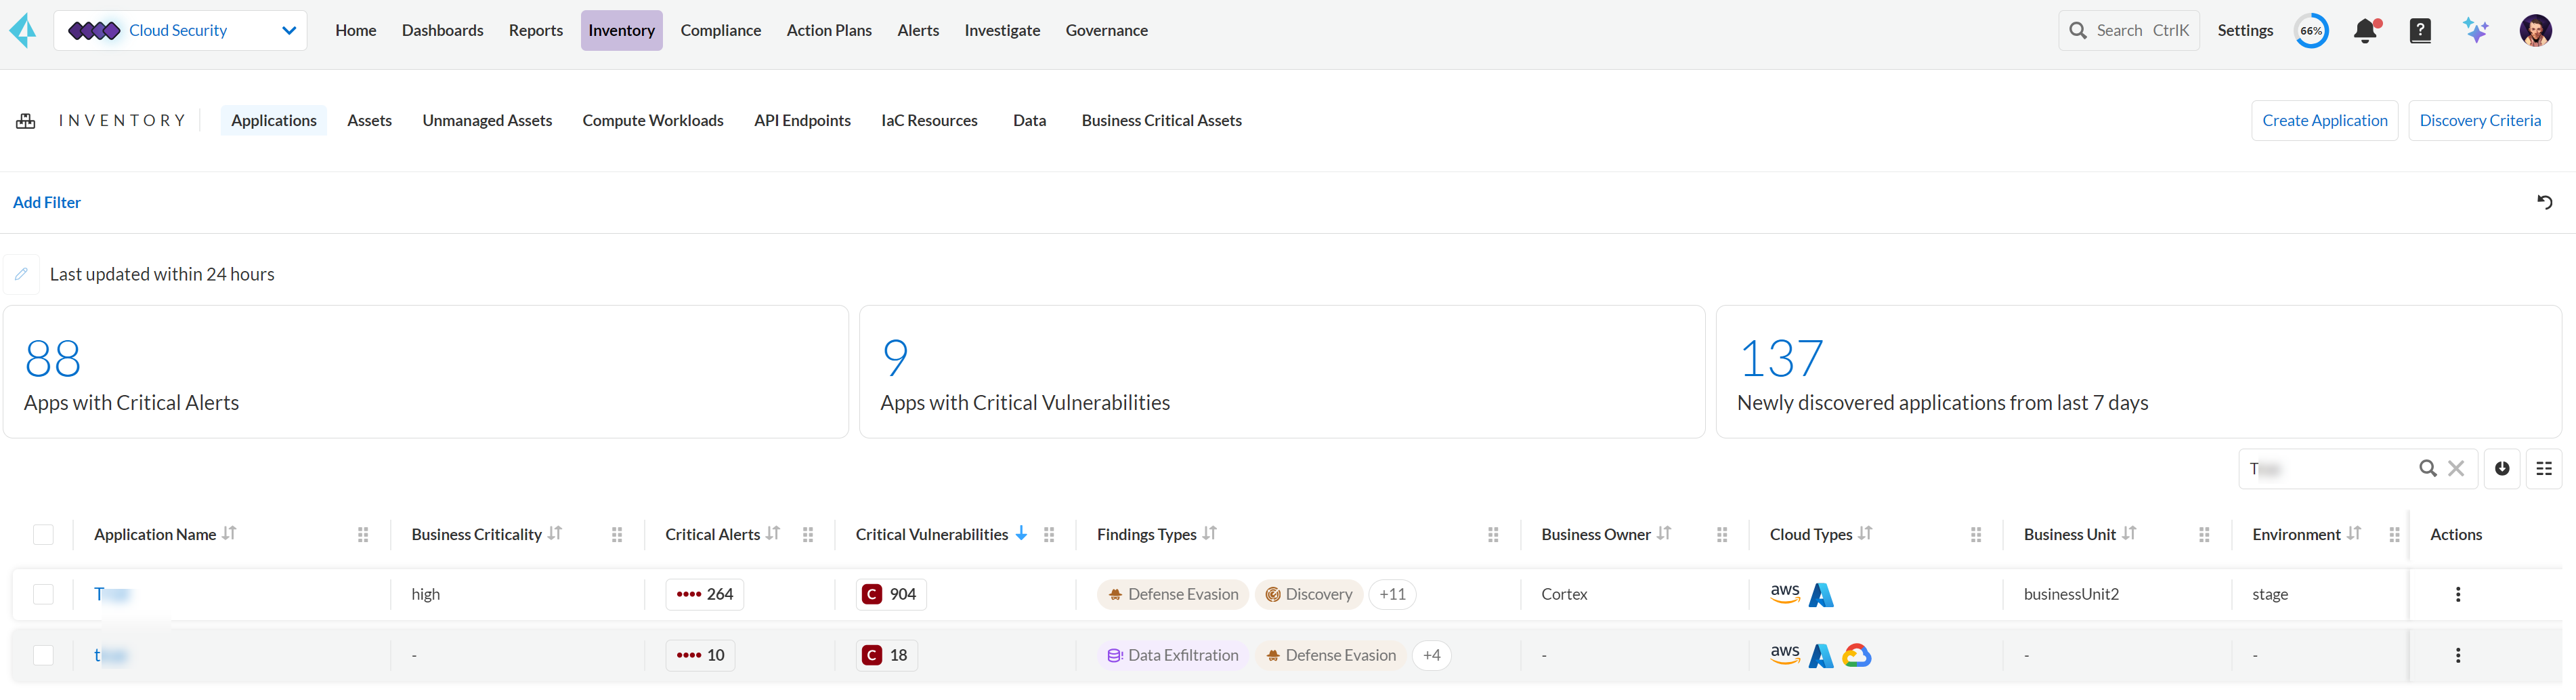
2. Log into Prisma Cloud and select **Inventory > Applications** to access information about your applications.
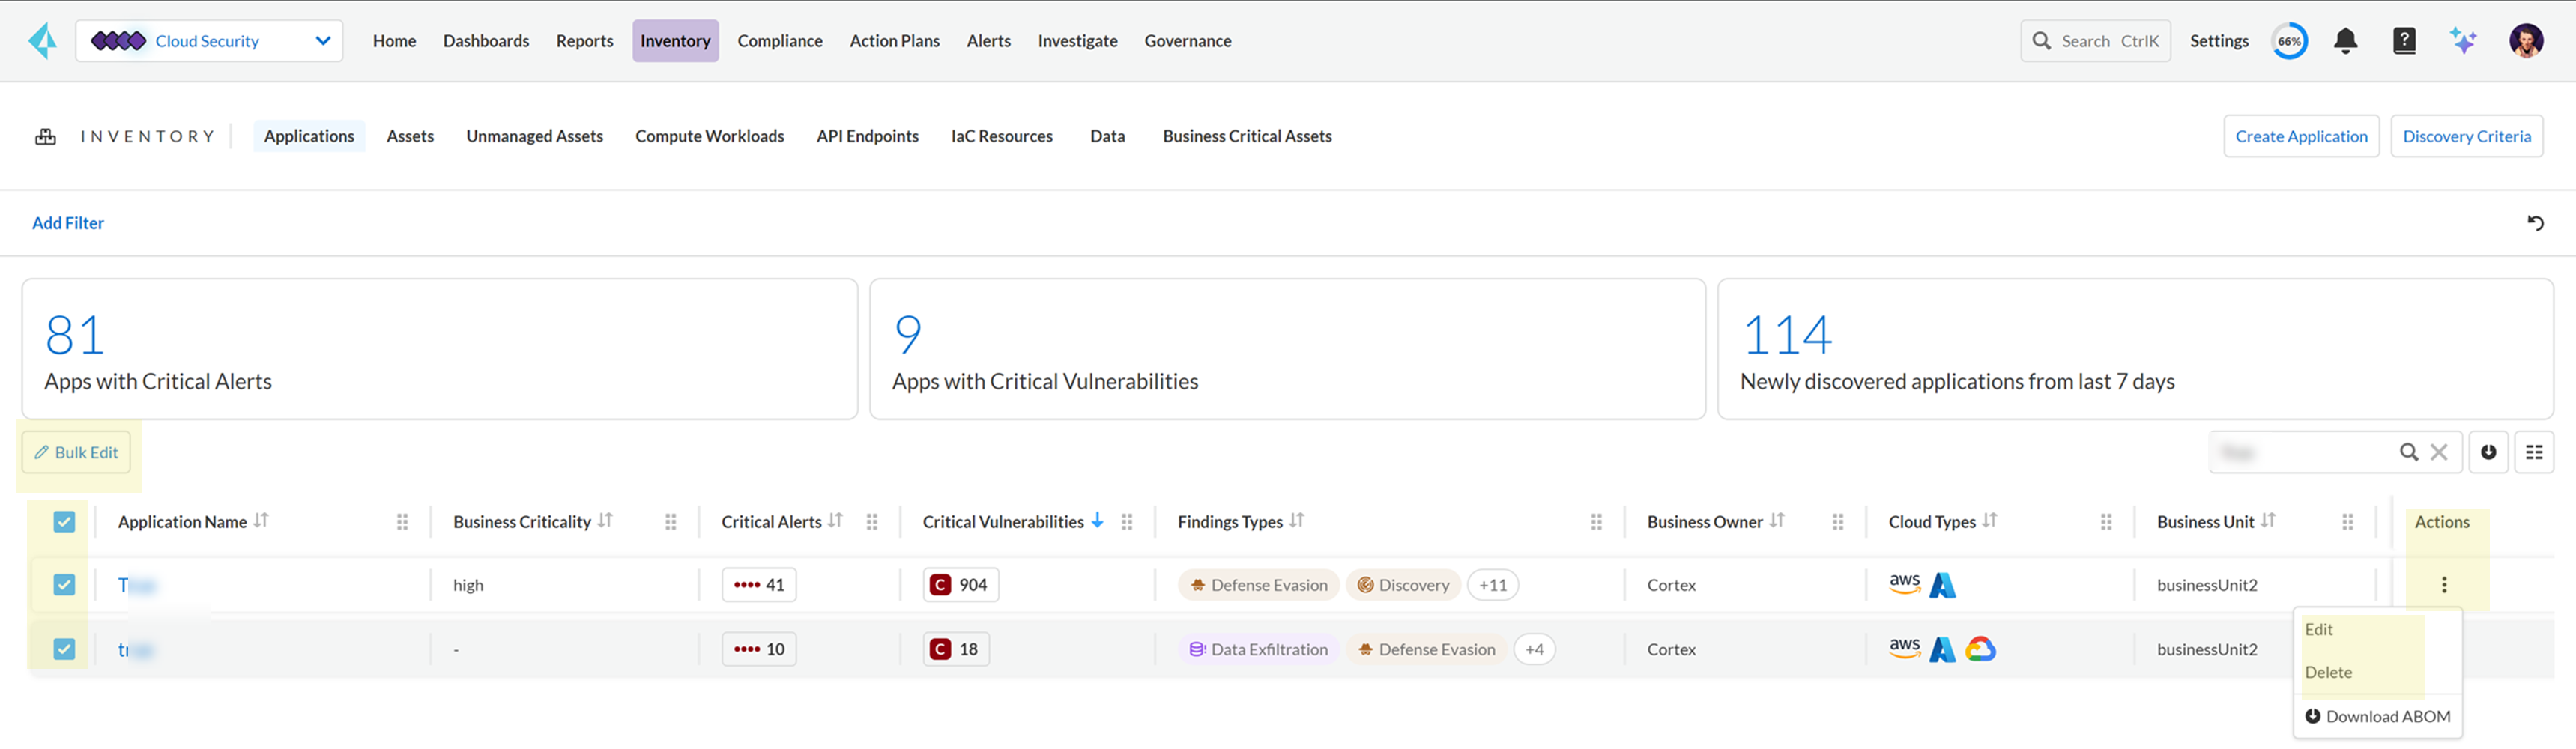
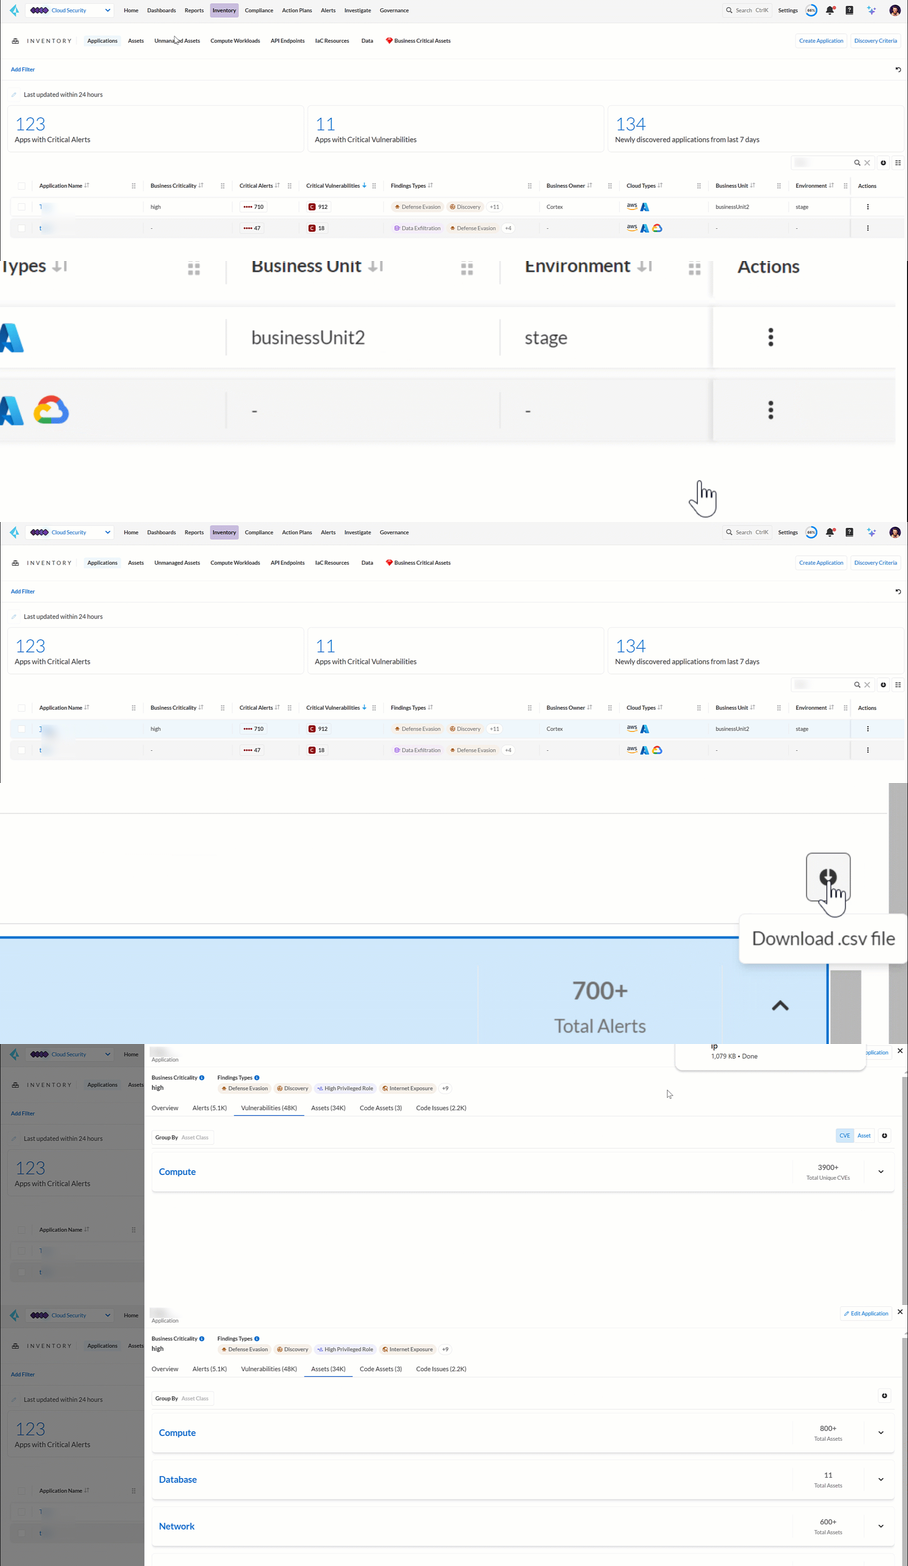
At the top of the page, the application snapshot widget allows you to quickly assess the security status of all your applications at a glance based on the number of **Apps with Critical Alerts**, **Apps with Critical Vulnerabilities**, and **Newly discovered applications from the last 7 days** across your cloud estate.
In the applications inventory table, each row displays the **Application Name** and details about its **Business Criticality**, **Critical Alerts**, **Critical Vulnerabilities**, **Finding Types**, **Business Owner**, **Environment**, and many more.
(tt:\[NOTE]) The applications inventory table is restricted to display only 1000 records due to a system limitation.
## Filter your Applications
To make your search more efficient, use the following filters:
* **Application Name**: Enter the name of the application you want to find.
* **Business Criticality**: Enter the business criticality details to filter applications categorized by their importance.
* **Environment**: Enter the environment details to filter applications available in that specific environment.
* **Business Owner**: Enter the business owner details to filter applications associated with the designated owner.
## Customize Discovery Criteria
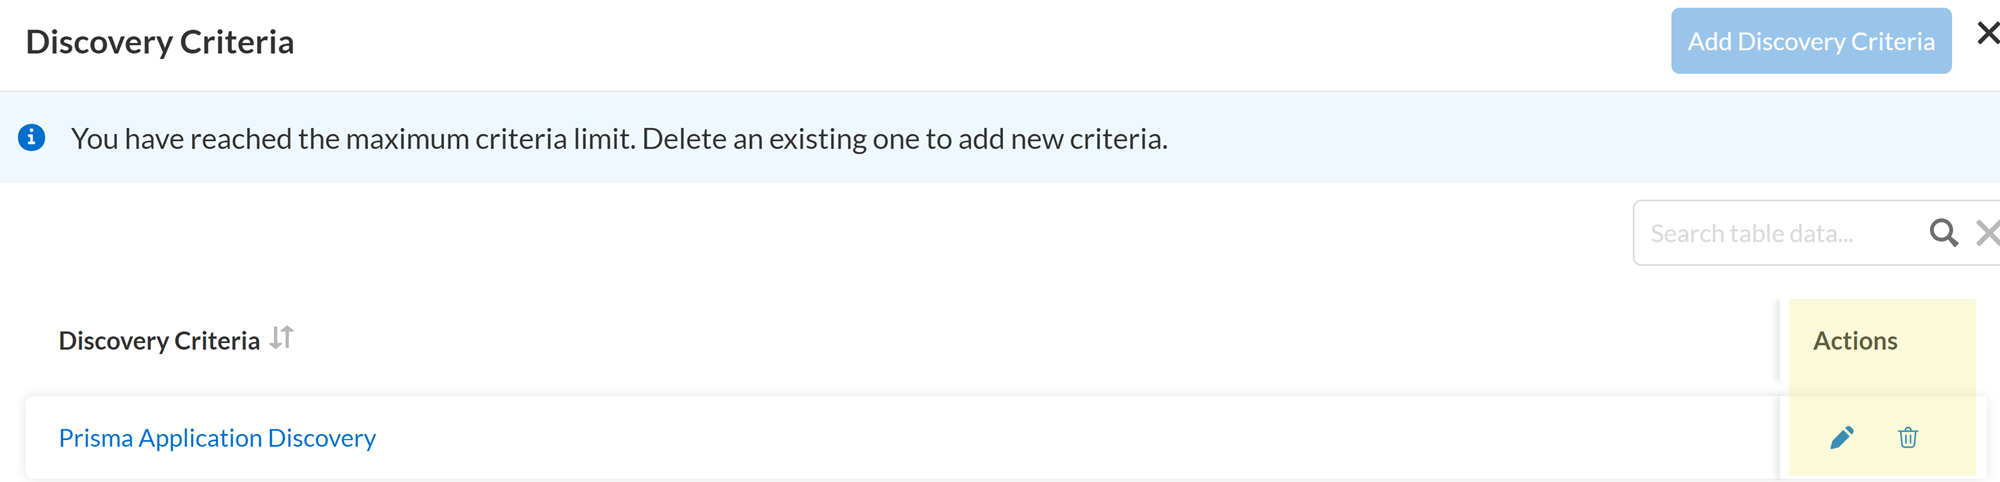
To refine the scanning criteria further to better fit your needs, you can **Edit** the default discovery criteria, **Add** new custom discovery criteria, or **Delete** existing ones.
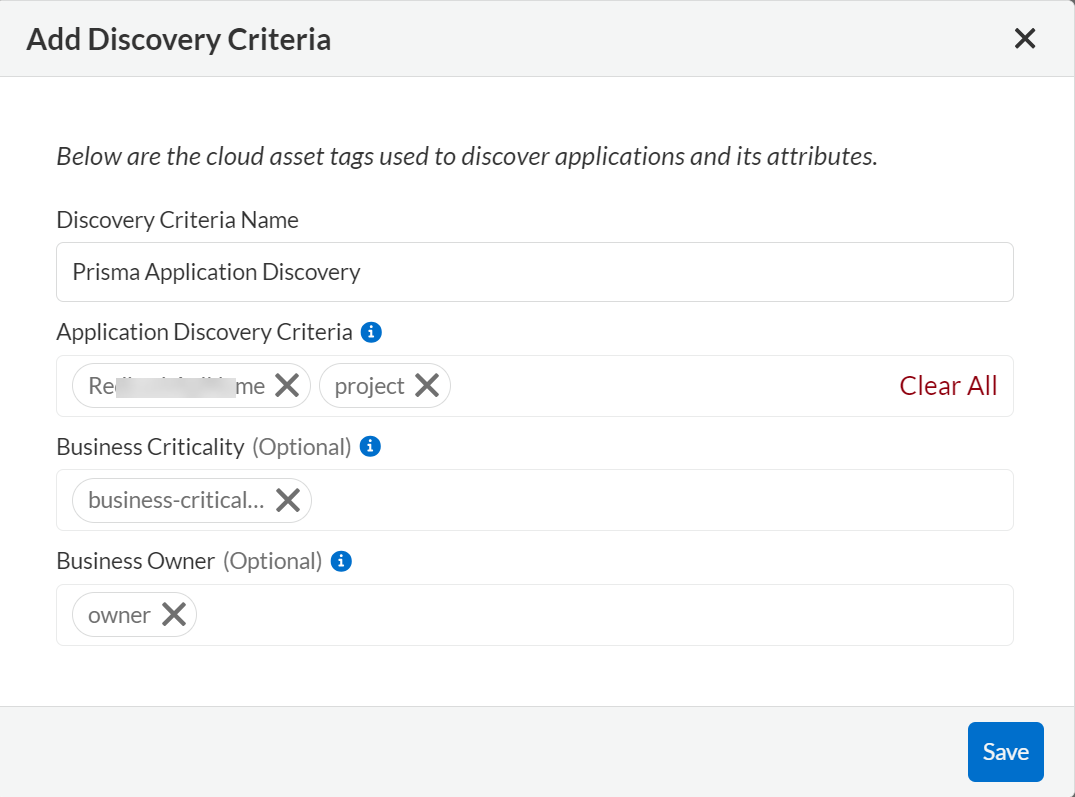
1. Select **Discovery Criteria > Add Discovery Criteria**.
2. Enter a **Discovery Criteria Name**.
3. Select cloud asset tags from the dropdown list to define the **Application Discovery Criteria**.
(tt:\[NOTE])
* Prisma Cloud finds applications using the case-sensitive cloud asset tags you select.
* You can select up to 5 asset tags. These asset tags operate using an **AND** function, meaning all selected tags must match for an application to be included in the scan.
* You can add up to 100 custom discovery criteria to enhance the scan parameters. Once you reach the maximum criteria limit, you must delete an existing one to add new criteria.
4. (tt:\[Optional]) Select an asset tag from the list to associate the **Business Criticality** of that application.
5. (tt:\[Optional]) Select an asset tag from the list to associate with the **Business Owner** of that application.
6. **Save** the criteria.
These custom discovery criteria will be applied during the next scan cycle, ensuring the scan results are tailored to your specific needs.
7. After successfully adding the discovery criteria, you will find it listed on the Discovery Criteria side panel. Use the **Actions** panel to **Edit** or **Delete** the criteria.
## Create Applications
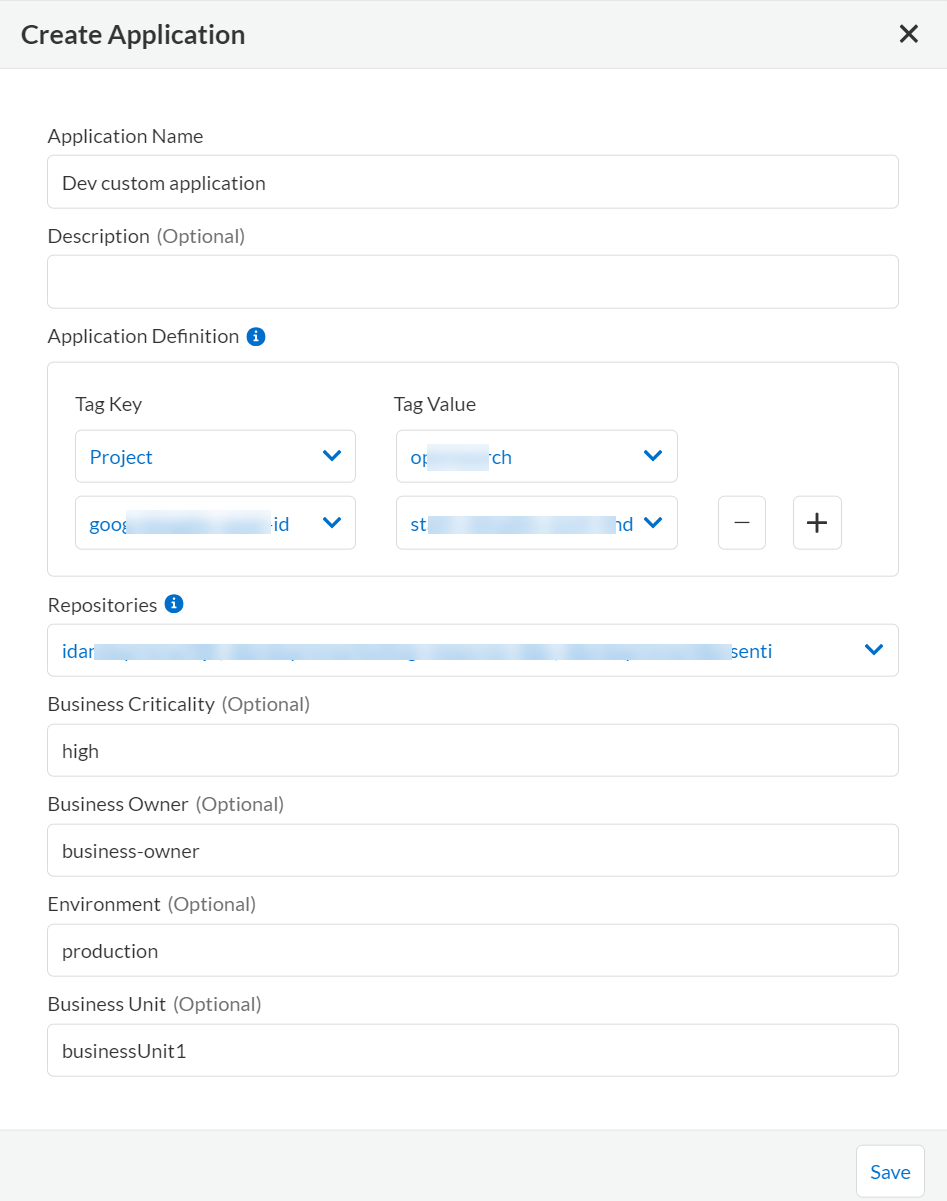
You can manually create a new application that will be included in the next scan. To create a new application, perform the following steps:
1. Click on **Create Application**.
2. Enter an **Application Name**.
3. (tt:\[Optional]) Enter a **Description** of the application.
4. Under **Application Definition**, add the required **Tag Keys** and **Tag Values** by selecting from the list to define the application tags.
(tt:\[NOTE])
* Prisma Cloud finds applications based on the case-sensitive cloud asset tags you select. Once you save the definition tags, you cannot modify them. You must create a new application and specify the tag keys and values again.
* You can select up to 5 tags. These tags operate using an **AND** function, meaning all selected tags must match for an application to be included in the scan.
5. (tt:\[Optional]) Select Repositories.
You can only select repositories if you are subscribed to [Application Security](/content-collections/application-security/get-started/enable-application-security.md) on Prisma Cloud. You can include up to 100 repositories to be associated with the application.
6. (tt:\[Optional]) Enter additional information to define the application, such as:
1. **Business Criticality**.
2. **Business Owner**.
3. **Environment** where the application is deployed.
4. **Business Unit** associated with the application.
7. **Save** the custom application.
The newly created application will be included in the next scan, ensuring that it is monitored for risks and vulnerabilities based on your specified criteria.
8. After successfully creating the application, it is listed on the **Application Inventory** page. Use the Actions panel to **Edit** or **Delete** the application. You can also select multiple applications from the application inventory page and use **Bulk Edit** to edit all selected applications simultaneously.
## Review your Applications
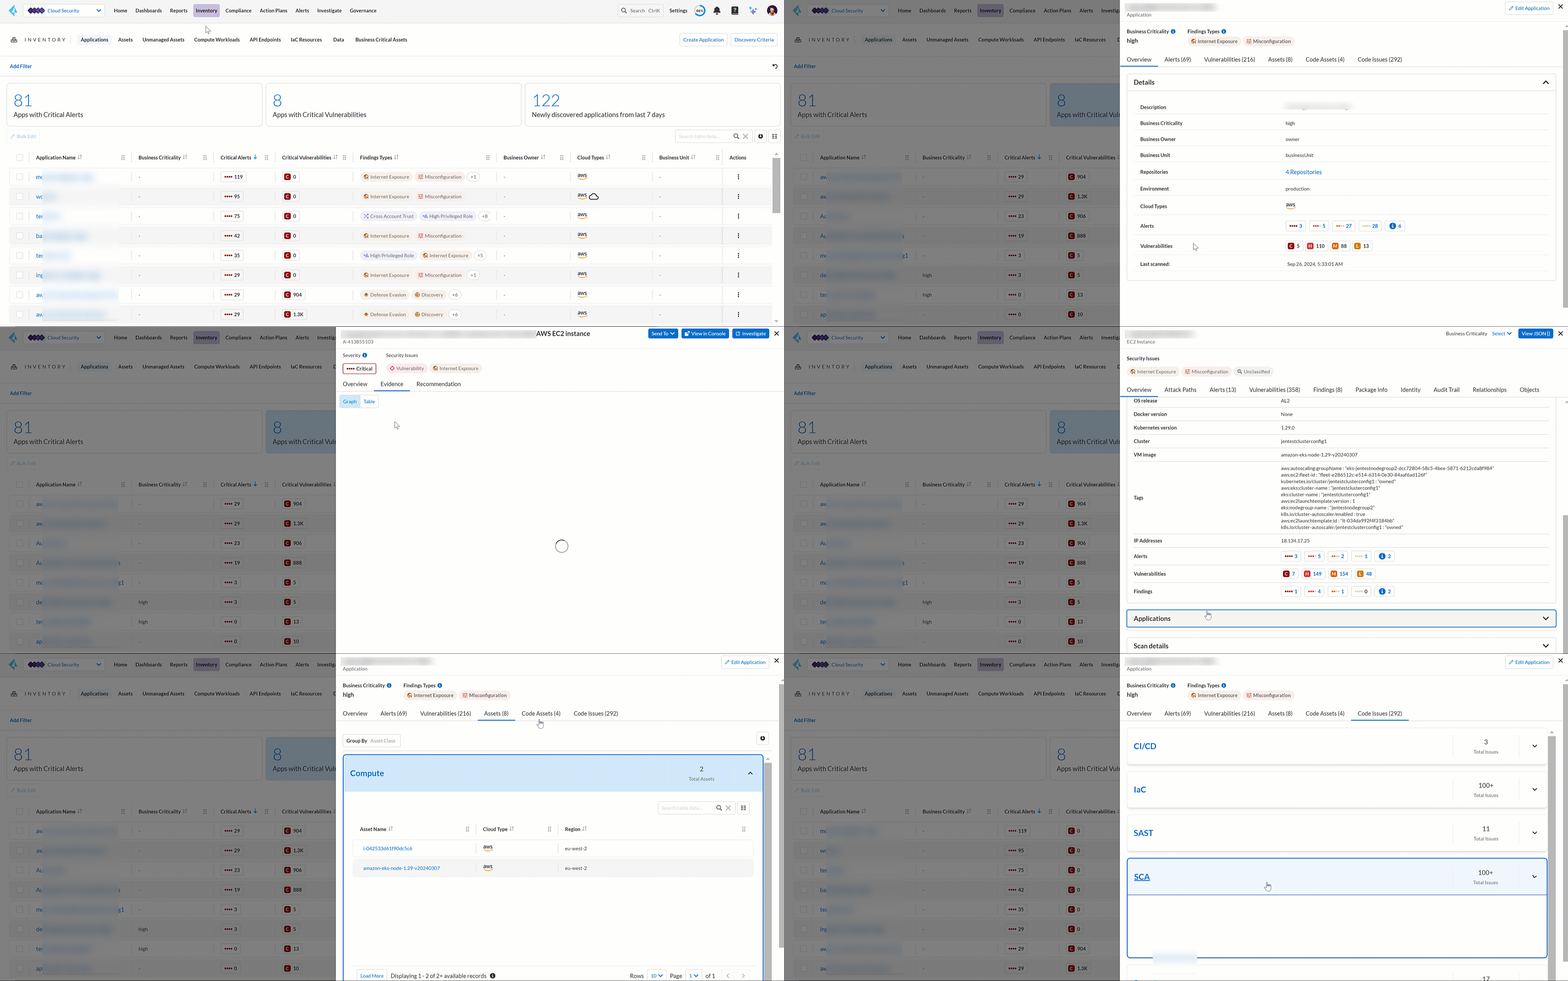
To review and inspect your scanned applications, go to the **Application Name** in the inventory table and select the link in each row to be redirected to the **Applications** view. This view allows you to deep dive into application details and explore the security context uncovered by Prisma Cloud. It provides you with a focused view of the following application details:
* **Header**
* **Application Name** is displayed at the top of the header.
* **Business Criticality** is also displayed at the top of the header.
* **Finding Types** lists the various categories of security issues associated with the assets belonging to the application.
* **Tabs**
* **Overview—** This default tab provides a comprehensive overview of the selected application, including details such as **Description**, **Criteria**, **Business Criticality**, **Business Owner**, **Business Unit**, **Alerts**, **Environments**, **Alerts**, **Vulnerabilities**, **Repositories**, and many more.
* **Alerts—** Displays alerts grouped by severity levels—**Critical**, **High**, **Medium**, **Low**, and **Informational**. You can select a severity level to view the list of impacted assets and its associated alerts. Using this information, you can correlate these alerts from an application perspective, allowing you to understand how the alert affects the application as a whole. You can also **Snooze** or **Dismiss** the alert directly from the side panel.
* **Vulnerabilities—** Displays Common Vulnerabilities and Exposures (CVE) discovered on the application, helping to identify vulnerable asset types within the application. The vulnerabilities are grouped by asset classes such as Compute.
* **Assets—** Displays the assets associated with the application, grouped by **Asset Classes** such as **Compute**, **Database**, **Storage**, **Network**, and more. You can select an asset class to access more granular information about that asset.
* **Code Assets—** Displays the **Repositories** associated with the application, allowing you to track and manage the code repositories included in the scan. To view this tab, make sure that you are subscribed to [Application Security](/content-collections/application-security/get-started/enable-application-security.md) and have the **System Admin** role.
* **Code Issues—** Displays the code issues based on the repositories included in the scan, grouped according to various issues such as **IaC**, **CI/CD**, **SAST**, **SCA**, and **Secrets**. To view this tab, make sure that you are subscribed to [Application Security](/content-collections/application-security/get-started/enable-application-security.md) and have the **System Admin** role.
After reviewing the application, you can take appropriate action to better manage your applications and its assets.
## Download Application Inventory
You can download the complete inventory details for a specific application in **.csv format**. To do this, locate the application in the inventory table, go to the **Actions** panel, and select **Download ABOM** (Application Bill of Materials), which will generate and download a .zip file containing separate .csv files for metadata, alerts, assets, and vulnerabilities related to that application.
Additionally, you can also download **.csv files** directly from the **Alerts**, **Vulnerabilities**, and **Assets** tabs in the **Applications** View side panel. This allows you to extract detailed data such as alert information, vulnerability reports, and asset details, making it easier to conduct further analysis or integrate the data into external systems for operational purposes.
**Next Step**
Use the [Application Query Attributes](/content-collections/search-and-investigate/application-queries/application-query-attributes.md) to search and investigate your applications.
---
# Agent Instructions
This documentation is published with GitBook. GitBook is the documentation platform designed so that both humans and AI agents can read, navigate, and reason over technical content effectively. Learn more at gitbook.com.
## Querying This Documentation
If you need additional information that is not directly available in this page, you can query the documentation by asking a question.
Perform an HTTP GET request on the following URL with the `ask` and `goal` query parameters:
```
GET https://docs.prismacloud.io/content-collections/cloud-and-software-inventory/applications-inventory.md?ask=&goal=
```
`ask` is the immediate question: it should be specific, self-contained, and written in natural language.
`goal` is what the user is ultimately trying to achieve, the reason they need the answer. Sharing it helps GitBook give you a better, more relevant answer. A goal is most helpful when it describes the outcome the user wants rather than restating the question. For example, with `ask=how do I create an API token`, a goal like `automate deployments from our CI pipeline` lets GitBook tailor the answer to that use case.
The response will contain a direct answer to the question and relevant excerpts and sources from the documentation.
Use this mechanism when the answer is not explicitly present in the current page, you need clarification or additional context, or you want to retrieve related documentation sections.