> For the complete documentation index, see [llms.txt](https://docs.prismacloud.io/llms.txt). Markdown versions of documentation pages are available by appending `.md` to page URLs; this page is available as [Markdown](https://docs.prismacloud.io/content-collections/connect/connect-cloud-accounts/onboard-aws/onboard-aws-org.md).
# Onboard Your AWS Organization
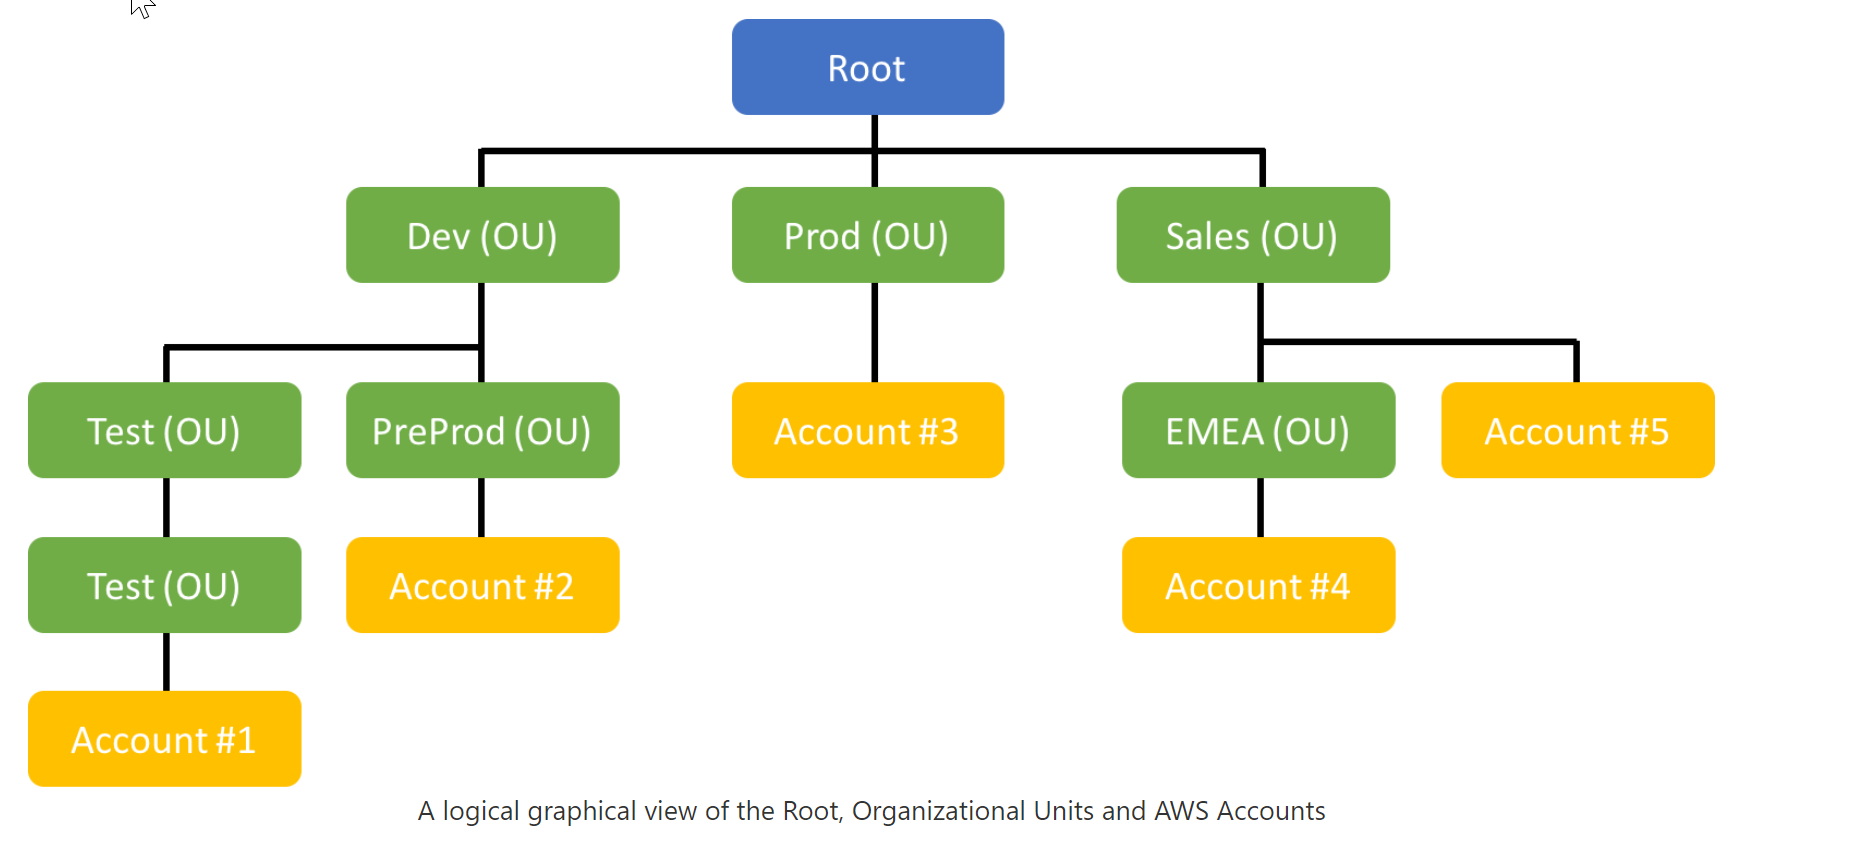
If you have consolidated access to AWS services and assets across your company within AWS Organizations, you can onboard the AWS *master account* on Prisma Cloud. When you enable AWS organizations on the AWS management console and add the root or *master* account that has the role of a payer account which is responsible for paying all charges accrued by the accounts in its organization, all member accounts within the hierarchy are added in one streamlined operation on Prisma Cloud.
To onboard your AWS Organization on Prisma Cloud, you must first deploy a CFT in the master account to create the Prisma Cloud role to protect your assets deployed on the master account. Then, you use CloudFormation StackSets to automate the creation of the Prisma Cloud role, which authorizes Prisma Cloud to access each member account. When you then add a new member account to your AWS organization, it is onboarded automatically on Prisma Cloud within a few (up to six) hours.
* If you want to exclude one or more Organizational Units (OUs) and all the member accounts it includes, you can manually disable individual member accounts on Prisma Cloud after they are onboarded. Alternatively, to onboard a subset of accounts, you can exclude the OUs when deploying the StackSet so that the Prisma Cloud role is only created in the OUs for which you want to onboard accounts.
* If you had previously onboarded your AWS master account as a standalone or individual account, you must re-add the account as an organization. All your existing data on assets monitored, alerts generated, or account groups created are left unchanged.
After you onboard your account as an AWS organization, you cannot roll back. To add the account as a standalone or individual account, you must delete the organization on Prisma Cloud and use the instructions to [Onboard Your AWS Account](/content-collections/connect/connect-cloud-accounts/onboard-aws/onboard-aws-account.md).
* If you had previously onboarded an AWS account that is a member of the AWS organization that you now add on Prisma Cloud, all your existing data on assets monitored, alerts generated, or account groups created are left unchanged. On Prisma Cloud, the member account will be logically grouped under the AWS organization. When you delete the AWS organization on Prisma Cloud, you can recover all the existing data related to these accounts if you re-onboarded within 24 hours. After 24 hours, the data is deleted from Prisma Cloud.
1. From **Settings > Providers**, select **Connect Provider > Cloud Account**.
2. Select **Amazon Web Services** as the cloud account you want to onboard and **Get Started**.
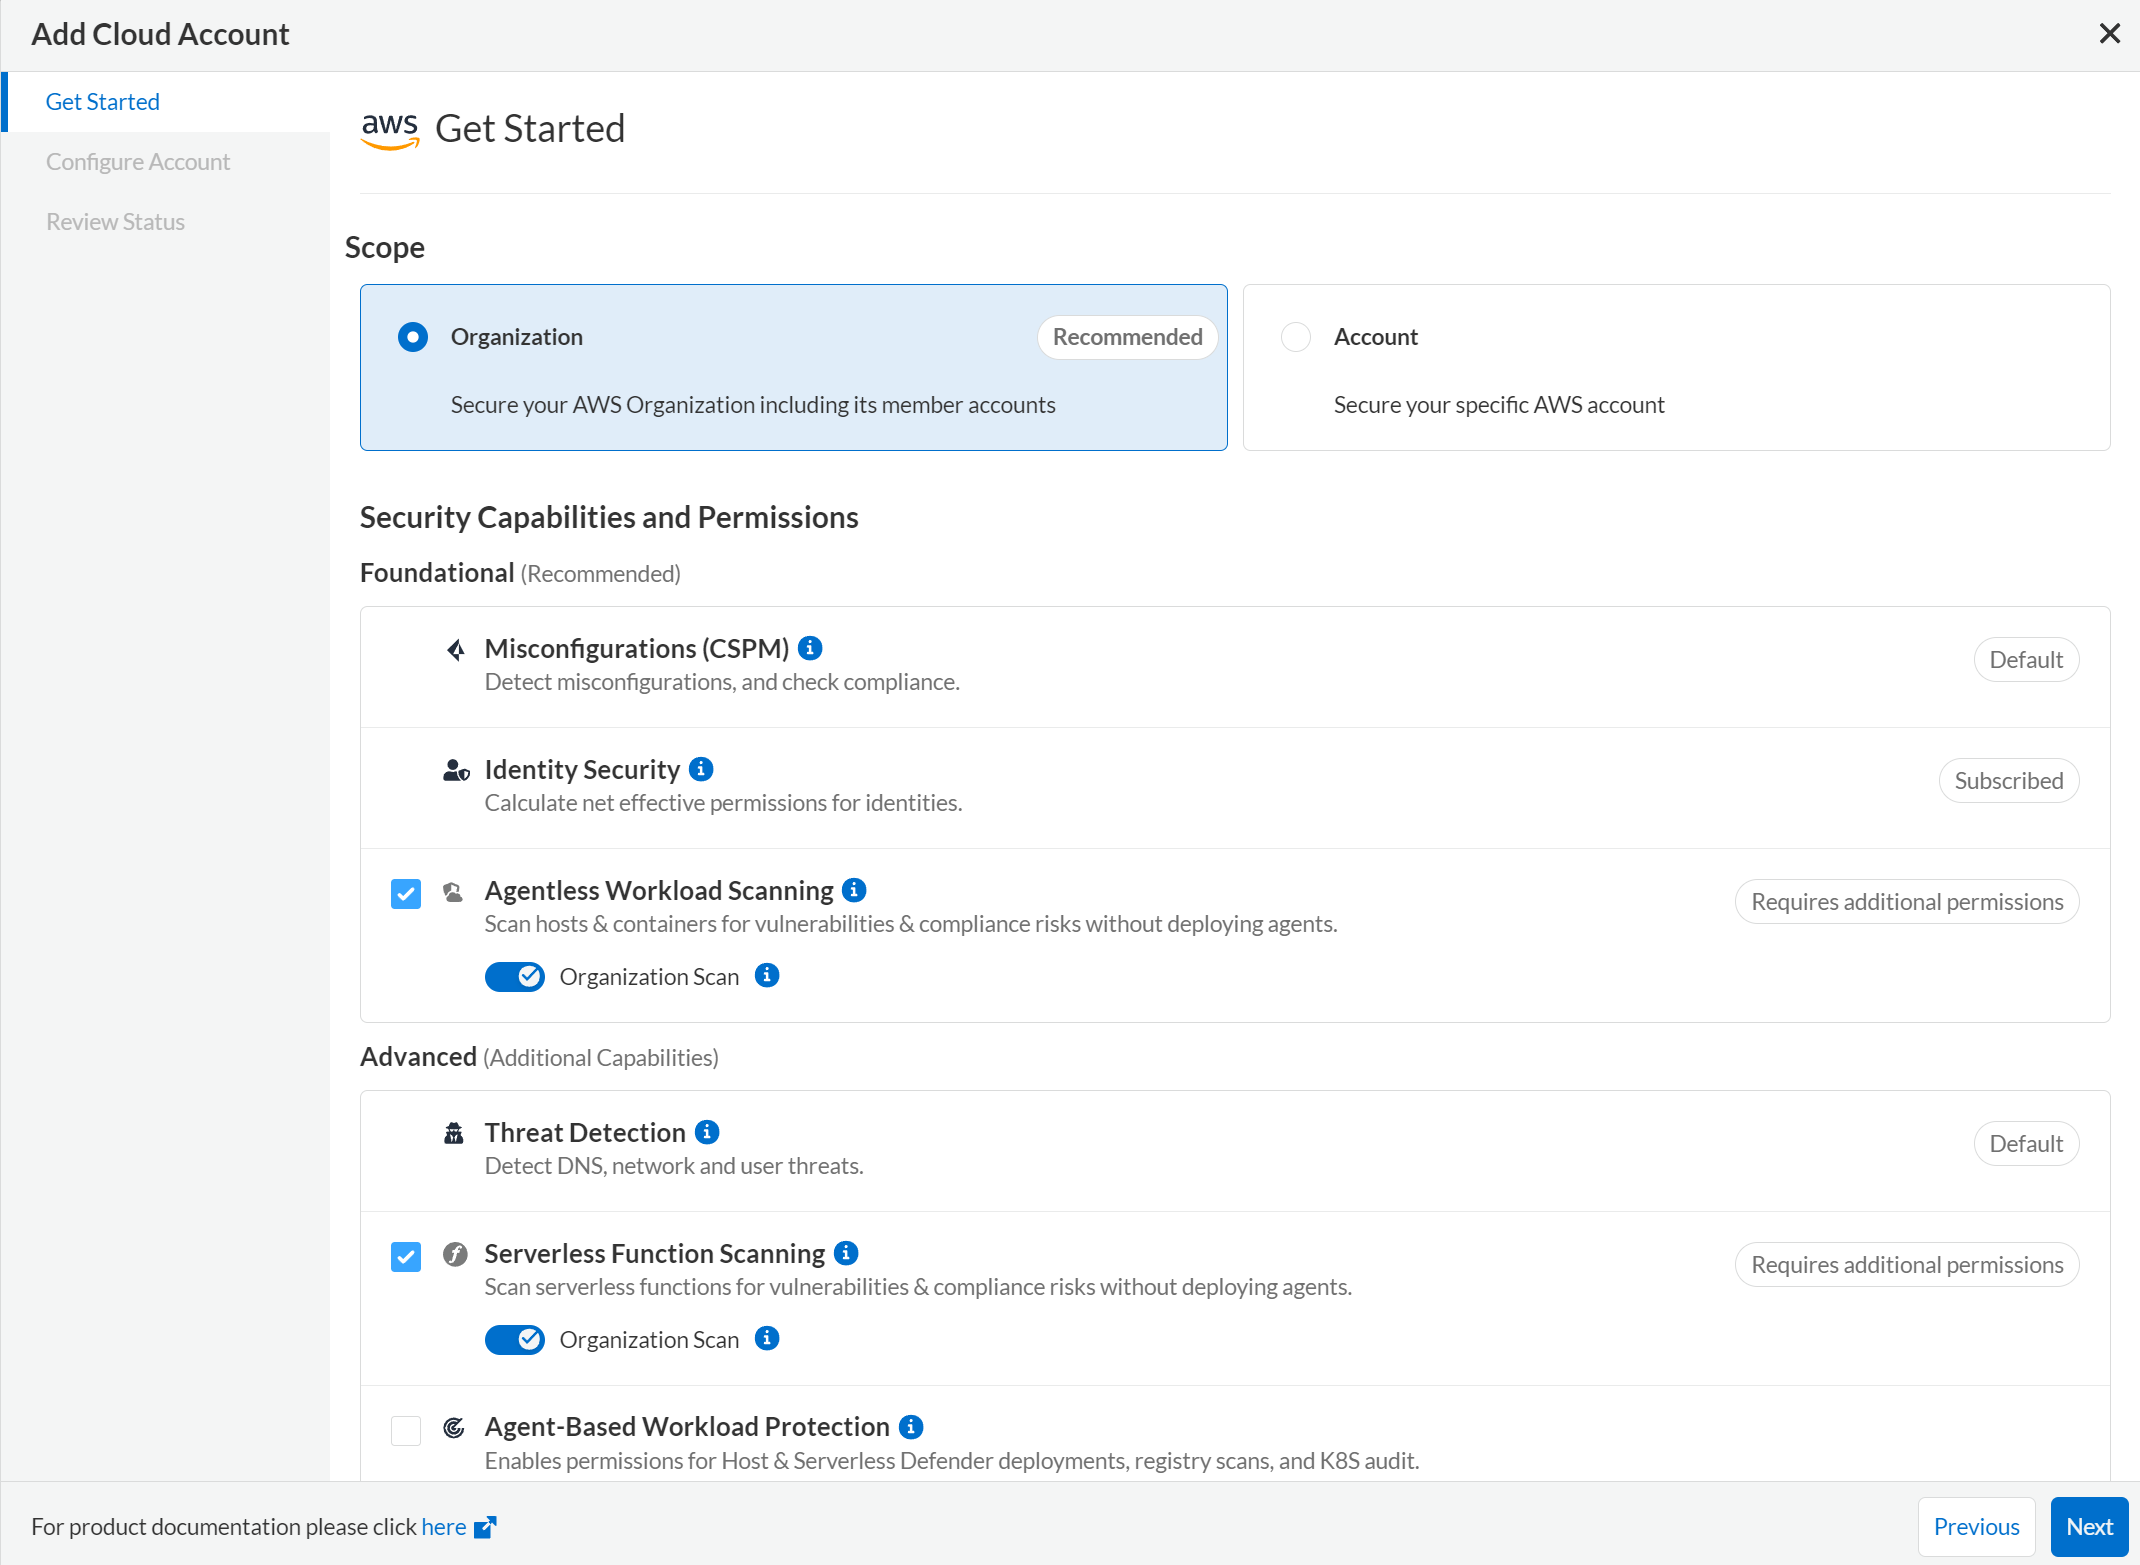
1. Select **Organization** under **Scope** for better security coverage.
2. Select the **Security Capabilities and Permissions** that you want to enable for the AWS organization.
The capabilities are grouped in to **Foundational** and **Advanced**. Based on your selection, Prisma Cloud dynamically generates a CFT that includes the associated permissions for the Prisma Cloud role.
* Use the **Foundational** (recommended) capabilities during the start of your organization’s cloud adoption journey to effectively manage assets in the cloud and on-premises.
The **Foundational** capabilities are enabled, by default:
* **Misconfigurations** grants the permissions required to scan cloud assets and ingest metadata.
* **Identity Security** grants the permissions required to calculate net effective permissions for identities and manage access.
* Enable and add permissions for [Agentless Workload Scanning](https://github.com/PaloAltoNetworks/pc-docs-md/tree/main/enterprise-edition/content-collections/runtime-security/agentless-scanning/agentless-scanning.md) (selected by default) to scan hosts and containers for vulnerabilities and compliance risks without having to install a defender. If you do not want the Agentless Workload Scanning capability, you can deselect the checkbox. Scans start automatically once you onboard your organization. You can also update the scanning [configuration](https://github.com/PaloAltoNetworks/pc-docs-md/tree/main/enterprise-edition/content-collections/runtime-security/agentless-scanning/configure-accounts/configure-accounts.md) for agentless scans.
* Use the **Advanced** (additional) capabilities to proactively control your cloud operations and identify and remediate issues before they manifest within your runtime environments.
The **Advanced** capabilities that you can choose to enable are:
* **Threat Detection** (enabled by default) grants the permissions required to detect DNS, Network, and Identity threats.
* Enable and add permissions for **Serverless Function Scanning** to scan cloud provider functions such as, AWS Lambda, Azure, and Google functions for [vulnerabilities](/content-collections/runtime-security/vulnerability-management/scan-serverless-functions.md) and [compliance](/content-collections/runtime-security/compliance/visibility/serverless.md). Scans start automatically once you onboard your organization. You can also update the [scanning](https://github.com/PaloAltoNetworks/pc-docs-md/tree/main/enterprise-edition/content-collections/runtime-security/agentless-scanning/configure-accounts/configure-accounts.md) configuration for serverless scans.
* Add permissions for **Agent-Based Workload Protection** to allow for [automated deployment of defenders](/content-collections/runtime-security/install/deploy-defender/defender-types.md) to provide protection to secure cloud [VMs](/content-collections/runtime-security/install/deploy-defender/host/auto-defend-host.md), [containers](https://github.com/PaloAltoNetworks/pc-docs-md/tree/main/enterprise-edition/content-collections/runtime-security/install/deploy-defender/container/container.md), and [Kubernetes orchestrators](https://github.com/PaloAltoNetworks/pc-docs-md/tree/main/enterprise-edition/content-collections/runtime-security/install/deploy-defender/kubernetes/kubernetes.md). Registry scanning, Kubernetes audits, and other features required by defenders are also enabled.
Once you select **Agentless Workload Scanning** and **Serverless Function Scanning**, the **Organization Scan** toggle is available. Toggle it **On** to scan all accounts linked to the organization.
3. Click **Next**.
3. **Configure Account**.
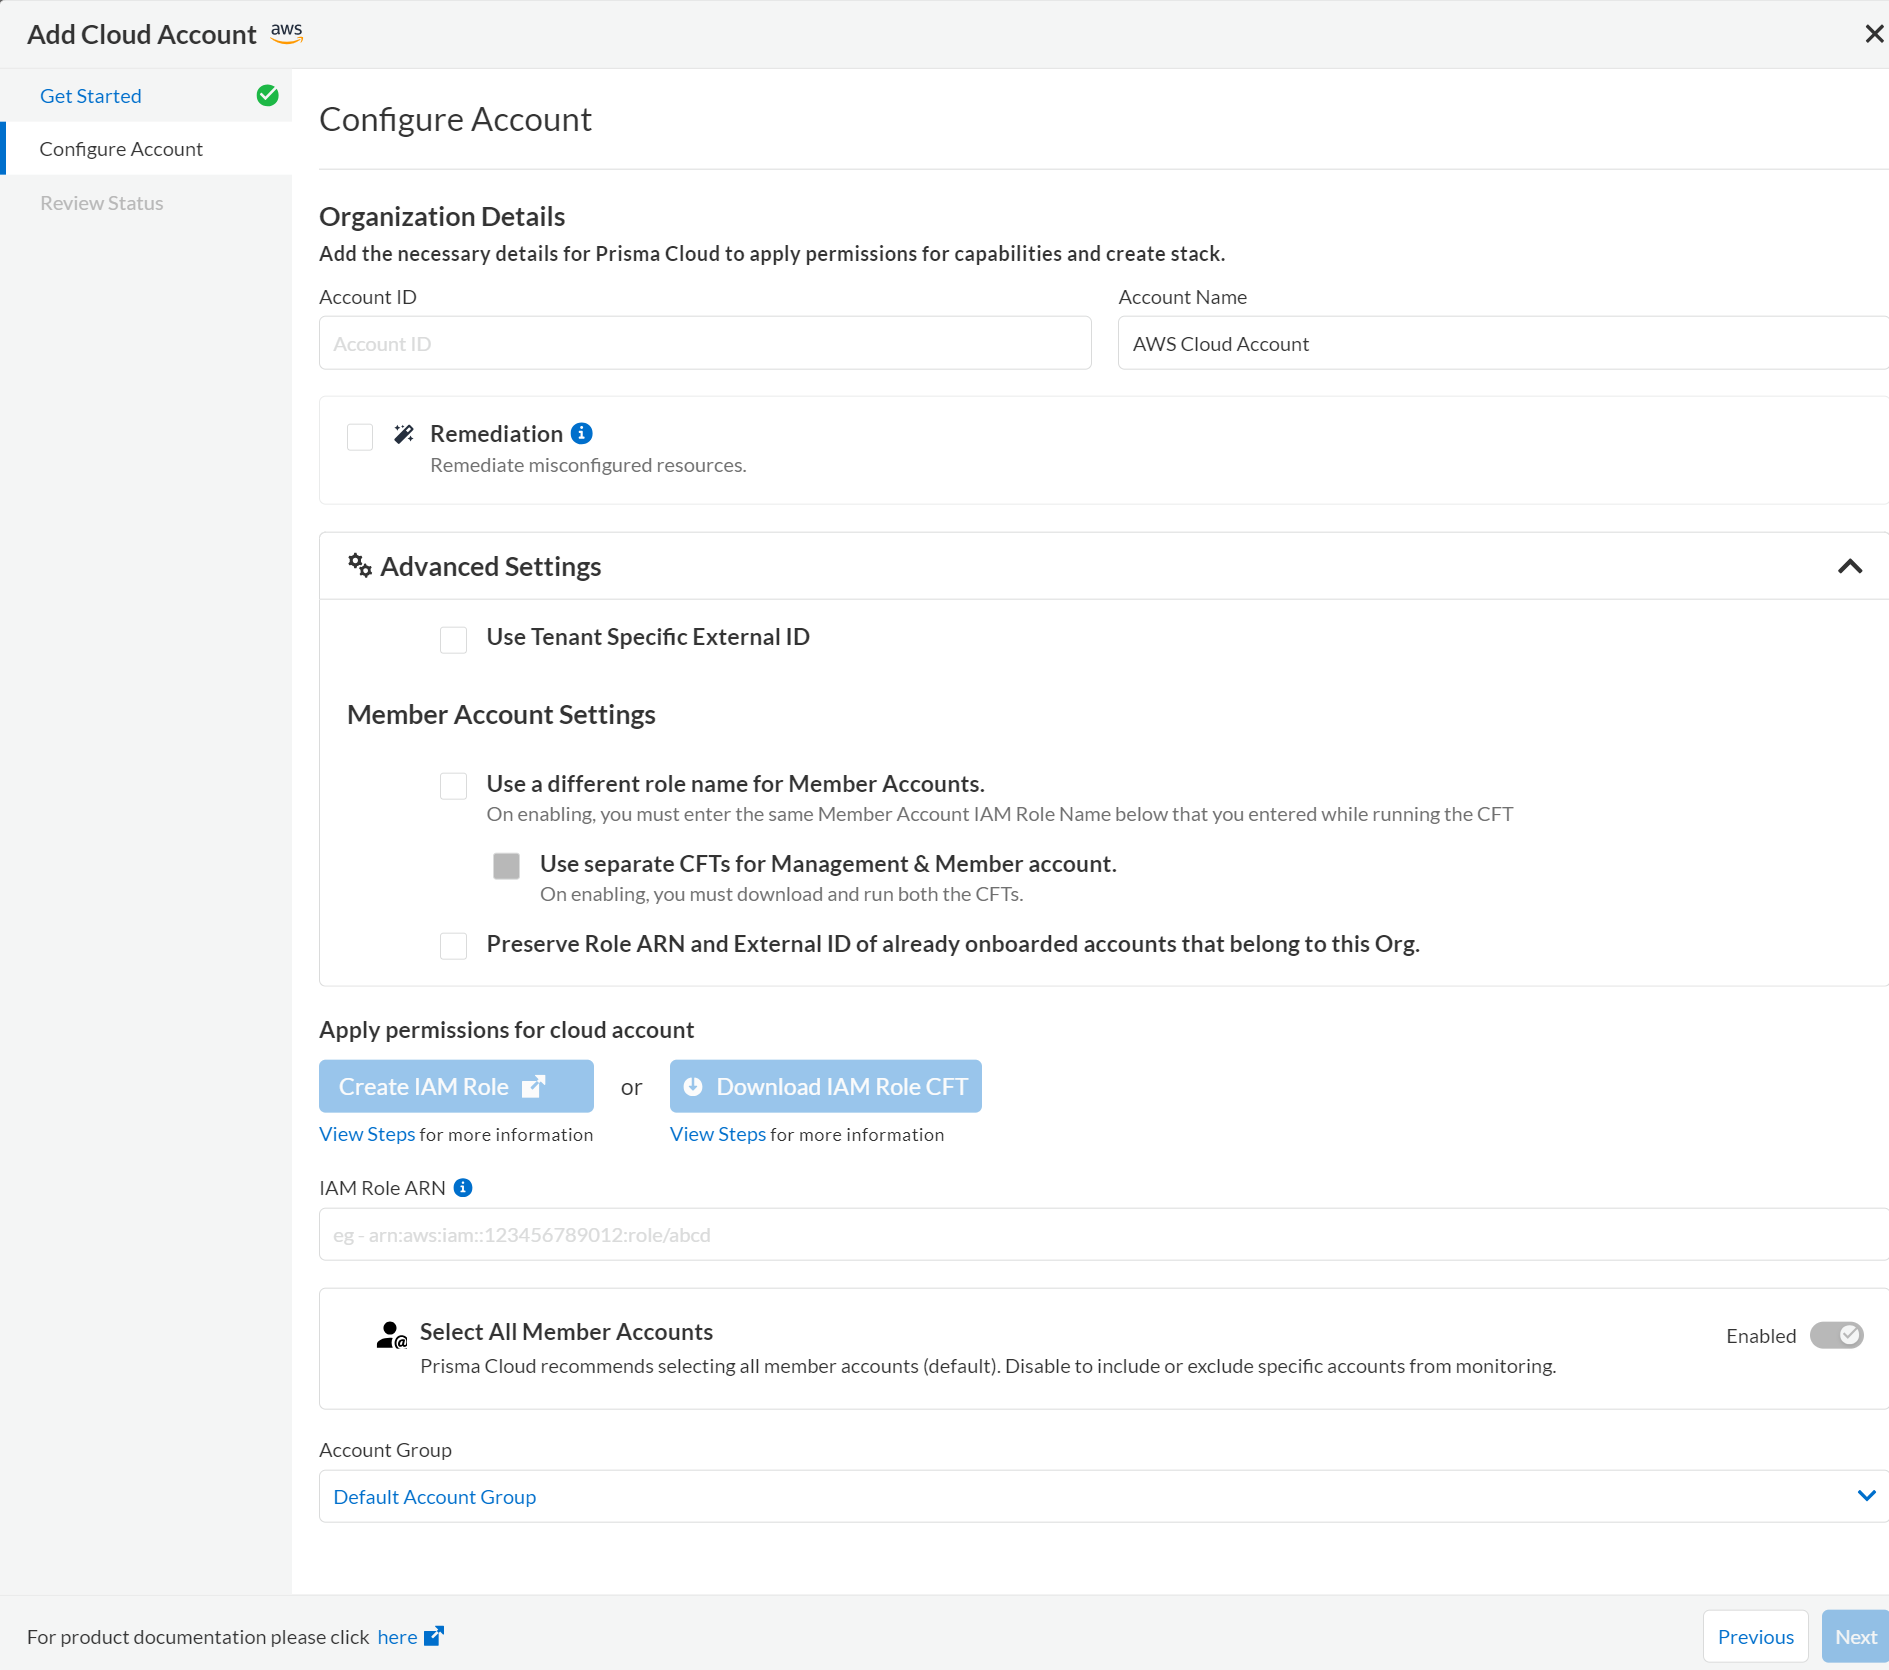
1. Enter **Account ID** (Management Account ID) and a **Cloud Account Name** that uniquely identifies your AWS Organization on Prisma Cloud.
2. Enable **Remediation** (optional) to grant permissions to remediate misconfigured assets. After you enable it, the Prisma Cloud role gets read-write access permissions to your AWS organization to successfully execute remediation commands.
3. Expand **Advanced Settings** to view the **Use Tenant Specific External ID** (optional) capability.
* By default, if you do **not** select the **Use Tenant Specific External ID** checkbox, Prisma Cloud provides a unique auto-generated external ID as part of the CFT when you **Download IAM Role CFT** in Step 4 below.
* If you select the **Use Tenant Specific External ID** checkbox, Prisma Cloud auto-generates a single external ID at the **tenant level**. This allows you to have that **single tenant level external ID** for that particular AWS org account when you download the CFT in Step 4 below.
* Under **Member Account Settings**, to have a custom member role name, select the **Use a different role name for Member Accounts** checkbox.
* To have separate CFTs for Organization management account and Organization members, you must enter a custom role name for members. Select the **Use a different role name for Member Accounts** checkbox and then select **Use separate CFTs for Management & Member account** before you continue with step 4 below.
* If you want to retain the existing role name and external ID for a member account when you move that account from standalone to under an organization, select the **Preserve Role ARN and External ID of already onboarded accounts that belong to this Org** checkbox.
* If you select both **Use Tenant Specific External ID** and **Preserve Role ARN and External ID of already onboarded accounts that belong to this Org**, the member accounts that are moved from standalone to under an organization will have the old external ID but not the tenant level external ID whereas the master account and the previously existing member accounts will have the tenant level external ID. Also, for migrated member accounts, **Preserve Role ARN and External ID of already onboarded accounts that belong to this Org** takes precedence over **Use Tenant Specific External ID**.
4. To set up the Prisma Cloud role on the AWS master account, **Create IAM Role** or **Download IAM Role CFT**. While running the IAM CFT in your AWS console, make sure to enter a custom name for Member role name and enter the same name in the **Member IAM Role Name** field.
Click the corresponding **View Steps** to follow those steps to generate the **IAM Role ARN**. The Prisma Cloud ARN has the External ID and permissions required for enabling authentication between Prisma Cloud and your AWS organization.
Once you **Download IAM Role CFT**, it is valid for 30 days. Even if you close the dialog before completing the onboarding process, you can onboard again within 30 days using the same Account ID and Role ARN created with the previously downloaded CFT.
After you download the CFT from Prisma Cloud and before you upload and create a stack using that CFT, make sure that you enable **Trusted access for AWS Account Management** if you have not previously enabled it:
* Sign in to your AWS Organization management account. You must sign in as an IAM user, assume an IAM role, or sign in as the root user (not recommended) in the organization’s management account.
* Select **AWS Organizations** from the list of **Services**.
* Click **Services** from the left navigation pane.
* Choose **CloudFormation StackSets** from the list of services.
* Select **Enable trusted access**.
* Make sure that you have entered the correct [OrganizationalUnitIds](https://docs.aws.amazon.com/organizations/latest/userguide/orgs_manage_org_details.html#orgs_view_root) from the Organization structure. Provide the organizational root OU ID (prefix r-) to run it for all the accounts under the Organization, else provide a comma-separated list of OU IDs (prefix ou-).
5. Paste the **IAM Role ARN**.
6. Select **Member Accounts**. Prisma Cloud recommends to select **All** member accounts.
7. Select an [Account Group](/content-collections/administration/create-manage-account-groups.md).
During initial onboarding, you must assign all the member cloud accounts with the AWS Organization hierarchy to an account group. Then, [create an Alert Rule for run-time checks](/content-collections/alerts/create-an-alert-rule-cloud-infrastructure.md) to associate with that account group so that alerts are generated when a policy violation occurs.
If you want to selectively assign AWS member accounts to different Account Group on Prisma Cloud, you can [modify the account group to include multiple cloud accounts](/content-collections/administration/create-manage-account-groups.md).
8. Click **Next**.
4. **Review Status**.
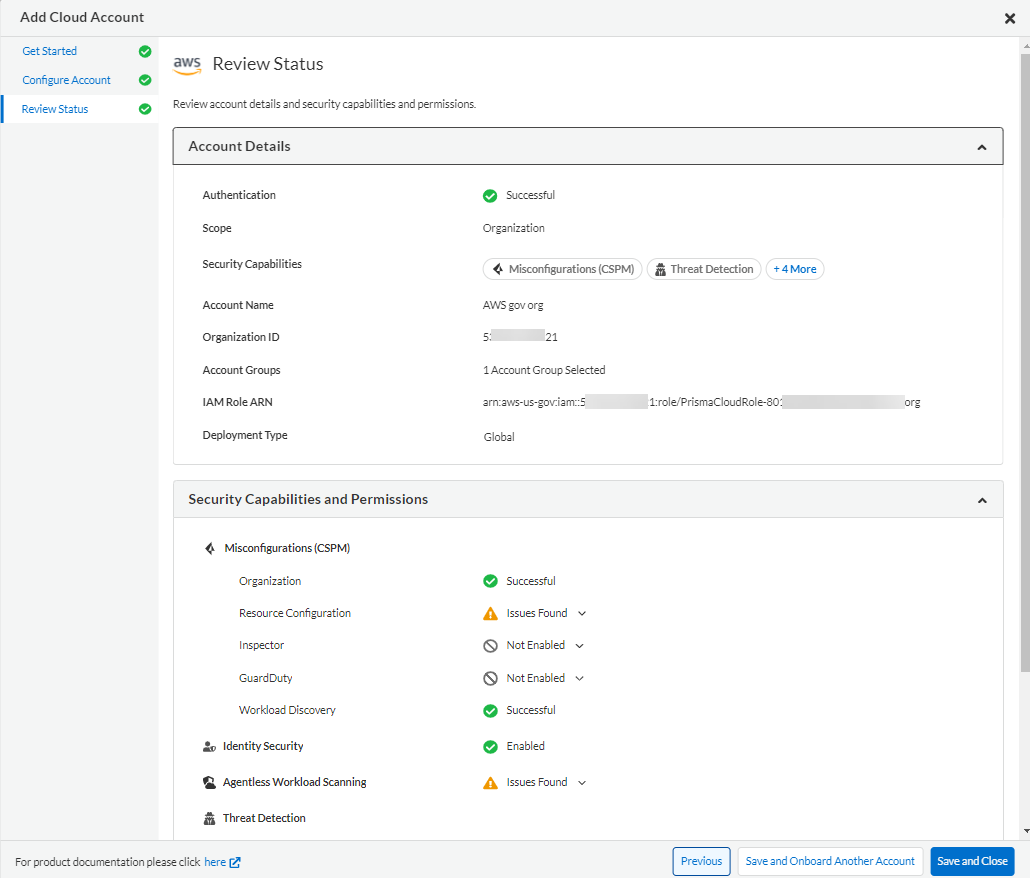
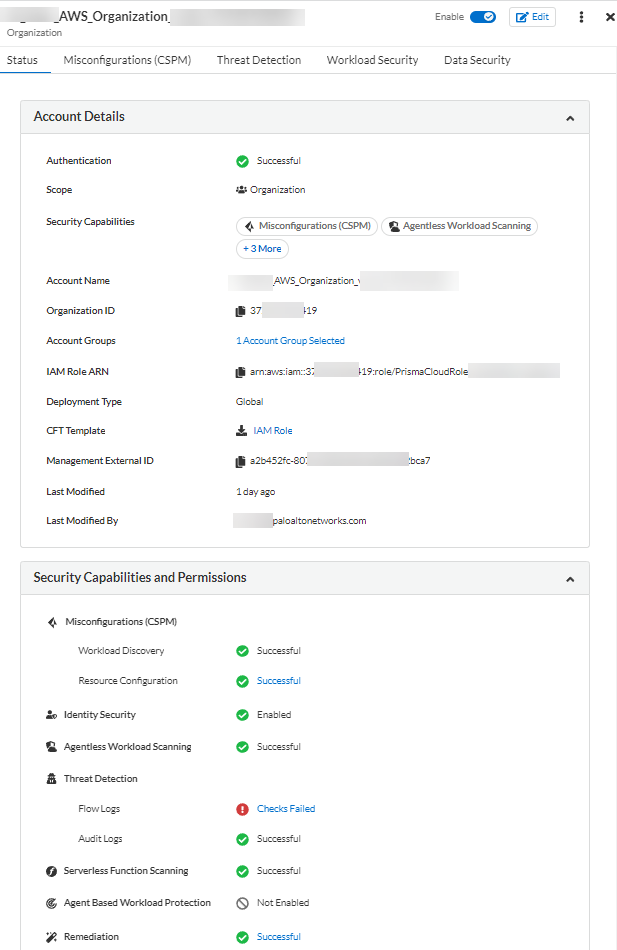
Verify the **Details** of the AWS Organization and the status checks for the **Security Capabilities** you selected while onboarding the organization on Prisma Cloud.
1. Ensure that all the security capabilities you selected display a green **Enabled** icon.
2. For the security capabilities that display a red **Checks Failed** icon, click the corresponding drop-down to view the cause of failure. To resolve the isssue, see [Troubleshoot AWS Onboarding Errors](/content-collections/connect/connect-cloud-accounts/onboard-aws/troubleshoot-aws-errors.md).
3. Click **Save and Close** to complete onboarding or **Save and Onboard Another Account**.
After you sucessfully onboard your AWS account on Prisma Cloud, the account is automatically available in Runtime Security and enabled for **Workload Discovery** and **Serverless function scans**. For **Agentless scans**, you have to complete the configuration to trigger the scan.
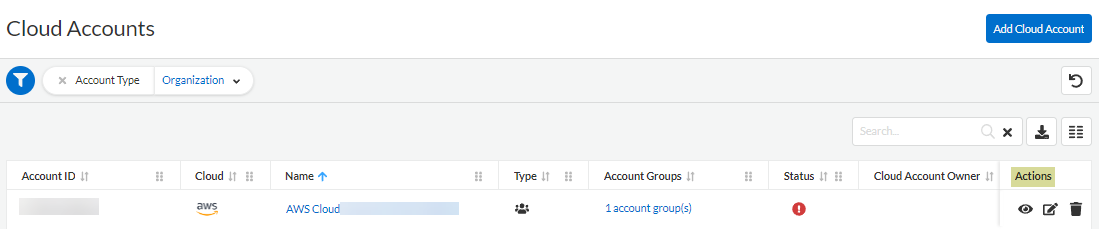
You can view the newly onboarded AWS organization on the **Cloud Accounts** page.
4. If an onboarded account displays a yellow or red status, you can either reload or refresh the cloud account and it’s associated security capabilities. Select **Home > Settings > Providers > Cloud Accounts** and click on the **Status** of the cloud account you want to refresh. Next, select the refresh button on the **Status** window to reload your cloud account.
---
# Agent Instructions
This documentation is published with GitBook. GitBook is the documentation platform designed so that both humans and AI agents can read, navigate, and reason over technical content effectively. Learn more at gitbook.com.
## Querying This Documentation
If you need additional information that is not directly available in this page, you can query the documentation by asking a question.
Perform an HTTP GET request on the following URL with the `ask` and `goal` query parameters:
```
GET https://docs.prismacloud.io/content-collections/connect/connect-cloud-accounts/onboard-aws/onboard-aws-org.md?ask=&goal=
```
`ask` is the immediate question: it should be specific, self-contained, and written in natural language.
`goal` is what the user is ultimately trying to achieve, the reason they need the answer. Sharing it helps GitBook give you a better, more relevant answer. A goal is most helpful when it describes the outcome the user wants rather than restating the question. For example, with `ask=how do I create an API token`, a goal like `automate deployments from our CI pipeline` lets GitBook tailor the answer to that use case.
The response will contain a direct answer to the question and relevant excerpts and sources from the documentation.
Use this mechanism when the answer is not explicitly present in the current page, you need clarification or additional context, or you want to retrieve related documentation sections.