> For the complete documentation index, see [llms.txt](https://docs.prismacloud.io/llms.txt). Markdown versions of documentation pages are available by appending `.md` to page URLs; this page is available as [Markdown](https://docs.prismacloud.io/content-collections/multitenant-management/create-and-manage-tenants.md).
# Create and Manage Tenants
Tenant Groups are logical groupings of multiple managed Prisma Cloud tenants. Administer multiple tenants with ease by creating tenant groups and mapping individual tenants to them. Additionally, Policy groups can be mapped to tenant groups in order to apply the constituent policies of the policy group on to the individual tenants.
Follow the steps below to create a Tenant Group:
1. On the Multitenant Management console, select the **Tenant Groups** tab.
2. Select **Create Tenant Group** and provide a name for the group.
3. Click **Save** to complete tenant group creation.
## Create Tenant
You can also create a managed Prisma Cloud tenant from the Tenant Group dashboard. Follow the steps below to create a Tenant:
When creating a tenant, user details should be those of the end customer who will be the **owner** of the tenant. The email address you entered will be used to send a Welcome email to the user that includes account creation instructions and use of the Multitenant Management console.
1. Click **Tenant Groups** tab.
2. Select **Create Tenant**.
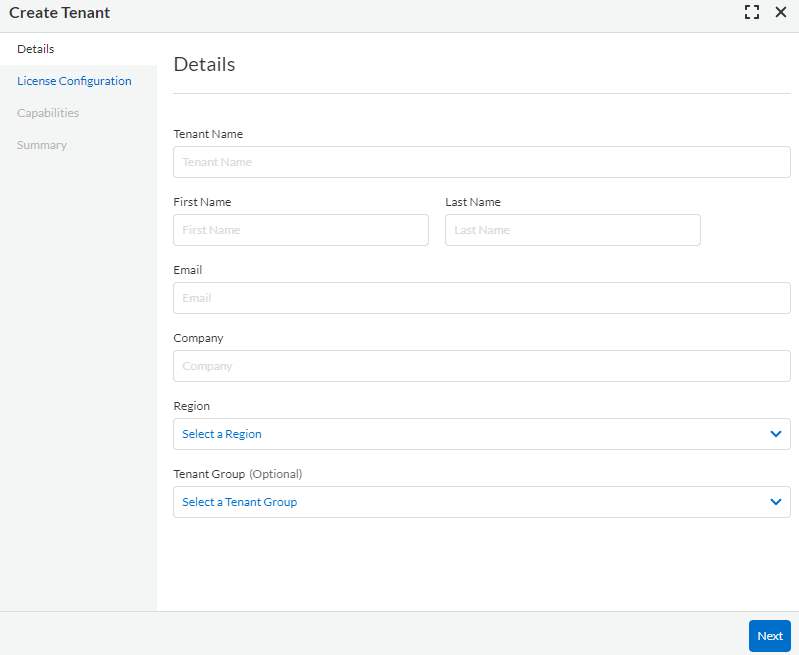
3. Provide Tenant details as shown below.
1. In the First Name, Last Name, and Email address fields, provide details pertaining to the individual who will be System Administrator on the tenant. This user will receive a welcome email from Prisma Cloud in order to manage and administer the Prisma Cloud tenant. Multitenant Management admin users, mapped as System Administrators on the managed Prisma Cloud tenants cannot be deleted by an Admin on managed Prisma Cloud tenants.
2. In the Company field, provide the name of the company or organization the Tenant is provisioned for.
3. Optionally assign the tenant to a **Tenant Group**.
Policy Groups can only be assigned to tenant groups. If you know which tenant group this tenant should belong to, it is recommend that you assign a tenant to a tenant group. Alternatively you can also assign it to a group later. Policies mapped from the Multitenant Management Console are immutable on the managed Prisma Cloud tenants.
4. Provide the **License Configuration** details.
1. Select a **License Pool**.
2. Enter the total number of credits to allocate to the tenant.
A minimum of 100 credits need to be allocated to a tenant and the total number of credits cannot exceed the amount that is allocatable to the tenant.
3. Select a **Plan Type** to assign to the Tenant.
4. On the **Capabilities** tab select the Default and Optional Modules you want to enable on the tenant. Click **Next** to continue.
5. Review the summary and click **Save** to create the tenant.
Multitenant Management tenants do not currently include Data Security Posture Management (DSPM) functionality. Create a support ticket if you wish to have this option activated.
## Tenant Deletion and Credit Reallocation
Credits can be reallocated from one tenant to another tenant or tenants at any time. Follow the steps below to edit an existing tenant and reduce the number of credits allocated to them:
A tenant **must** have a minimum of 100 credits allocated at all times while the tenant is active.
1. Navigate to the **Tenant Groups** dashboard and select any tenant that you want to remove or reduce credits from.
2. Select the pencil icon to launch the **Edit Tenant** view.
3. Select **License Configuration** from the left navigation menu.
4. Update the **Allocated Credits** field to the appropriate credit value.
Once the credits are reduced from a tenant, these credits are placed back into the **Balance Credits Available for Allocation** quantity. Users on the Multitenant Management console can now leverage these credits, in addition to any credits which previously existed on the **Credits Purchased** quantity, to create new tenants, allocate credits, and edit existing credits allocated to tenants.
### Tenant Deletion
Note the following caveats when deleting tenants:
* Credits will remain allocated to a deleted tenant for a period of 120 days. After 120 days, the credits are available in the **Credits that are allocatable** pool from which they can be applied to other tenants.
* When a tenant is deleted, reduce the credits associated with the tenant to 100 (which is the minimum) and then delete a tenant, for efficient credit management. This ensures that these credits are immediately available in the **Total Purchased** quantity, available for allocation.
---
# Agent Instructions
This documentation is published with GitBook. GitBook is the documentation platform designed so that both humans and AI agents can read, navigate, and reason over technical content effectively. Learn more at gitbook.com.
## Querying This Documentation
If you need additional information that is not directly available in this page, you can query the documentation by asking a question.
Perform an HTTP GET request on the following URL with the `ask` and `goal` query parameters:
```
GET https://docs.prismacloud.io/content-collections/multitenant-management/create-and-manage-tenants.md?ask=&goal=
```
`ask` is the immediate question: it should be specific, self-contained, and written in natural language.
`goal` is what the user is ultimately trying to achieve, the reason they need the answer. Sharing it helps GitBook give you a better, more relevant answer. A goal is most helpful when it describes the outcome the user wants rather than restating the question. For example, with `ask=how do I create an API token`, a goal like `automate deployments from our CI pipeline` lets GitBook tailor the answer to that use case.
The response will contain a direct answer to the question and relevant excerpts and sources from the documentation.
Use this mechanism when the answer is not explicitly present in the current page, you need clarification or additional context, or you want to retrieve related documentation sections.