> For the complete documentation index, see [llms.txt](https://docs.prismacloud.io/llms.txt). Markdown versions of documentation pages are available by appending `.md` to page URLs; this page is available as [Markdown](https://docs.prismacloud.io/content-collections/multitenant-management/multitenant-management-sso.md).
# Configure SSO for User Onboarding
Prisma Cloud offers System Administrators the ability to provision users using Security Assertion Markup Language (SAML) based Single Sign-On (SSO) configuration. Configure SSO to create new Prisma Cloud Multitenant Management users on an as needed basis, when users with the appropriate entitlements log in using SSO.
* Once SSO configuration is set up, users must use the SP initiated Auth URL (**Home > Settings > SSO > SP Auth URL**) to login for the first time. Other SAML based IdP initiated login workflows are **not** supported.
## SSO Configuration for Microsoft Entra
Follow the steps below to configure Microsoft Entra IdP for SSO Access to the Multitenancy console. Microsoft Entra is third-party software, specific procedures, and screenshots may change without notice. We encourage you to also review the [Microsoft Entra documentation](https://learn.microsoft.com/en-us/entra/).
This topic outlines steps to:
* [Create a Microsoft Entra Enterprise Application and Configure SAML properties](#configure-saml)
* [Set up SAML Attributes](#saml-attributes)
* [Configure SSO settings on the Multitenant Management Console](#configure-mttm)
### Create a Microsoft Entra Enterprise Application and Configure SAML properties
1. Complete the following steps on the Microsoft Azure Entra portal to create an Enterprise Application and configure SAML properties.
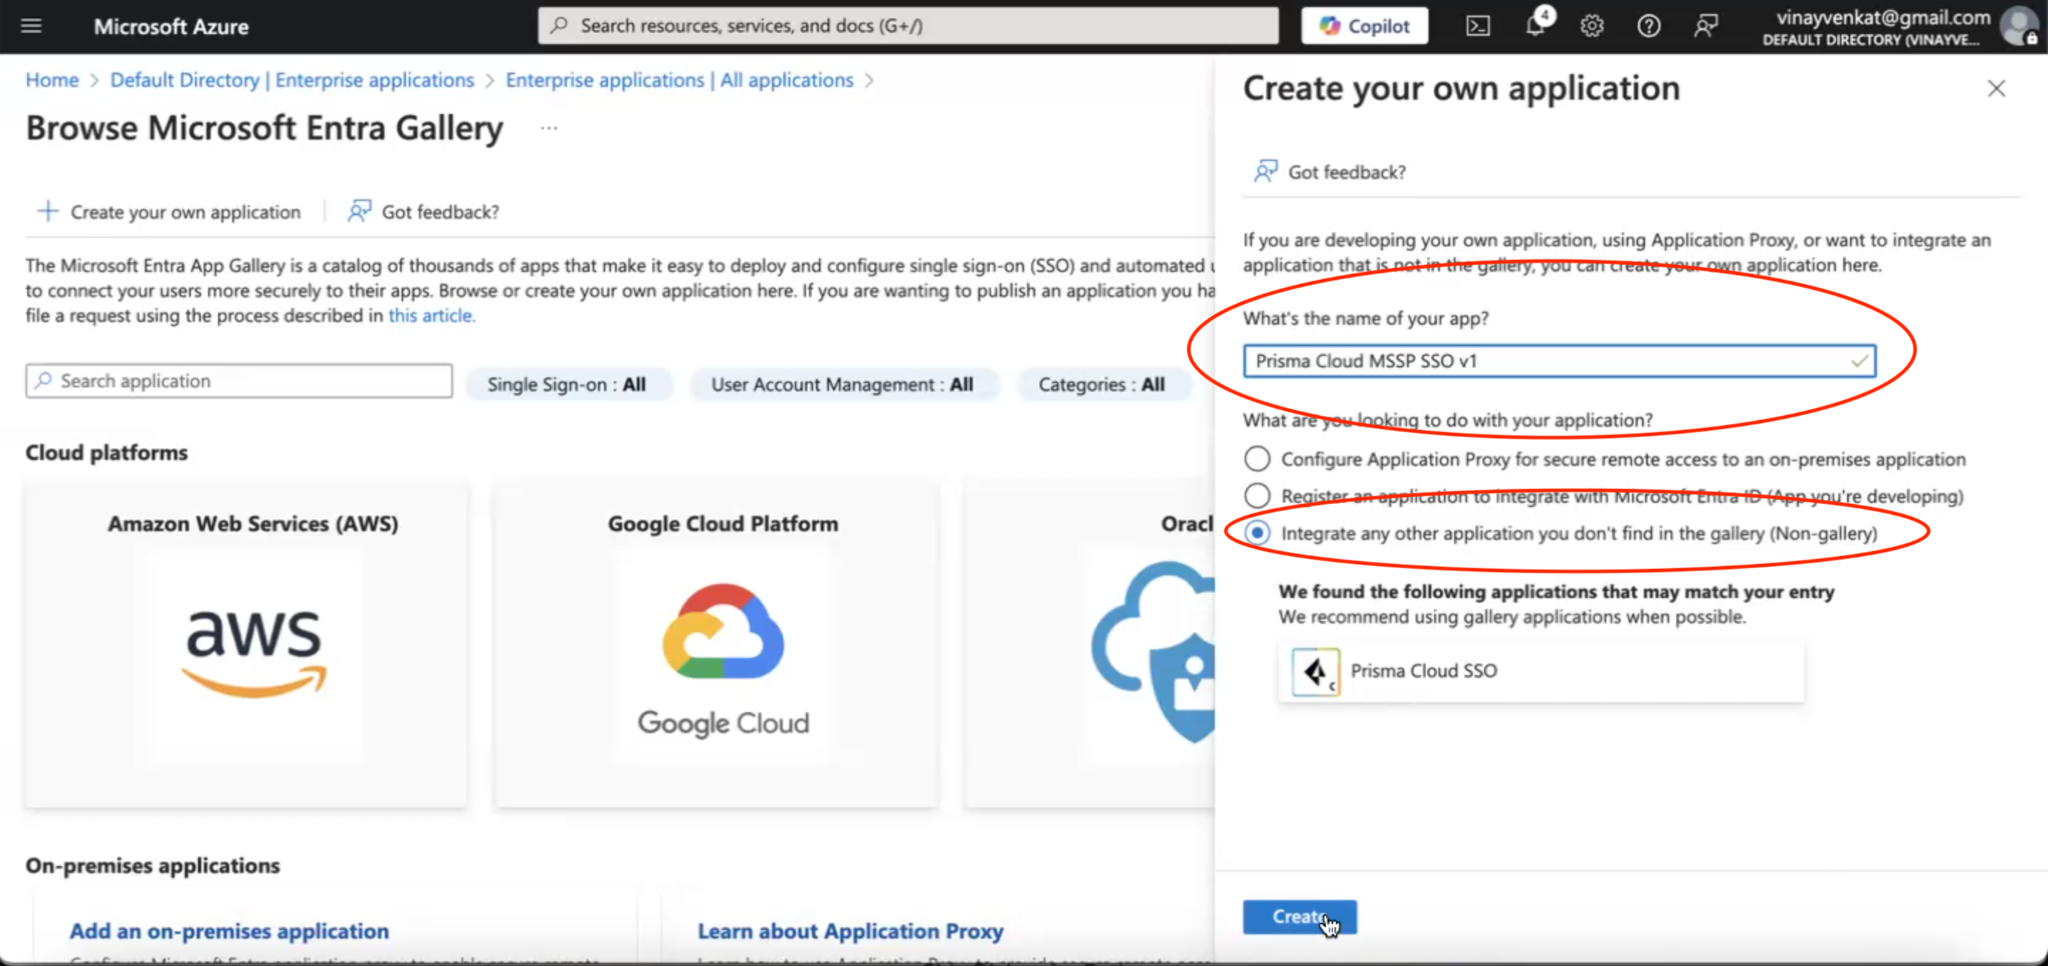
1. Create and configure a new **Enterprise Application** in Microsoft Entra.
Do not click on the Prisma Cloud SSO icon shown as that is for the Prisma Cloud SSO and not for Prisma Cloud Multitenancy SSO.
2. From the Application view select **Manage > Single sign on > SAML** to configure the SAML properties for the Application.
3. Add your Users and Groups to the Enterprise Application created in the previous step. Verify that the User you are trying to configure SAML for is listed under **Manage > User Groups**.
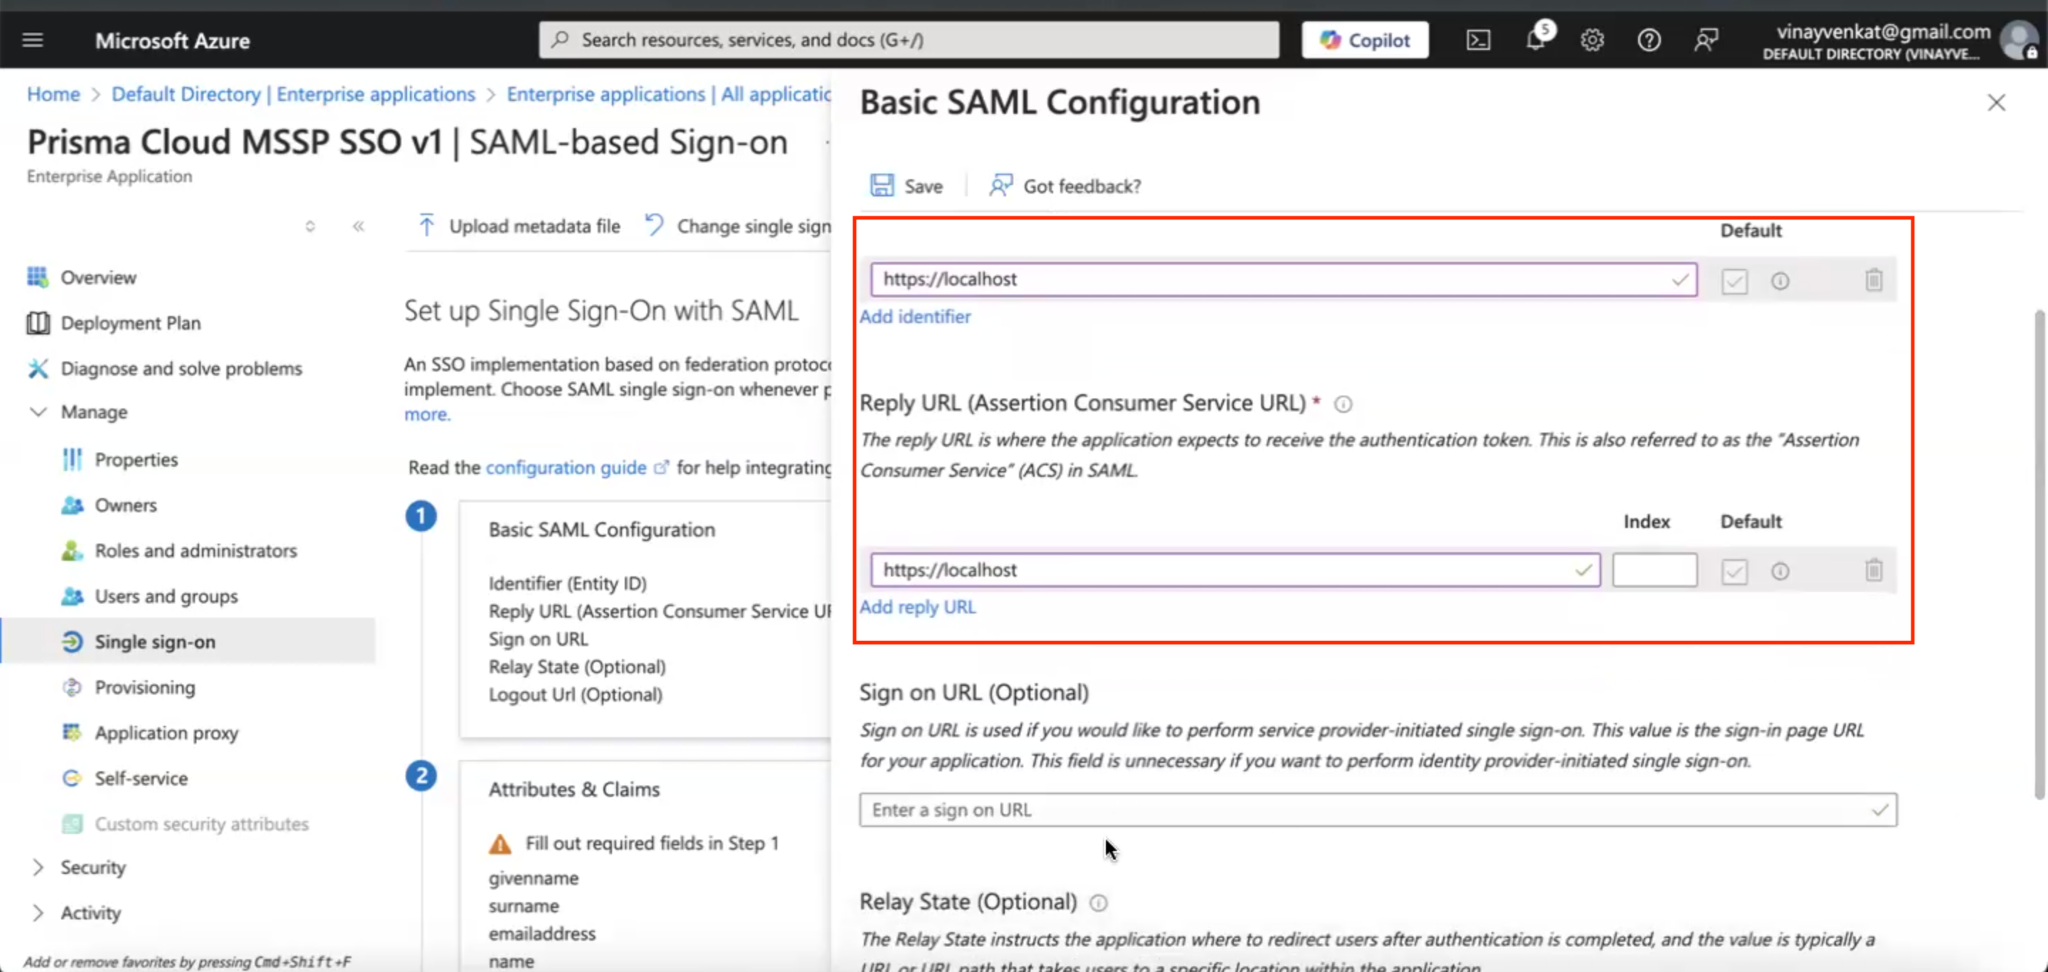
4. Configure the Basic SAML specific fields on the Microsoft Entra Enterprise Application as shown below. Select the **Edit** icon on the Basic SAML Configuration page. Configure the Identifier and the Reply URL fields with the value (). These fields will be updated later with the fields that are returned from the Prisma Cloud Multitenant console SSO page configuration page.
5. Select **Save** to complete basic SAML Configuration.
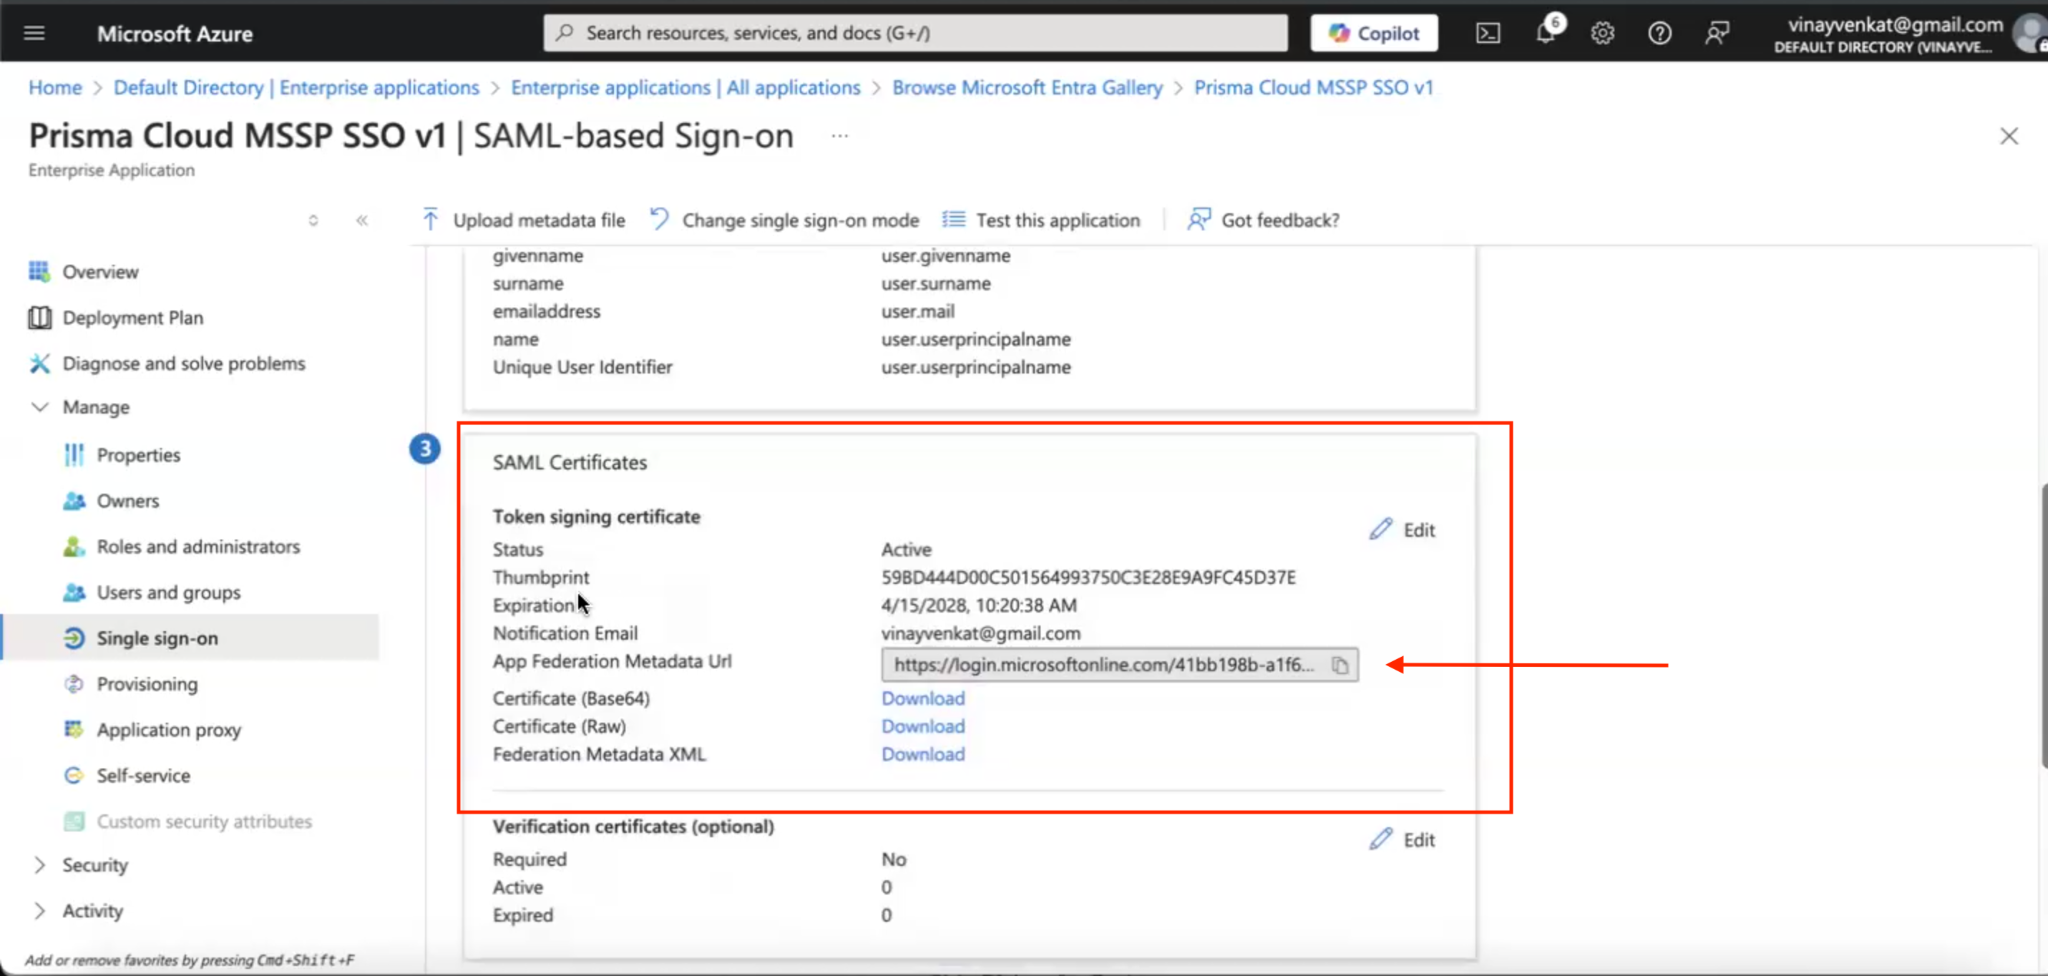
6. Copy the **App Federation Metadata URL** field from the SAML Certificate section as shown below. This is the Metadata URL that will be required to configure the SSO settings on the Prisma Cloud Multitenant Management console.
### Set up SAML Attributes
Follow the steps below to set up SAML attributes on the Microsoft Azure Entra portal:
1. Configure the SAML attributes that will be used as part of the SAML handshake process on the SAML application configuration page.
1. Navigate to **Attributes & Claims > Additional Claims** and elect the **Edit** icon to modify the values. When editing these values ensure that there are no quotes in the value for the source attribute field.
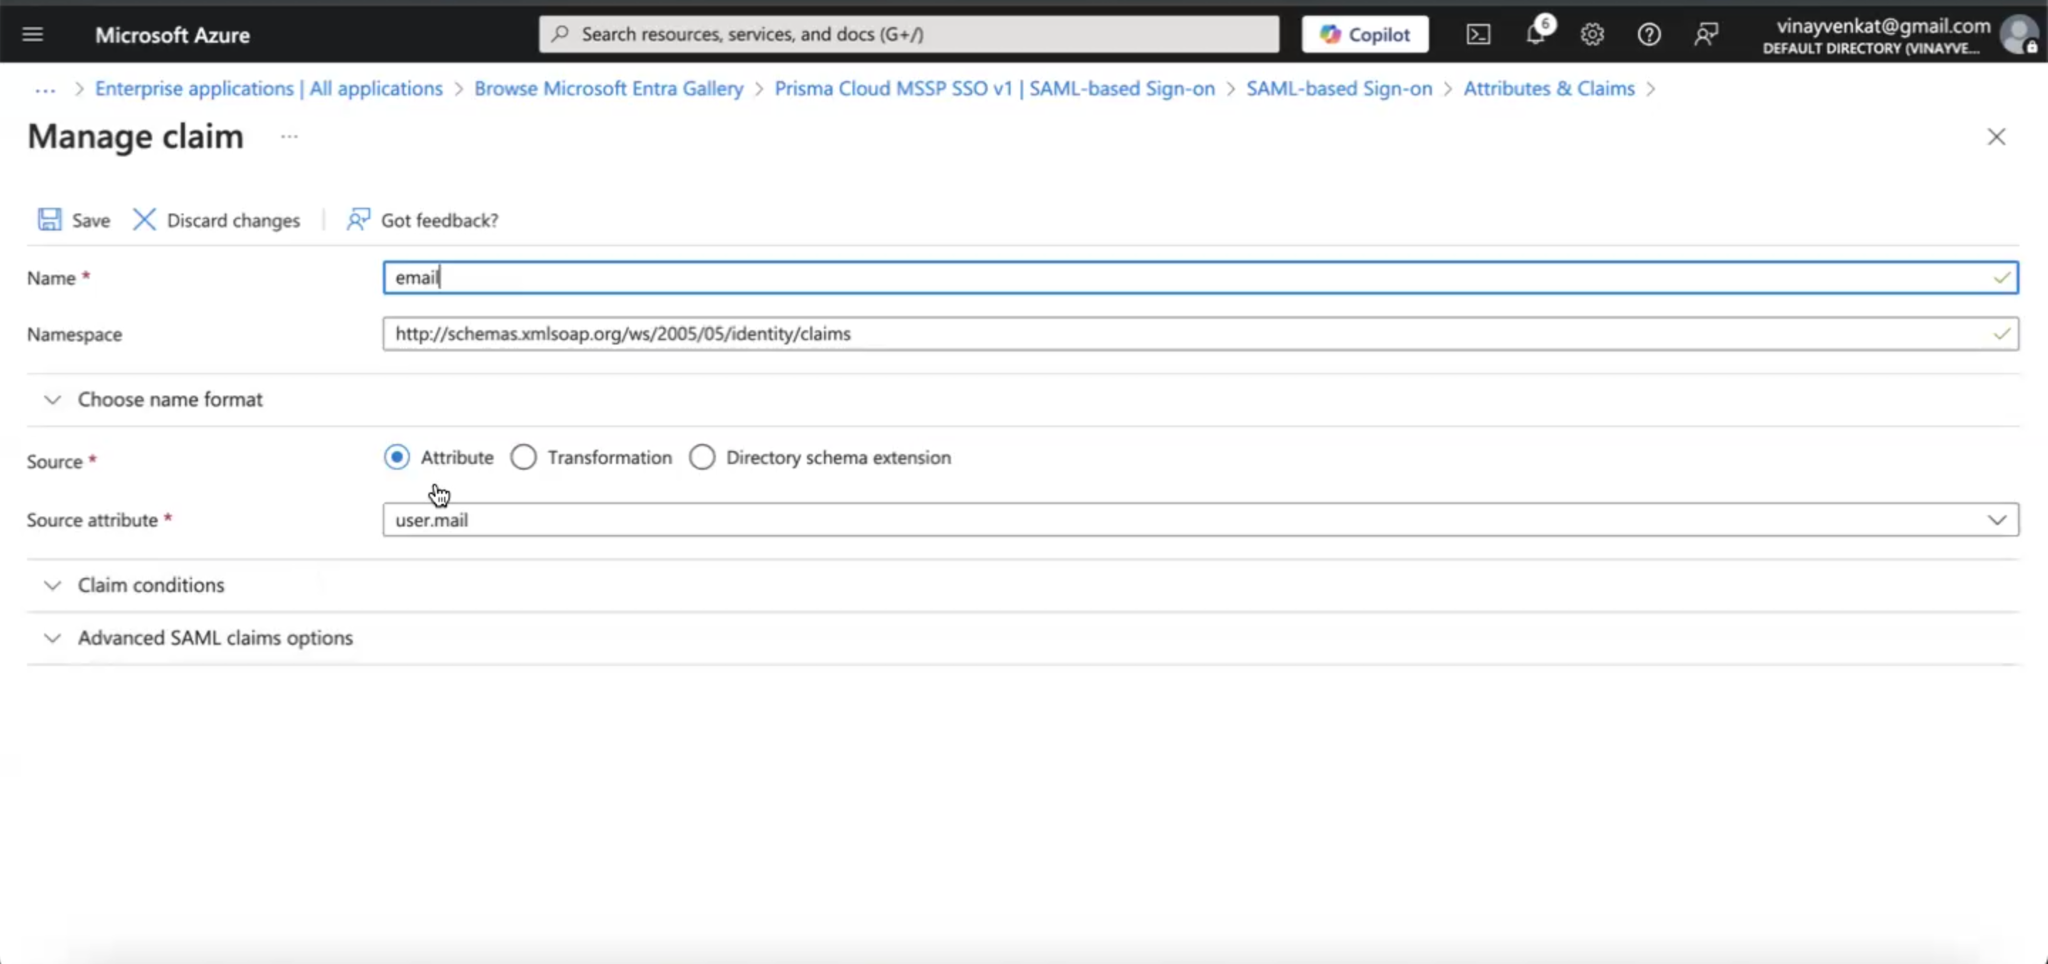
2. Edit the **user.email** value to **email** and click **Save**.
3. Edit the **user.givenname** claim value to **firstname** and click **Save**.
4. Edit the **user.surname** claim value to **lastname** and click **Save**.
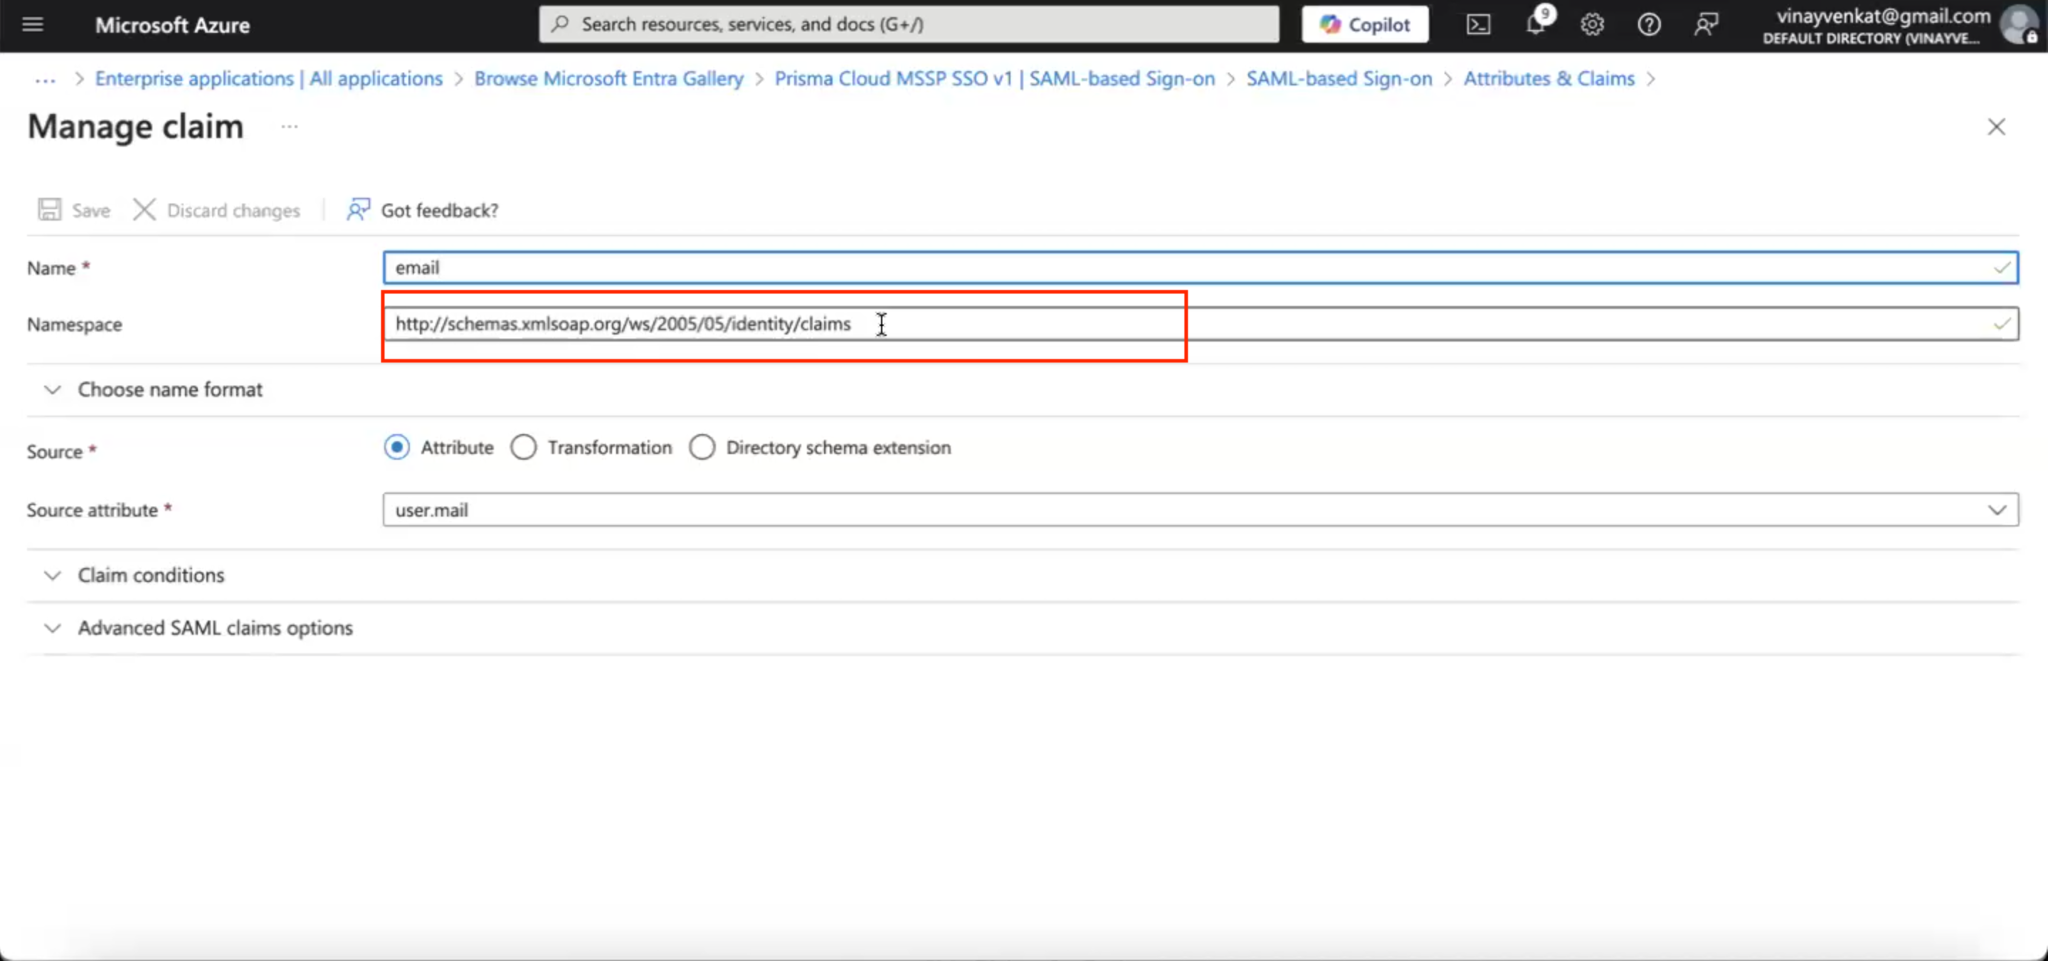
5. Copy the full URL for the namespace from one of the claims as shown below. This namespace URL will be used to configure various attributes on the Prisma Cloud Multitenant Management console SSO configuration page.
### Configure SSO settings on the Multitenant Management Console
Complete the following steps on the Multitenant Management console:
1. Login to the Multitenant Management console and navigate to the **Settings > Access Control > SSO**. You may need to refresh the page if the SSO section is not visibile.
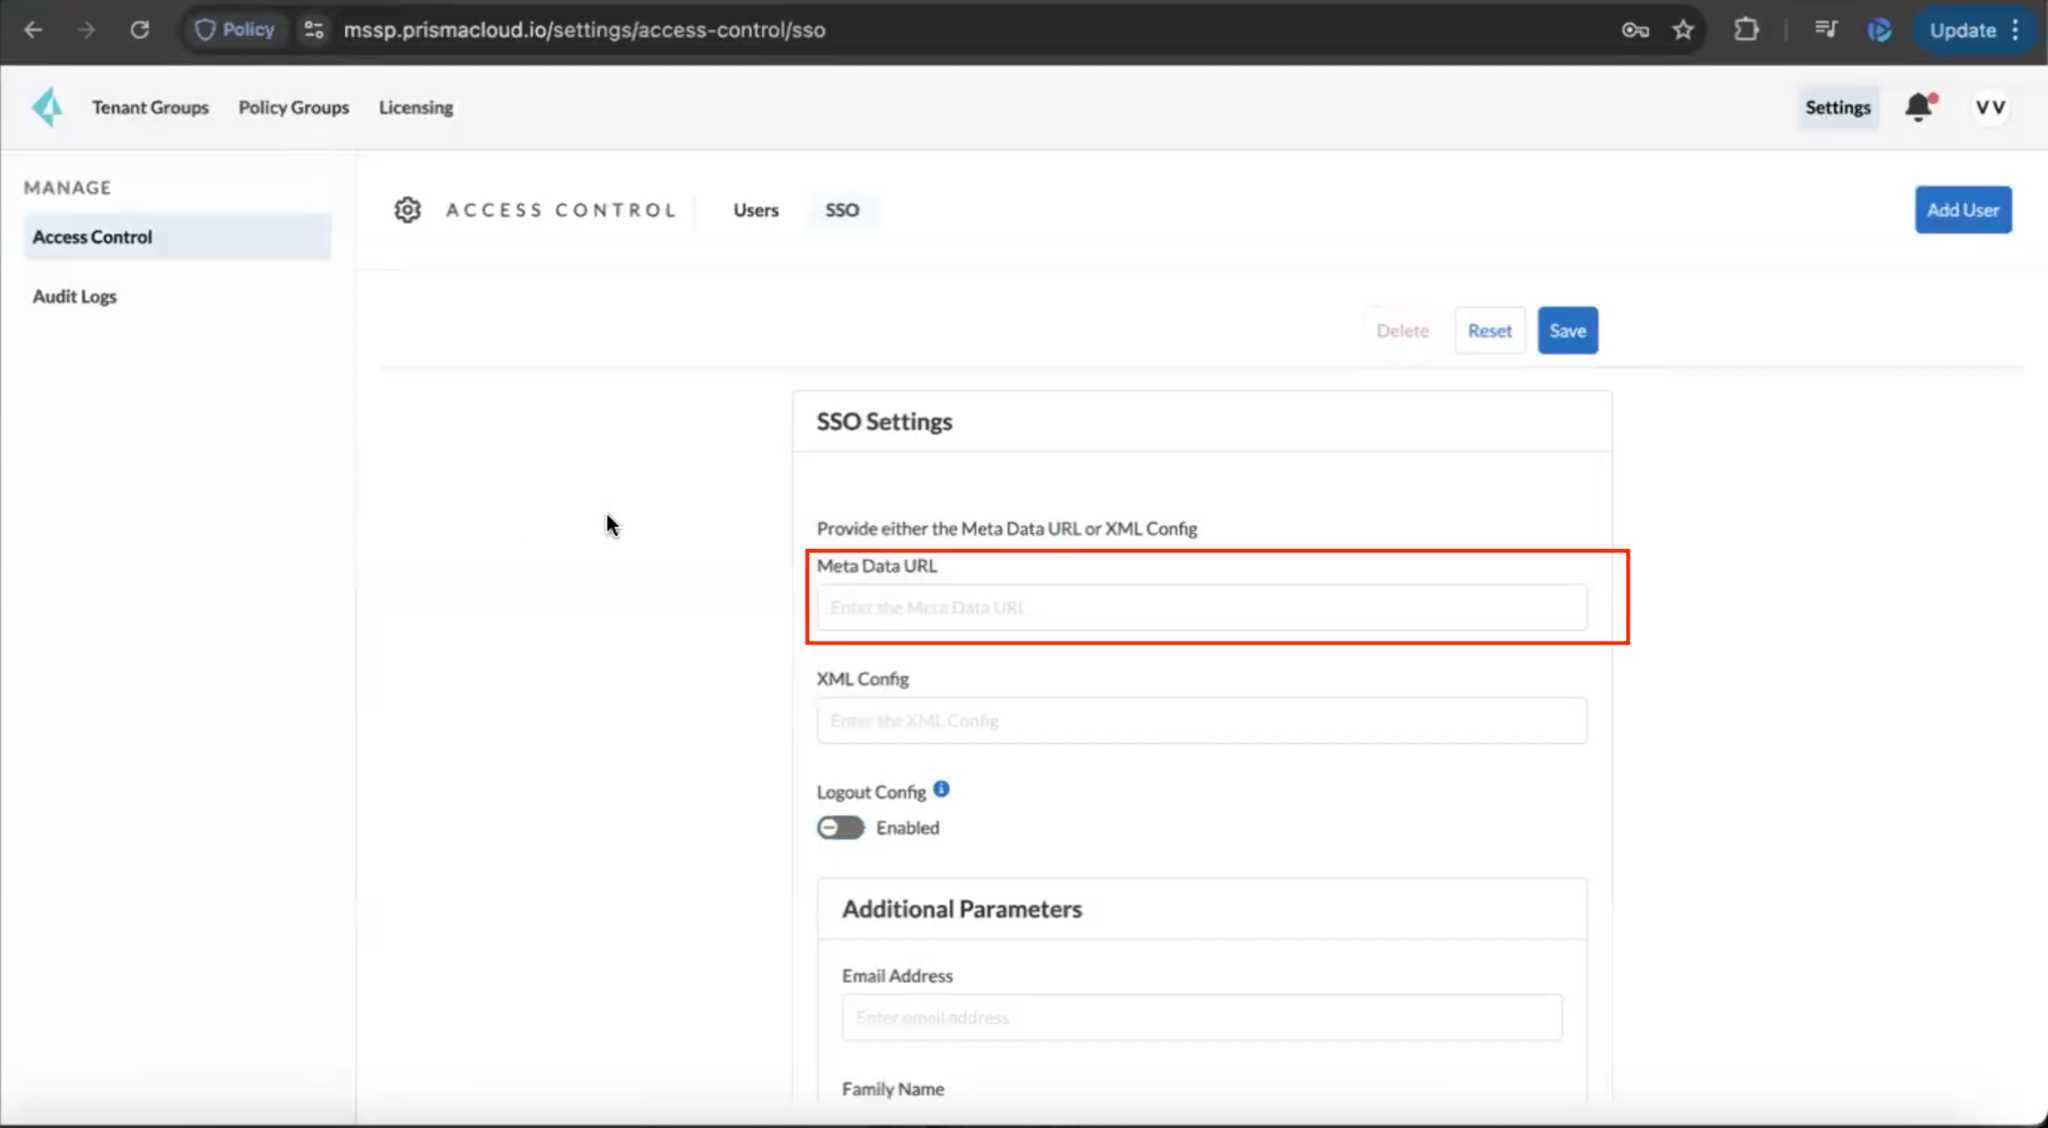
2. Enter the **App Federation Metadata URL** field copied in the step above into the Meta Data URL field shown below.
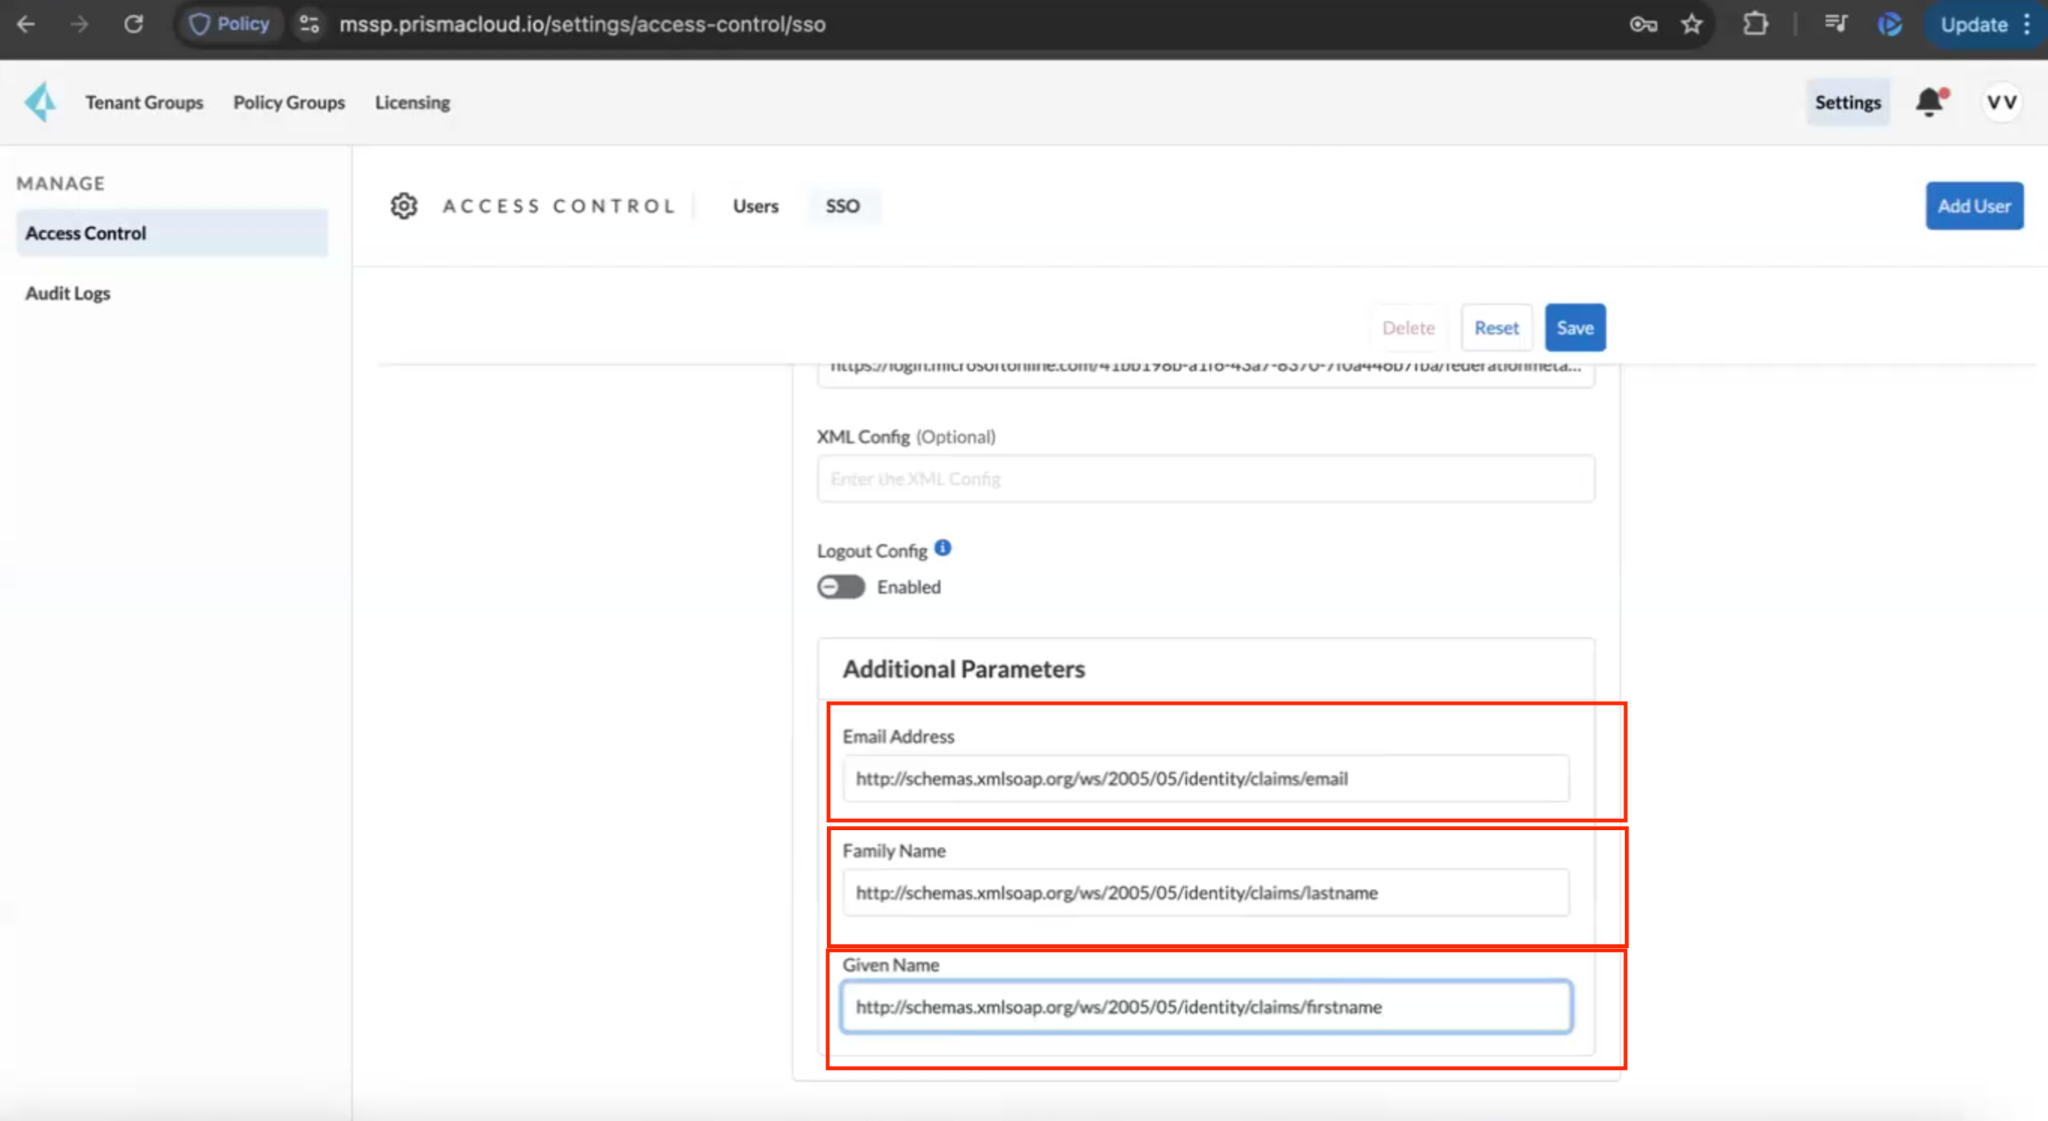
3. Configure the **Additional Parameters** as shown below. Use the convention **\\** to enter the values.
4. Select **Save** to persist the configuration on the Multitenant Management console.
5. Once you save the configuration, the SSO page will be updated to provide values for the settings shown in the figure below. Copy the settings provided by the Multitenant Management console SSO configuration page. This will be used to populate various fields in the Microsoft Entra application.
6. Use the following values from the Multitenant Management console SSO configuration to populate the corresponding fields on the Microsoft Entra Basic SAML Configuration page:
* Audience URL -→ Identifier
* SAML Auth URL -→ Reply URL (Assertion Consumer Service URL)
* SP Auth URL -→ Sign On URL
7. Copy all the URLs provided by the Multitenant Management console SSO configuration page in the step above, so that you can now input those as shown below into the Microsoft Entra Application.
8. Finally, test the SSO login into the Multitenant Management console. Follow one of the options below to verify SSO setup:
* Copy the SP Auth URL from the Multitenant Management console SSO configuration page and paste it into a new browser session. When complete you should automatically be logged into the Multitenant Management console.
* Select **Manage > Single sign on > Test this Application** from the Application view on the Microsoft Entra portal.
---
# Agent Instructions
This documentation is published with GitBook. GitBook is the documentation platform designed so that both humans and AI agents can read, navigate, and reason over technical content effectively. Learn more at gitbook.com.
## Querying This Documentation
If you need additional information that is not directly available in this page, you can query the documentation by asking a question.
Perform an HTTP GET request on the following URL with the `ask` and `goal` query parameters:
```
GET https://docs.prismacloud.io/content-collections/multitenant-management/multitenant-management-sso.md?ask=&goal=
```
`ask` is the immediate question: it should be specific, self-contained, and written in natural language.
`goal` is what the user is ultimately trying to achieve, the reason they need the answer. Sharing it helps GitBook give you a better, more relevant answer. A goal is most helpful when it describes the outcome the user wants rather than restating the question. For example, with `ask=how do I create an API token`, a goal like `automate deployments from our CI pipeline` lets GitBook tailor the answer to that use case.
The response will contain a direct answer to the question and relevant excerpts and sources from the documentation.
Use this mechanism when the answer is not explicitly present in the current page, you need clarification or additional context, or you want to retrieve related documentation sections.